Settings
The following categories of settings are managed in the Settings section on the left side navigation menu.
- Account Administration
- Web Booking Setup
- Website Content
- Guest Emails
- Mobile Setup
- Users
1. Account Administration
1.1 What can I set in the Account Administration section?
The following information are set in this section
- Billing & Invoices - Vendor Billing/Credit Card Info, View OnRes Invoices
- Account Setup - Account Info, Currency, Taxes, Contact Info, Supported Languages
- Property Info & Amenity - Set Property Info and Hotel/Room Amenities
- Email Management - All Vendor Email addresses, Alert & Notification Control
1.2 How to view my Invoice records?
Click on the Billing & Invoice tab. Choose a Year that you want to view. All invoices
for the selected year will be listed in the table below. Click on the Invoice No to
see the invoice.

1.3 How to set all notification & alerts (emails) to the property?
Email Management is the centralized page to allow user to set all notification & alerts
including email addresses to the property. E.g. Confirmation Emails, Billing Emails,
Contact Emails, and other alert & notification related information.
1.4 How to set Amenities?
Amenities are set at the Property & Amenities tab under the Setting section of the left side
navigation menu.
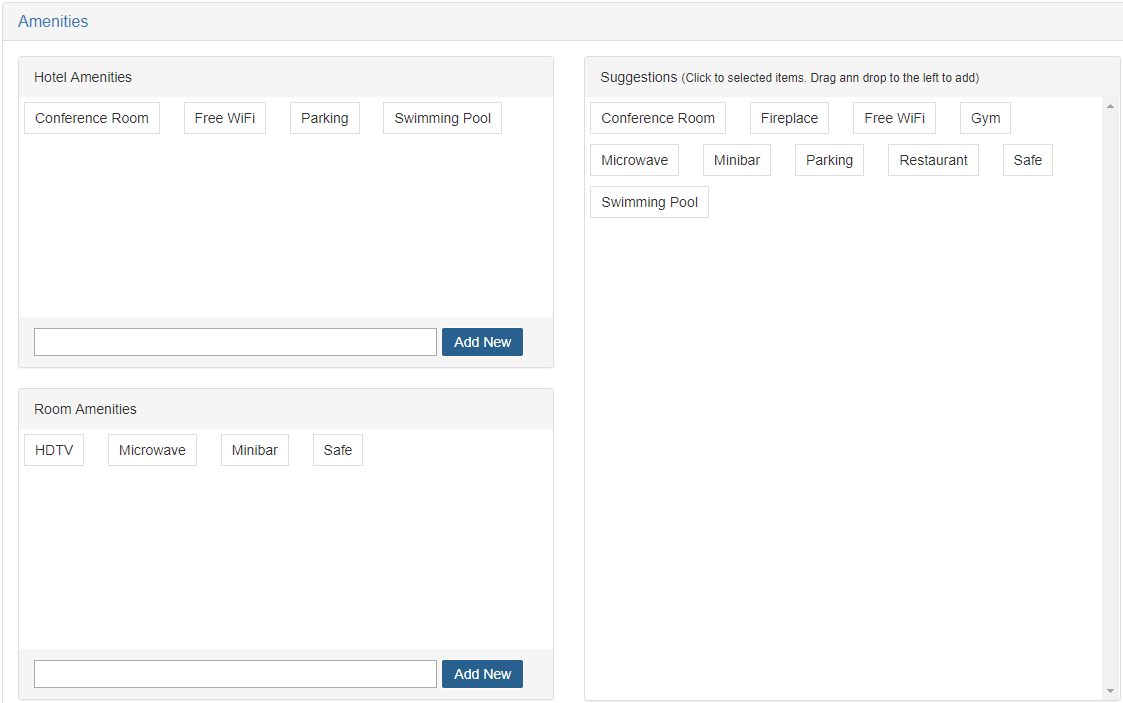
You can set Hotel Amenities and Room Amenities by adding in the text box below each section and
press Add New button, or drap and drop the items from the Suggestions
on the right side.
Note: click and drag at the same time would not work. Click on an item (or multiple items) first,
then drag.
2. Web Booking Setup
2.1 What can I set in the Web Booking Setup section?
This section contains settings for the booking process pages:
- Booking Process related setup
- Search Result related setup
- Policy page related setup
- Check-out and Confirmation related setup
- Miscellaneous
2.2 Booking Process related setup
These settings are related to the Booking Process.
- Minimum days in advance booking
This is a system level setting that restricts the minimum number of days that user can make
online reservations through our web booking engine. This is also applicable to Booking.com
channel bookings (but not Expedia and GDS channels. For Expedia Reservations,
please contact Expedia Support to manage Advance Booking Restrictions).
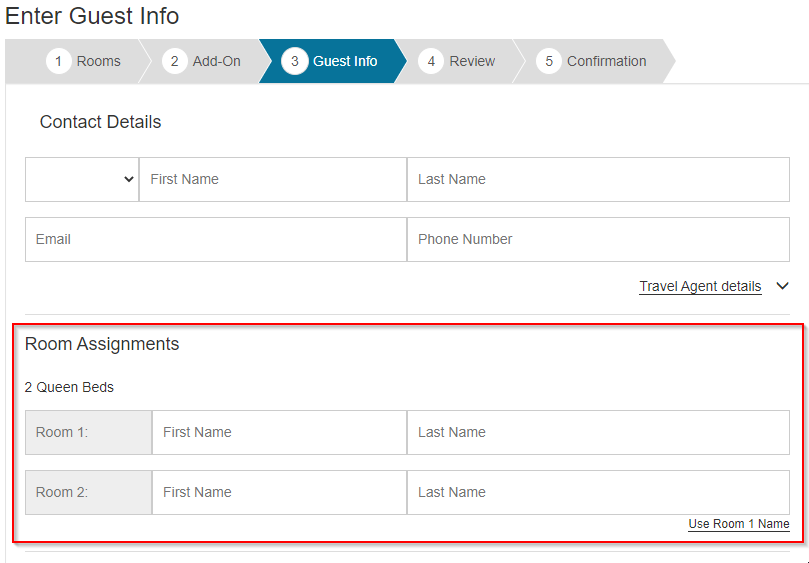
- Ask for guest names per multiple room
Selecting this will require online bookers to enter the names of the guests for each room when multiple
rooms of the same room type are booked (see screenshot below).
However please be aware that this can lead to reservation fall-offs due to too many fields
to fill-out, hence is recommended to not enable unless it's necessary.
- Use Additional Guest Types
Allow guest to enter number of guests per these types: Adults, Children, Youth and Senior.
- Show Rates in Booking Widget
Show the lowest Best Available Rates or RACK rates in the Booking Widget calendar. See
Setup OnRes 2.0 Booking Process (section 5) for details.
- Show Availability in Booking Widget
Show room availability in the 2.0 Booking Widget calendar - NOTE: For Single Product Booking
Widgets, the availability is always showing irrespect to this setting.
See Setup OnRes 2.0 Booking Process (section 6) for details.
- Enable Multi Room Type Booking for Guests
This setting is only applicable for Multiple Room Type Booking enabled accounts.
If disabled, guests are not allowed to book
multipe room types in one reservation, but you are still able to do it with manual bookings
- Enable Custom Message on top of the Booking Widget
You can use this to deliver important messages to guests on the booking pages, e.g.
health & safety messages. The Custom Message will show on top of the booking process pages.
See Setup OnRes 2.0 Booking Process (section 7) for details.
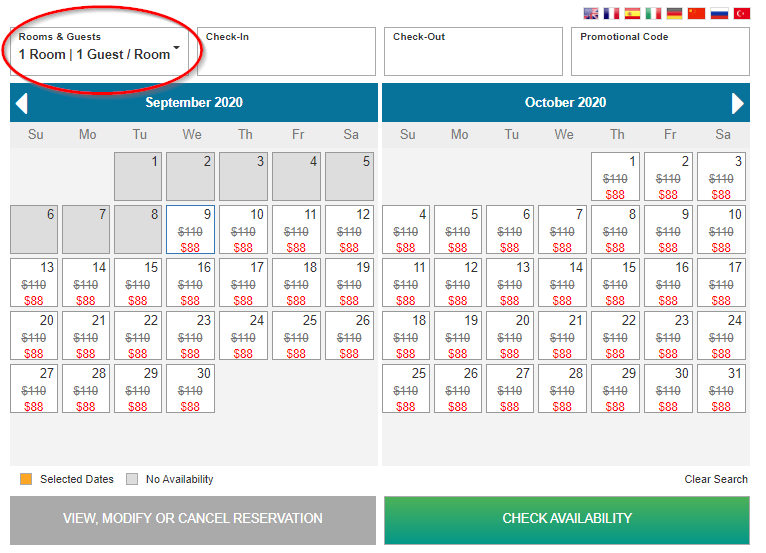
- Default Number of Guests in Booking Widget
This allows the hotel to set the Default Number of Guests in the Booking Widget when
users open the Booking Widget page (see screenshot below). Since the Booking Widget doesn't
allow guests to be zero, you can set this to be zero to force the guests to always
choose the actual number of guests before clicking the Check Availability button.
3. Website Content
3.1 What can I set in the Website Content section?
The following information are set in this section
- Web Appearence - the HTML header and footer in the booking process pages (
Search Result page, Policy page, Check-out page, and Confirmation page).
Multiple languages of these pages can be set here by choosing the language in the
Language dropdown list.
- Labels & Messages - you can customize the labels and messages for the booking process
pages, or click the Load Default button to populate
the fields with default settings. Press Save after any edit.
- Policies - Set the General Policy and Rate Group Cancellation Policies
- Comfirmation Page - Set the final booking confirmation page content
3.2 What are difference between General Policy and
Rate Group Cancellation Policies?
General Policies are the property wide policies that every customer will see and acknowledge
during their booking process.
Rate Group Cancellation Policies are the policies specifically tied to certain rate groups.
Depending on what room and rate the customer has booked, the policies can be different. For
example, a No-Cancellation policy can be created and tied to a special last minute rate. Then only
the customers that have booked this rate will see and acknowledge this policy.
Both policies can be set at the Policies tab under Settings section in the left side navigation menu.
For Rate Group Cancellation Policies, click New Policy button to
create a new policy. Click the Policy Name to view the details of the policy.
4. Guest Emails
4.1 What can I set in the Guest Emails section?
This section contains all settings for emails going to the Guests. Note, this is different from
the Email Management section which contains settings for emails going to the property.
- Reservation Confirmation Email - the final email sent to the guest confirming the reservation.
- Reservation Reminder - if enabled, the system will automatically send a reminder email to
the guest X-day(s) in advance depending on the setting.
- After Stay Thank You Note - if enabled, the system will automatically send a thank-you email to
the guest X-day(s) after the check-out depending on the setting.
- Check-in Notice - if enabled, the system will automatically send a Check-in notice to
the guest on the check-in date.
- Check-out Notice - Check-out notice email is not supported yet, but once the email content
is configured here, you can send Check-out notice manually at the Reservation Details window (under
Emails tab). Receipts can also be attached to the email depending on the setting.
4.2 How to edit the email contents and use the Special Codes?
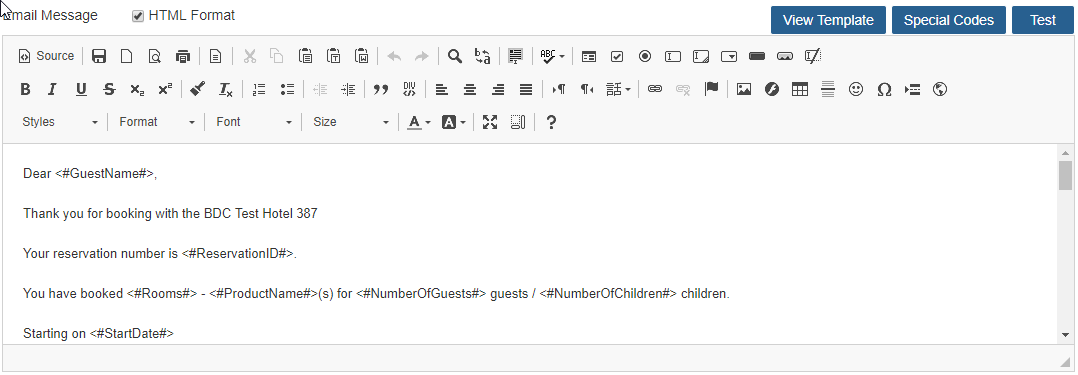 A rich format text editor is provided for editing when the HTML Format is enable.
There is a built-in Template for starters. Click on Template
to bring up a pop-up showing an email template, which has typical Special Codes embedded in
the message content.
Click on Apply Template to populate the template contents into
your editor. Review the texts and click on Save.
Special Codes are special tags that you can insert into your email subject or body content,
as a placeholder that will be replaced by actual values from the current reservation at run time.
Take a look at the detailed description of these codes when you click on the
Special Codes button.
Testing - click on the Test button to send a test email to
the email specified in the Reply Email Address field. You must save your changes before performing
the test.
5. Mobile Setup
5.1 What can I set in the Mobile Setup section?
This section contains all settings for mobile booking process pages, and OnRes Full Smartphone
Website Solution pages.
6. User Management
6.1 How to create a new user?
Users are managed at the User Management tab (Settings >> User Management), or
click on your Username Initial icon on top right of the screen and choose Users.
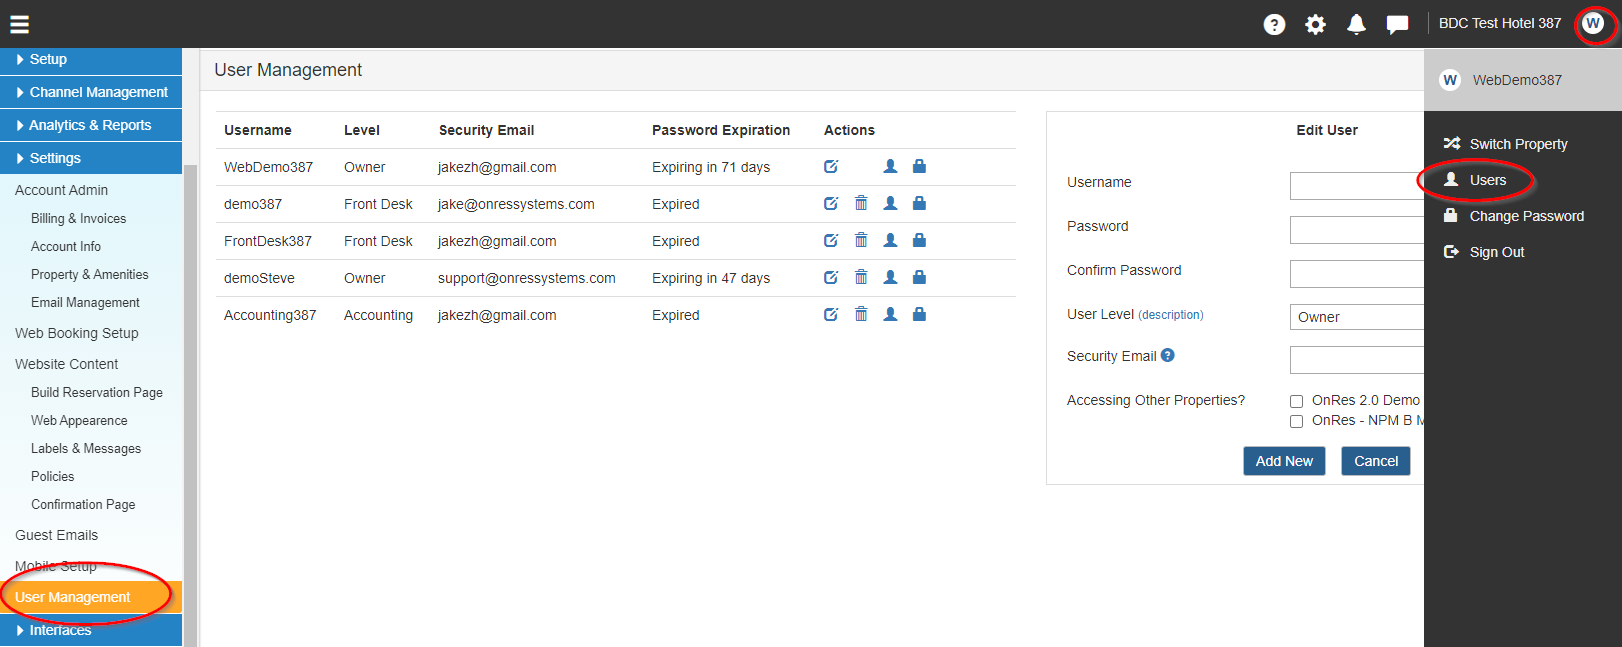
New user can be created on the Edit widget on the right side of the page. Fill in the form
with valid Username and Password and press Add New
Username has to be unique in the system. If not, the system will return an error message
after saving. Username cannot contain any characters except:
letters, digits, dot, hyphen, and underscore.
Password is required to:
- be at least 8 characters long
- contain at least one digit
- contain at least one lower-case letter
- contain at least one capital letter
User Level - defines the role of this user account. Each level has certain access
permissions to certain pages. Click on the "description" link to see the details of the
permissions.
Forgot Password Email - used to receive a temporary password generated during the
Password recovery process.
90 Day Password Expiry - if enabled, password will expire after 90 days.
6.2 How to modify an existing user?
Click the icon, the user information will be
populated in the Edit User widget on the right side of the page. Make necessary changes
and press Update to save.
If you are not changing the password, leave the password field blank.
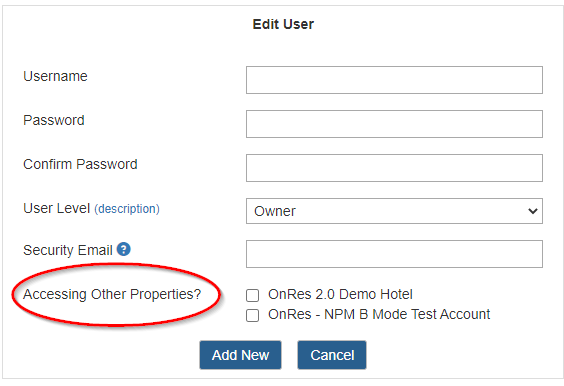
6.3 How to setup a user to be able to switch
between multiple properties?
When you have multiple property accounts with OnRes, Switching Property allows you to login to one
of the accounts first, then switch between your property accounts without login again (see the
following screenshot for illustration).
 Note: In order to enable this feature, you will need to contact OnRes Support first.
Once this feature is enabled, you will be able to assign each individual users in your account
to be able to access your other accounts. To do that, following the steps in Section 6.1
or 6.2. On Edit User widet on the right side, choose the vendor accounts that you'd
like this user to be able to access, click Add or Update after you are done.