Multiple Room Type Booking
This feature allows guests to book multiple room types as one reservation. For example, a guest
can make a reservation that contains one Junior Suite and two Standard Queen rooms.
The guest will receive only one confirmation email and one receipt that contains details of all
room types booked.
1. Make a Multiple Room Type Bookings online (web/mobile)
1.1 How to select multipe room types for your reservation?
After the guest enters the number of guests per room, and the check-in and check-out dates,
and presses the Check Availability button, the system will show a list of available room types
with the option to choose how many rooms you want to book for each room type.
As it shown in the screenshot, the selected rooms are shown in the Summary section. You can adjust
the number of the each room type to add more rooms or remove it from the selection.

Note: The Number of Guest selection in the booking widget is the number of guest per room
by default, when Multiple Room Type Booking feature is enabled.
1.2 How to add add-on items for each selected room type?
At the screen of choosing the add-on items, if multipe room types have been selected, a list of
selected room types will show on top of the add-on items list. Select the room type before you
choose the add-on items for this room type.
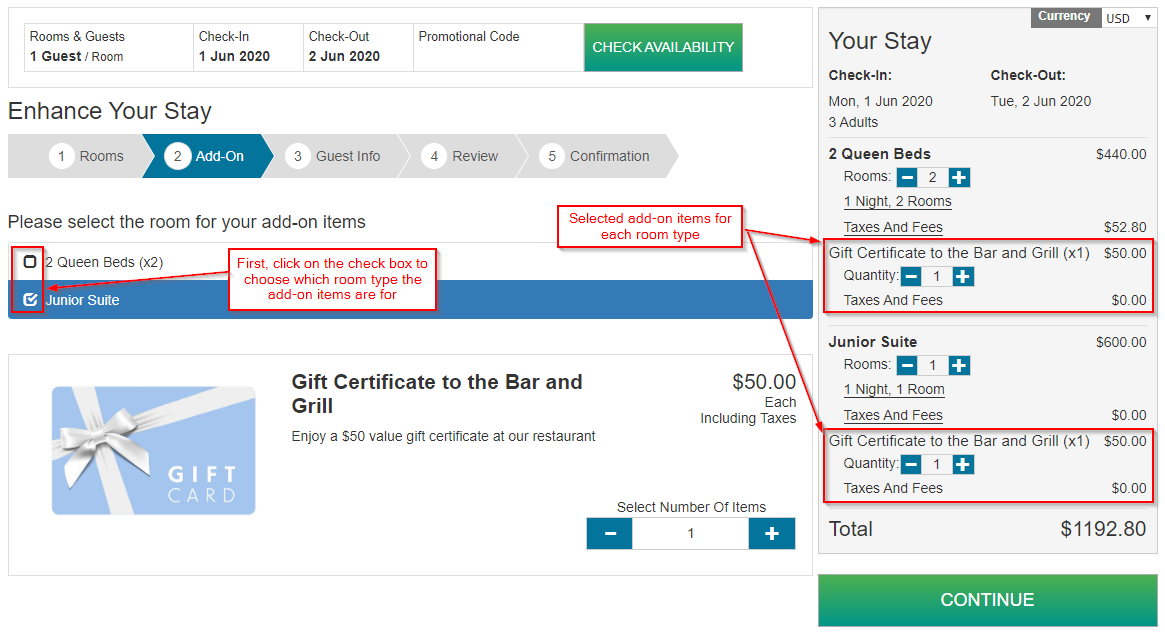
Note: the add-on items that are available for selection may be different for each room type,
depending on what products the add-on item was set up to associate with (see
Managing Add-Ons
for details.
2. Enable / Setup Manage Multiple Room Type Bookings
2.1 Setup Guest Email
If you would like to try out the Multiple Room Type Booking feature for your account, please contact
OnRes Support to enable it.
After the feature is enabled, you will need to make sure the Guest Email Bodys (for Multiple Room
Type Booking only) is properly set in Settings >> Guest Emails. Namely for the Reservation
Confirmation Email and Reservation Reminder Email.
The Guest Emails utilize a couple of new Special Codes to properly display the information of booked
rooms per room type, and the payment/cost information per room type. E.g.
<#MultiRoomTypeBookingInfo#> and <#MultiRoomTypePaymentInfo#>, which are included
in the new default template.
Here are the details:
Once the feature is enabled, your current Guest Email Body will be saved as a Backup, and
a new Email Body that is compatible to the Multipe Room Type Booking feature must be setup. As
shown in the screenshot, if the Email Body isn't in place, you can click on the
View Template button to apply the default template.
If the Email Body is already set, please review it and make sure it carries the information
for your needs.
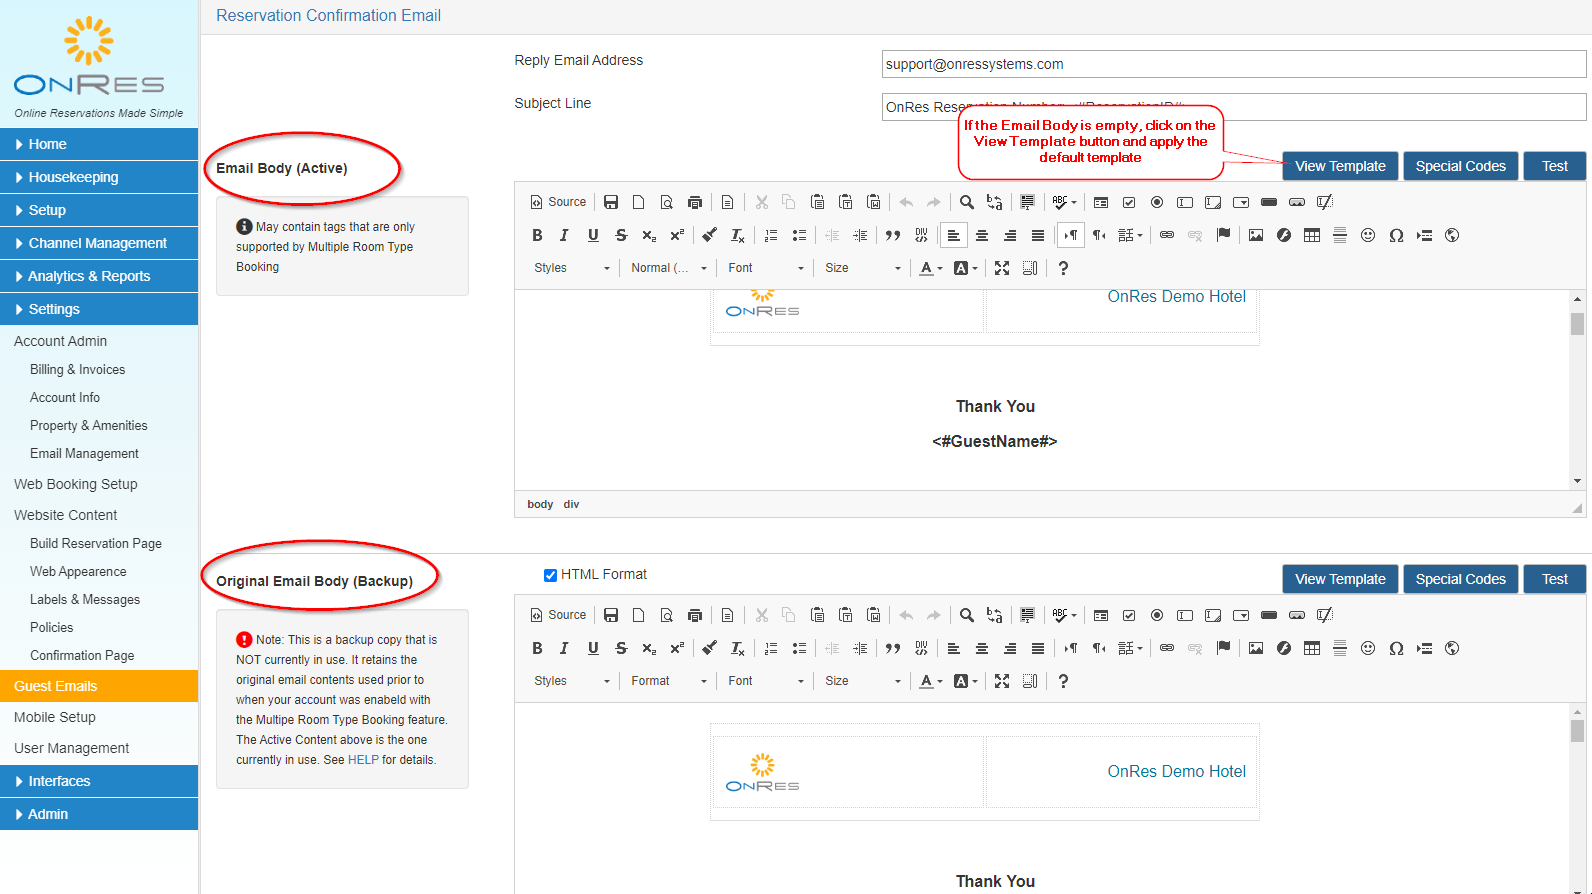
You can repeat this for Reservation Reminder Emails too.
2.2 Can I enable Mutlipe Room Type Booking
for Manual bookings only?
Yes. Sometimes you may not be ready to allow guests to book multiple room types
online (e.g. your Guest Confirmation Emails are not set to support this feature yet,
but you want to be able to create Master reservations from the back end.
You can achieve this by uncheck the checkbox for Enable Multi Room Type Booking for Guests
at Settings >> Web Booking Setup.
3. Manage Multiple Room Type Bookings
3.1 The Reservation IDs
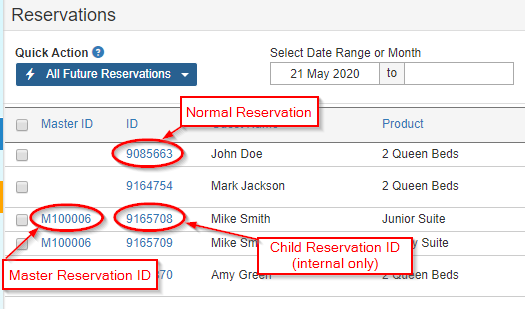
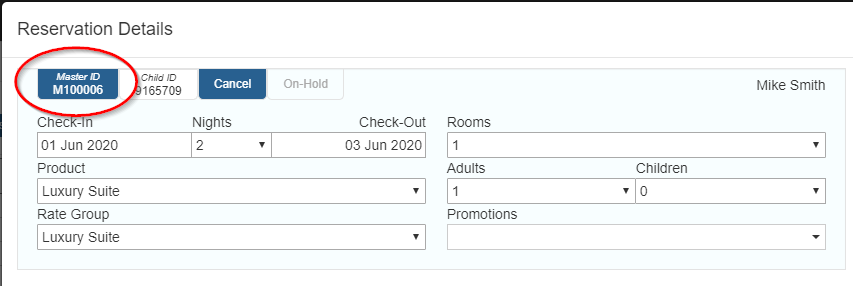
A reservation containing multipe room types is called a Master Reservation, with
a Master Reservation ID that starts with "M", e.g. M100020.
A normal reservation (which does not contain multiple room types) will have a normal
Reservation ID, e.g. 9123456.
Each room type booked in a Master Reservation is presented as a separate Child Reservation
identified by a Child Reservation ID. Note that the Child Reservation ID
is internal to hotel staff only - the guests have no knowledge of it.
The following screenshot shows a example of different types of reservation IDs
3.2 How to find / sort a Master Reservation?
In the Reservation List page, each Master Reservation has a Master ID shown in the first column.
Searching: You can search a reservation by its Master ID, Child ReservationID, the Guest Name,
or Email.
Sorting: When you sort the reservation list, all Child Reservations that belong to the
same Master Reservation will be shown together. If you sort the list by Check-In Date, the Master
Reservation will be sorted by the earliest check-in date of all of its Child Reservations.
If sorted by Check-Out Date, the Master Reservation will be sorted by the latest check-out
date of all of its Child Reservations.
3.3 How to view / edit a Master Reservation?
Click on the Reservation ID in the Reservation List will open the Reservation Details window.
For Master Reservations: it will show a list of Child Reservations, the common information of
all Child Reservations, and the Summary, which contains the corresponding sum amount of all Child
Reservations.
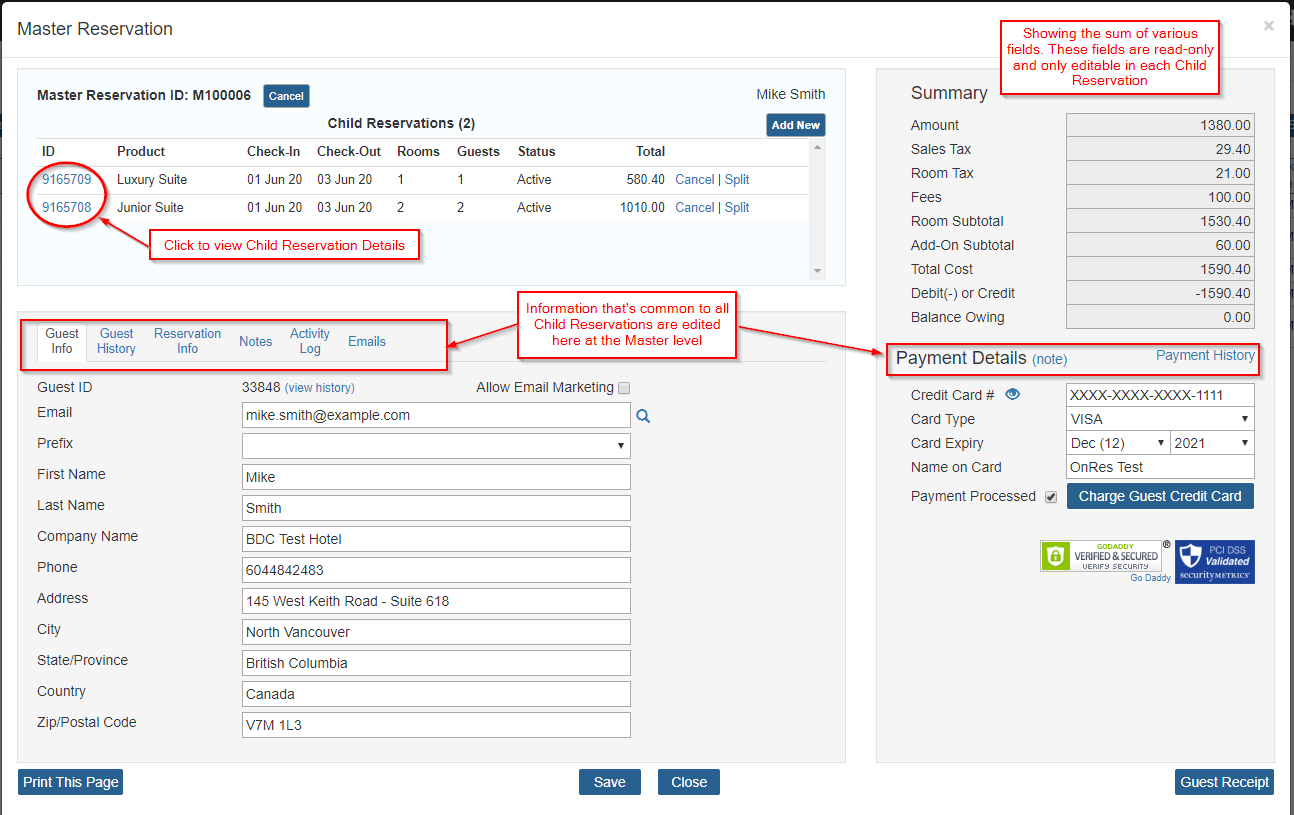
The following information are modified at the Master level, and the changes will go to all Child
Reservations.
- Guest Information
- Notes
- Payment Details (Credit Card Info)
Payment and Refund need to be made at the Master level
The following information are modified at the Child level, and the changes stays in that Child
Reservation only.
- Check-in/out Dates
- Number of guests
- Number of rooms for the reserved room type
- Product, Rate and Promotion
- Room Assignments
- Add-on Items
- Specific Reservation Info - e.g. check-in/out status for each Child Reservation
- Room Amounts / Fees, Debit and Credits
To go back to the Master Reservation from a Child Reservation window:
Click on the Master Reservation ID on the top left to go back to the Master Reservation window
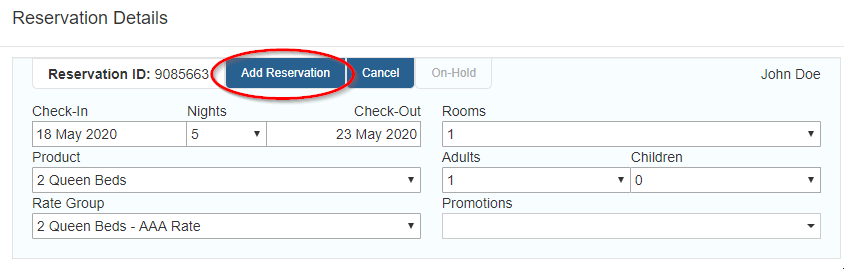
3.4 How to create a Master Reservation?
Basically, you can create a single reservation first. Then add another reservation into it
to make it a Master Reservation.
For example, suppose you would like to create a Master Reservation that contains a Junior Suite
and a Luxury Suite.
First, click the New Reservation button and create a single
reservation for a Junior Suite.
After the reservation is saved into the system, click on the Add Reservation
to add a new Reservation into the current reservation. The current reservation will be converted
to a Master Reservation and a Master Reservation ID will be generated and linked to both the
current and the newly added reservation.
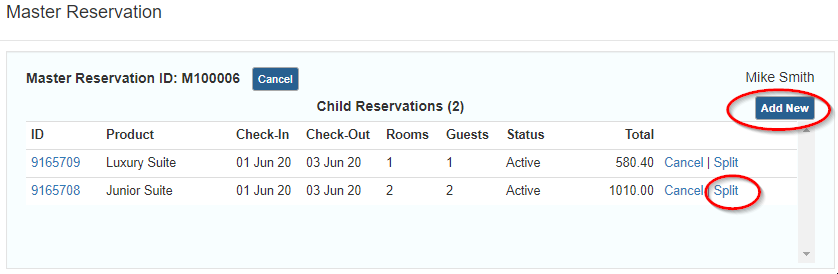
3.5 How to add/split a Child Reservation to/from an existing Master Reservation?
Add: Open the Master Reservation, and click on the Add New button
to add a new Child Reservation into the Master. The common info (e.g. Guest Info) will be automatically
populated.
Split: Open the Master Reservation, and click on the Split button in the Child Reservation List
to split the selected Child Reservation from the Master. The splitted Child Reservation will become an
independent reservation. Its current Child Reservation ID will become its normal Reservation ID.
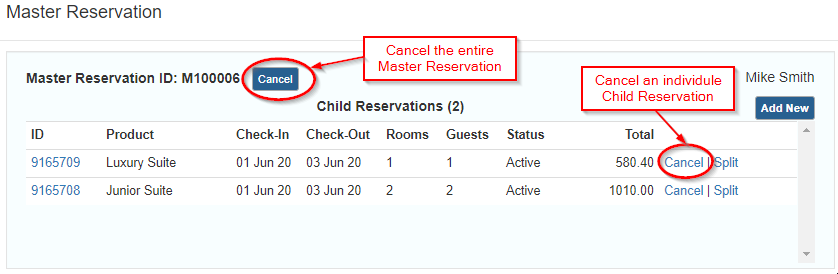
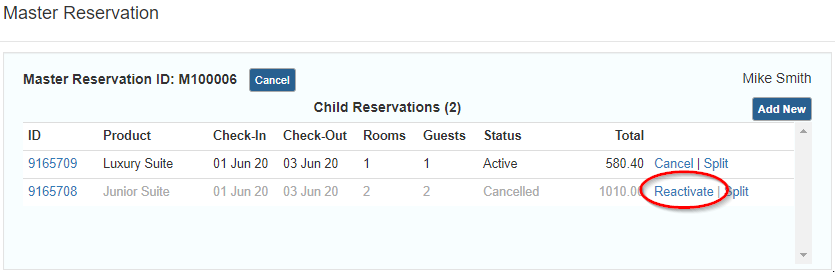
3.6 How to cancel/reactivate a Master or Child Reservation?
To Cancel a Child Reservation, open the Master Reservation, and click on the "Cancel" button in
the Child Reservation List to cancel the selected one. The cancelled Child Reservation remains in
the Master.
You can also cancell it by opening the Child Reservation Details and click on the
Cancel button on the top.
To Cancel the entire Master Reservation, open the Master Reservation, and click on the
Cancel button next to the Master Reservation ID. The action will
cancell all Child Reservations in the list.
To Reactivate a Child Reservation, open the Master Reservation, and click on the "Reactivate"
button in the Child Reservation List to reactivate the selected one.
To Reactivate the entire Master Reservation, you will need to repeat the above step to reactivate
each cancelled Child Reservation in the list.
3.7 How to merge existing single reservations into a Master Reservation?
There are two type of merges:
- Merge & Create - combine multiple single reservations into a new Master
- Add to Master - add existing single reservations into an existing Master
For Merge & Create
- Select multiple single reservations in the Reservation List, then click the
Select to Merge button to bring up the Merge popup.

- In the Merge popup window, select one of the merge candidates as the Primary. The
common information, such as Guest and Credit Card information from the Primary will
override what's in the other candidates, and become the common information of the new
Master.
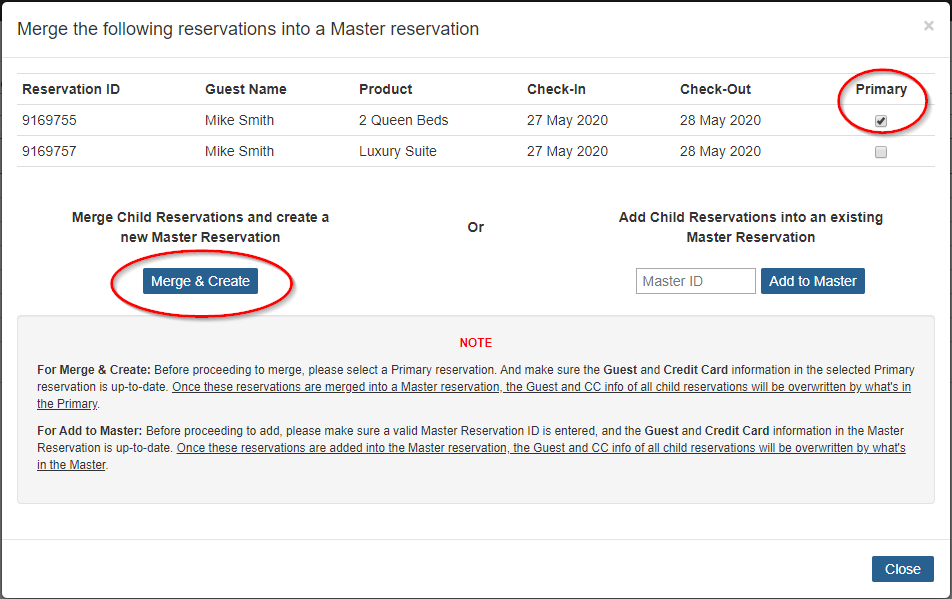
- Then click on the Merge & Create button to perform the merge
For Add to Master
- Select any single reservations and only one target Master Reservation
in the Reservation List, then click the
Select to Merge button to bring up the Merge popup.
 In the Merge popup window, click on the Add to Master
button to perform the merge.
In the Merge popup window, click on the Add to Master
button to perform the merge.
- Or, you can select the single reservations only, then click the
Select to Merge button to bring up the Merge popup.
In the Merge popup window, enter the Master Reservation ID next to the
Add to Master button, then click on the button to perform
the merge.
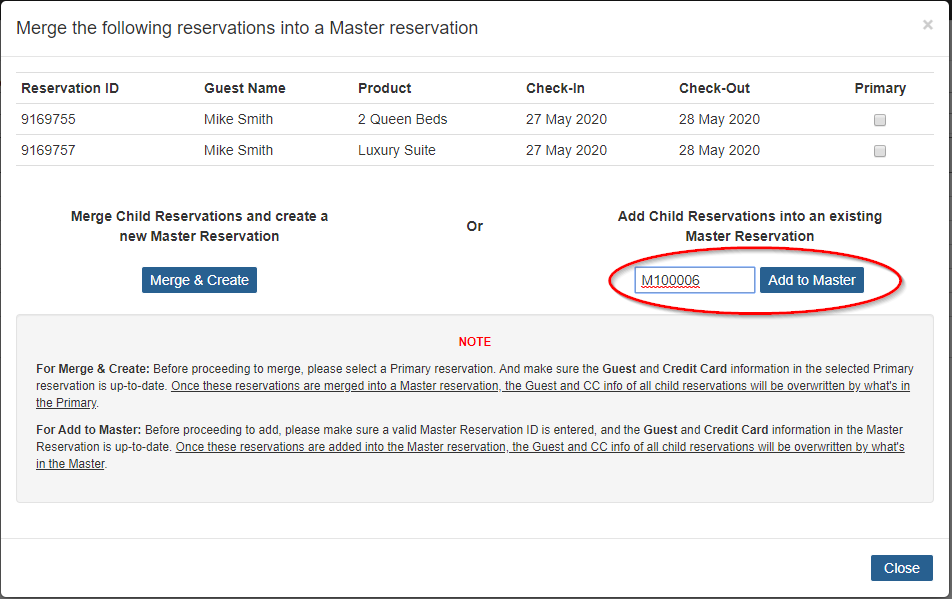
- Either way, the Master will serve as the Primary Reservation, i.e. the Guest and CC info
in the Master Reservation will override what's in the Child Reservations.