Group Reservation
1. General Info
1.1 What is Group Reservation?
A group reservation is one reservation for several rooms for one or more room types for one
or more rate groups. The need for Group Reservations arises when a party such as a company or
an event organizer, wishes to reserve multiple rooms before the names of the guests are known.
Typically, a special volume discount is agreed. The most important part in group reservations
is that the block of rooms is taken out of availability. The block then becomes its own subset
of available rooms from which individual reservations for the group are made.
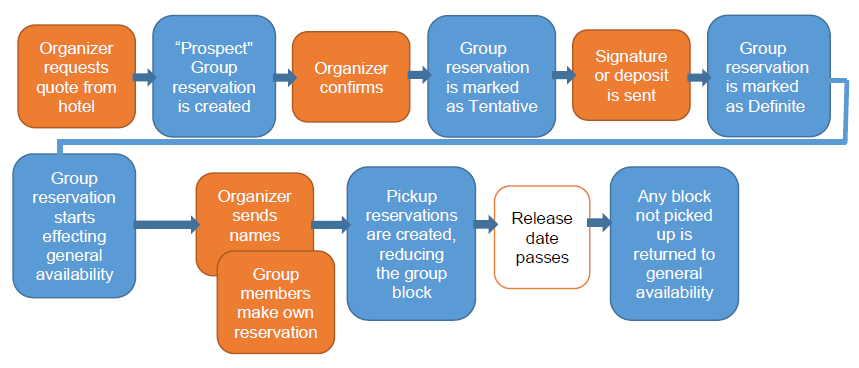
The typical flow of a group reservation over time is as follows:
1.2 How to view/create a Group Reservation?
A Group Reservation is managed at Home >> Group Reservations tab.
Click on an existing Group Reservation in the list to view/edit the reservation details of
the individual Group Reservation.
Click on the
New Booking button to create a new Group Reservation.

1.3 Items in the Group Reservation Details window
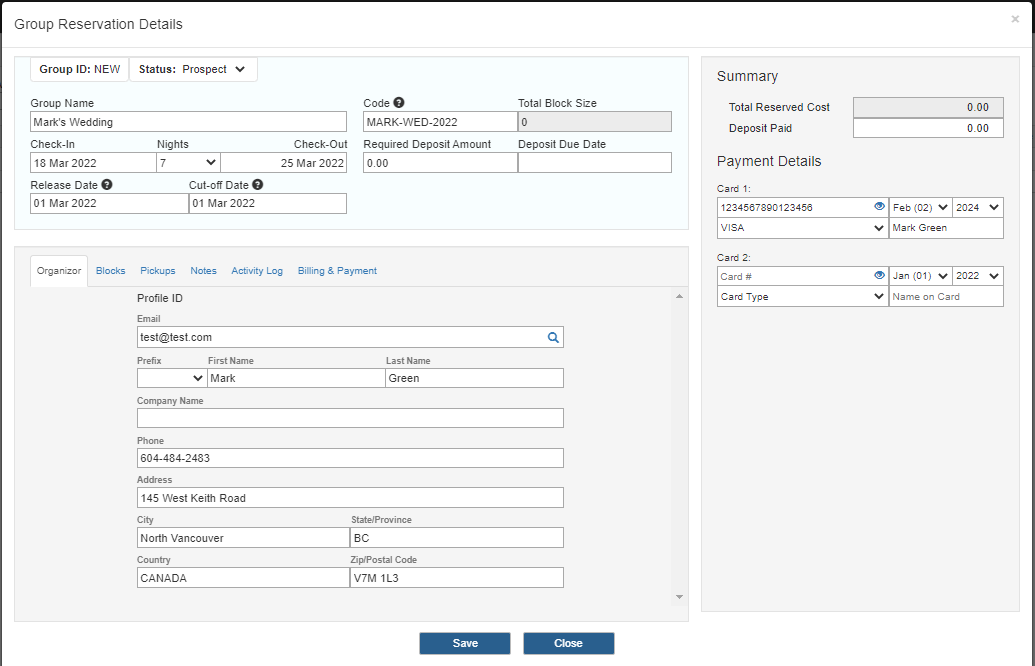
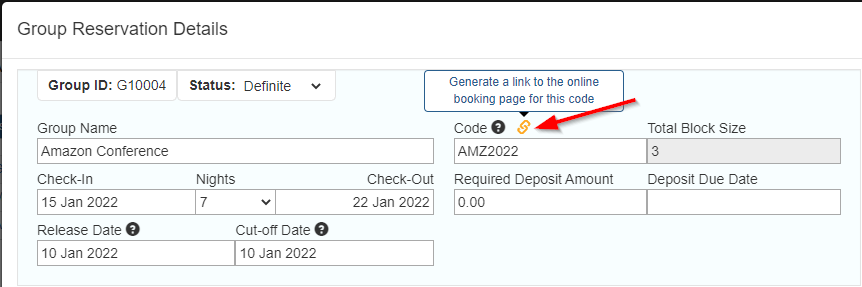
Group ID: a system generated code that identifies a Group Reservation.
It always starts with letter 'G', e.g. G12345.
Status: indicates the status of the reservation/inventory:
- Prospect - a quote has been issued to a requesting party. At this moment the rooms
in the block are not decreasing the general inventory.
- Tentative - some sort of an agreement with the booking party has been reached and
the rooms are taken out of the general inventory. You can either use this status while
awaiting a client signature, or a required deposit to be received before moving to the next
status.
- Definite - the rooms from the block have been taken from general inventory. from now on,
pickup reservations can be made.
- Cancelled - the group reservation has been cancelled. No block inventory can be allocated.
Note that you cannot cancel the Group Reservation if there are still uncancelled pickup reservations
in the block.
Group Name: name of the group.
Code: a user created code for guests to book online (letters, numbers and dashes('-') only,
max 15 chars, no spaces). Must be unique and cannot be the same as other Discount
or Promotional Codes. When guests book from our booking widget, enter the code in the
"Promotional Code"
Block Size: the total number of rooms allocated. Informational only (non-editable) - actual
block allocation takes place under the Block tab.
Check-In / Check-Out Dates: a date range starting from the first arrival date to the
last departure date. The inventory blocks will be allocated based on this date range.
Required Deposit Amount / Deposit Due Date: records the deposit amount and due date.
The deposit amount is for information only - actual amount, when it is received, needs to be posted
in the group folio under the Billing & Payment tab.
Release Date: the date on which the block needs to be turned into individual reservations.
If the names are not received, the (remainder of) the room block is returned to general availability.
Cut-off Date: From this date, cancelled reservations of this group no longer return to
the group block, but are returned to general availability.
Summary - Total Reserved Cost: the total revenue of the all picked up reservations,
calculated at the time of pickup reservation.
Informational only (non-editable). The actual reservation revenue is posted and managed in each
individual reservation's folio or in the Group folio.
Summary - Deposit Paid: paid deposit can be recorded here for informational purposes only.
To track it properly in the financial system, the deposit amount must be posted in the Group folio under the
Billing & Payment tab, or optionally managed in individual reservation's guest folio.
Guarantee information: credit card information.
Organizer Tab: the organizer's name and company information.
When the Group Reservation is created, the Organizer’s profile is created
as well and the Organizer profile ID is generated and will show on this
Organizer’s tab. An existing profile can be retrieved from the system
entering an email address and pressing the search button.
Blocks Tab: create, edit, or delete inventory blocks. Details can be found in subsequent help
sections.
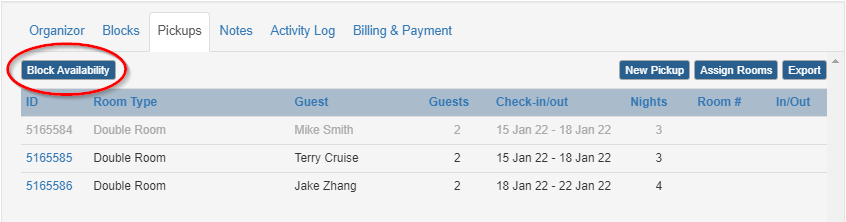
Pickups Tab: manages pickup reservations. Details can be found in subsequent help sections.
Notes Tab: records any notes regarding this Group.
Activity Log Tab: displays all activities related to the group reservation. Note: activities
for each individual pickup reservation can be found in the Reservation Details window for the respective
individual reservation.
Billing & Payment: Manage the group billing and payment. Details can be found in subsequent help
sections.
2. Manage Block Inventory
2.1 How to create, modify, release or delete a Block?
Inventory Blocks are managed under the Blocks tab.
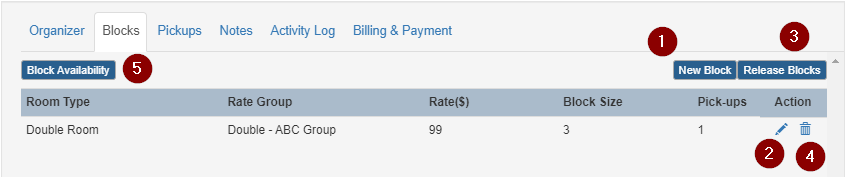
- Click New Block to create a new block.
- Click to view/edit an existing block.
- Click Release Blocks to manually release unbooked block
inventory back to the general availability. Note: the system will automatically release
the block inventory after the Release Date (see Night Audit (section 5.2) below)
- Click to delete a block.
Note: you cannot delete the block if pickup reservations have already been made in this block.
- Click Block Availability to view the current block availabilities
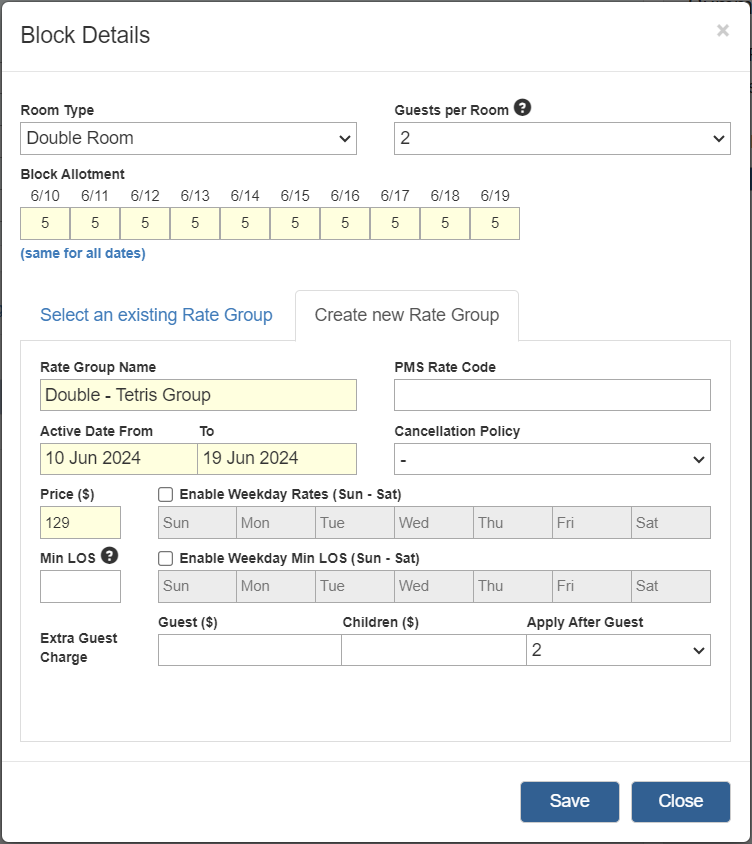
2.2 Block Details
Step 1: choose the Room Type of the inventory block.
Setp 2: set the Block Allotment - number of rooms in this block. You can set the allotment on a
per-day basis. If it's the same for all dates, enter it for the first date, then press "same for all dates"
button. Same for clearing the boxes: clear the first date, then press "same for all dates" to clear the rest.
Note: you cannot reduce the block size to less than the number of pickup reservations that
have been made in this block.
Step 3: set the default number of Guests per Room - informational only. The actual # of guests
can be edited in individual pickup reservations.
Step 4: choose an existing rate group, or create a new rate group for this inventory block
Step 4.1 - choose an existing Rate Group: Click and type into the Rate Group field to search
and select a Rate Group. Once the Rate Group is selected, you can edit the rate value and applicable
restrictions for the selected Rate Group by clicking on the "Set Rate fro this period" and
"Set Restrictions for this period" link.
Note: If this existing rate group is associate with other room types, the rate value or restriction
changes will be available to those room types as well.
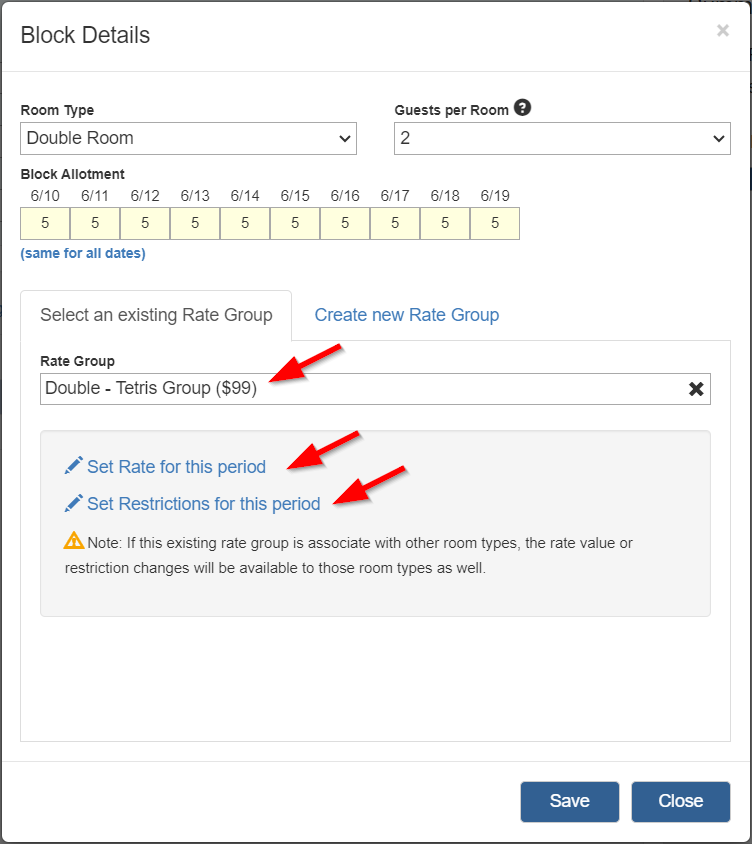
Step 4.2 - create a new Rate Group: click the New Rate Group tab and enter
required information for the new Rate Group, e.g. Rate Group Name, date period, price and any
applicable restriction. For accounts enabled with the Financial System, you must enter the
associated Posting Codes for the new Rate Group as well.
After the creation, the Rate Group details can be modified later at Setup >> Rates and/or at
Home >> Rates & Restrictions section.
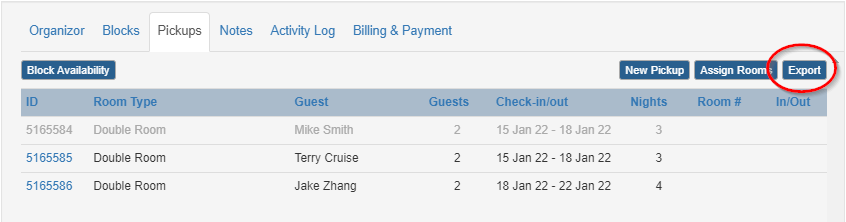
3. Pickup Reservations
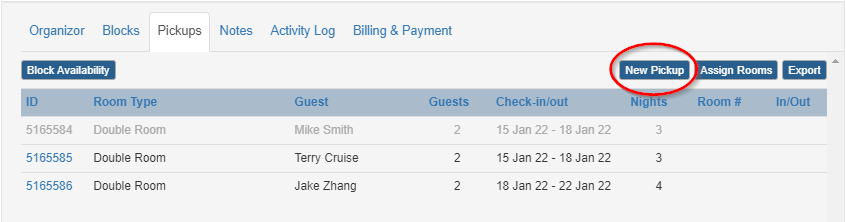
3.1 How to create a batch of pickup reservations?
When you have received a list of guest names for the group, you can create all pickup reservations
in one batch by clicking on the New Pickup button.
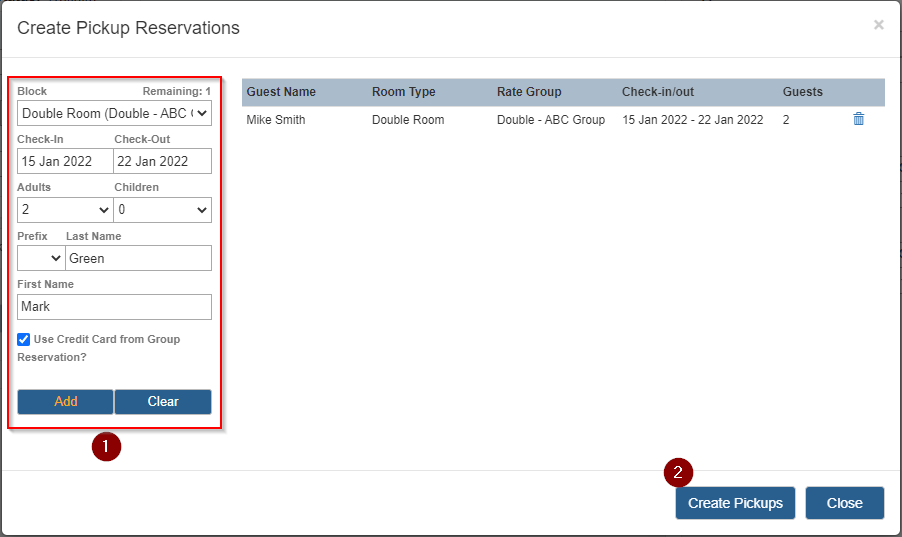
In the Create Pickup Reservatiosn popup window,
- Select the block for the applicable room type, rate group and date combination
- Enter the check-in/out date or keep the default from the block
- Enter the number of the guests for the room or keep the default from the block
- Enter the guest prefix, last and first name
- Select whether to use the credit card from the Group Reservation
- Press Add button to add the guest reservation to the list on the
right
- Press Clear to clear the guest name
- Review the list of reservations and press the Create Pickups
button to proceed.
Note: these pickup reservations created here are single-room reservations.
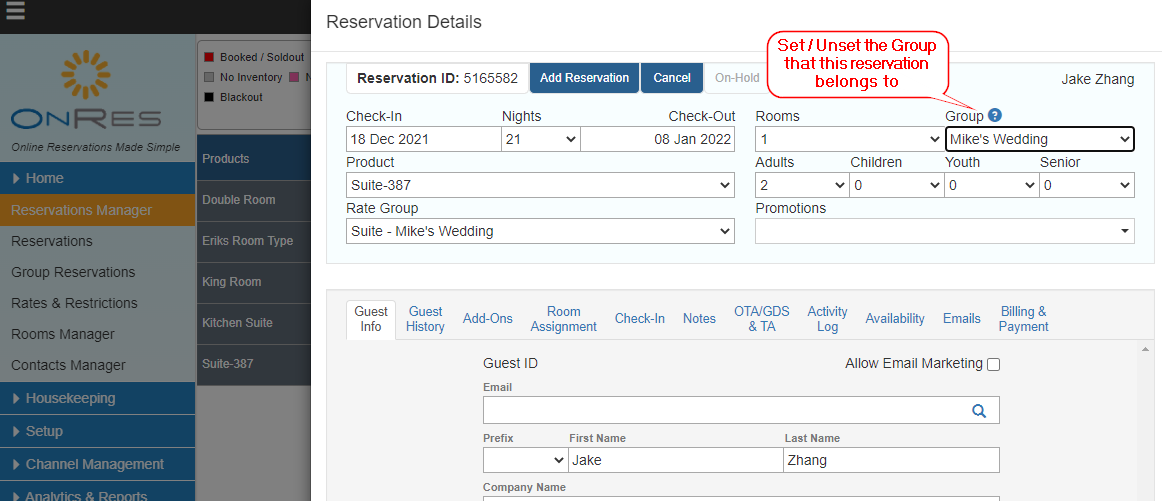
3.2 Other ways to create/edit pickup reservation?
Like every other regular reservation, you can also create/modify a pickup reservation from
the Reservation Details window.
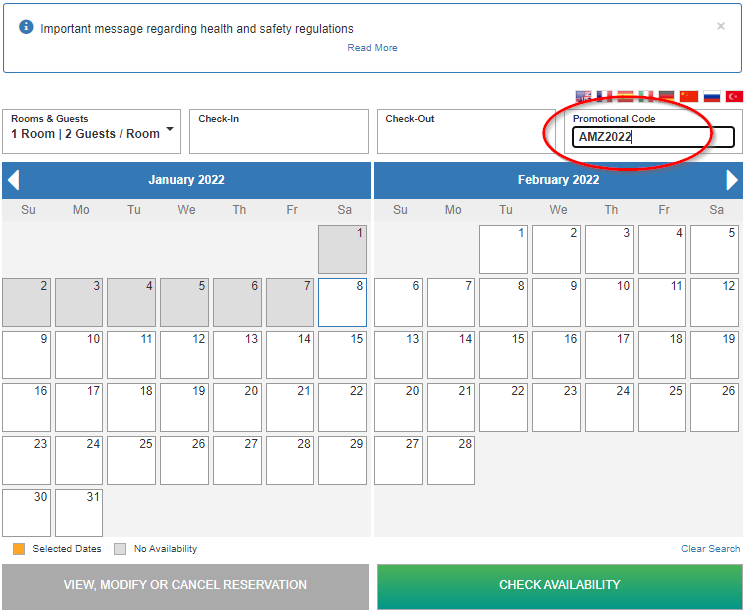
3.3 How to book a pickup reservation online (by the guest)?
When you have assigned a Code to the Group Reservation, you can let the guest to book a
pickup reservation using this code from your website using the OnRes Booking Engine. When your guest
enters the code in the Promotional Code field in the booking page, the search results will be the
available blocks (and rates) allocated for this group only.
Our system can also generate a link to your booking page with this code pre-populated. You
can click on the button to generate the link.
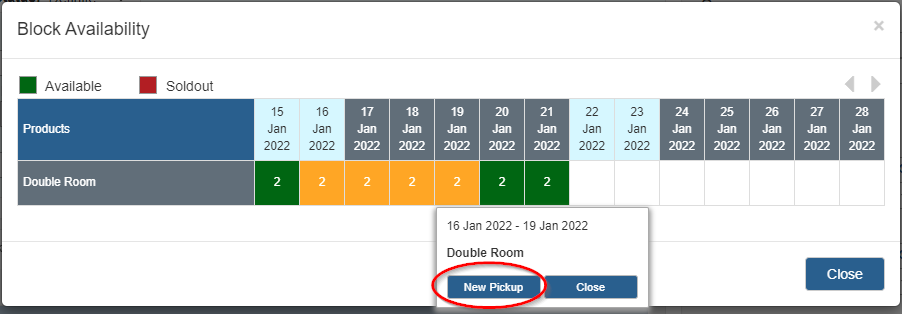
3.4 How to view the Block Availability?
You can view the block availability on a date grid by pressing the
Block Availability button.
You can also book a pickup reservation from the Block Availability popup by clicking
on the date grid and drag to select the start/end date (selected dates will be highlighted
in orange).
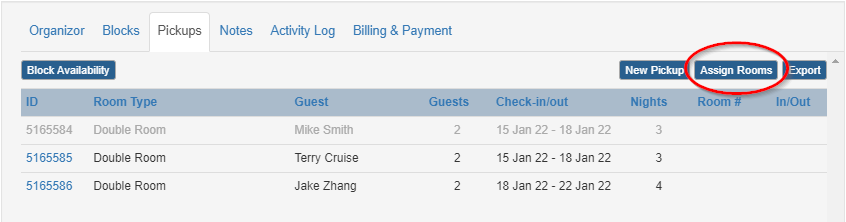
3.5 How to assign rooms to pickup reservations in a batch?
Besides the normal ways to assign a room to a pickup reservation either from the Reservation Details window
or from the Rooms Manager (see this page for details), you can also
let the system automatically assign a room for each pickup reservations in the list, by
pressing the Assign Rooms button.
4. Billing & Payment
4.1 Do you need a folio (bill) for the group?
If you decide to charge all or partial cost of the member reservations to the group, you can
transfer the charges to the group folio, which is managed under the Billing & Payment tab.
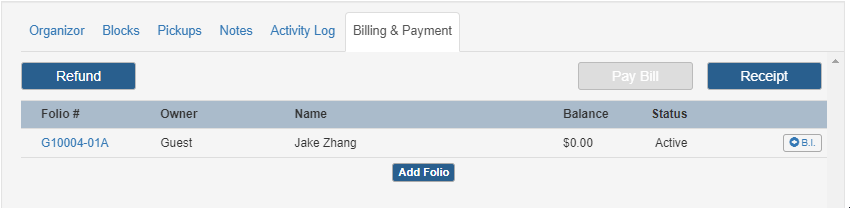
Similar to the folios managed in each reservation, a default folio will be created once the
Group Reservation status is set to "Definite", with the folio ID be "GXXXXXX-01A",
where XXXXX is the Group Reservation ID.
You can create multiple folios for the group by pressing the New Folio
button. The subsequent folio IDs will be "GXXXXXX-01B" and "GXXXXXX-01C" and so on.
There are two ways to transfer charges from member reservations to the group folio:
- Manaually transfer charges from a single reservation folio to a group folio
- Setup a Billing Instruction to transfer the charges from all member reservations
to the group folio
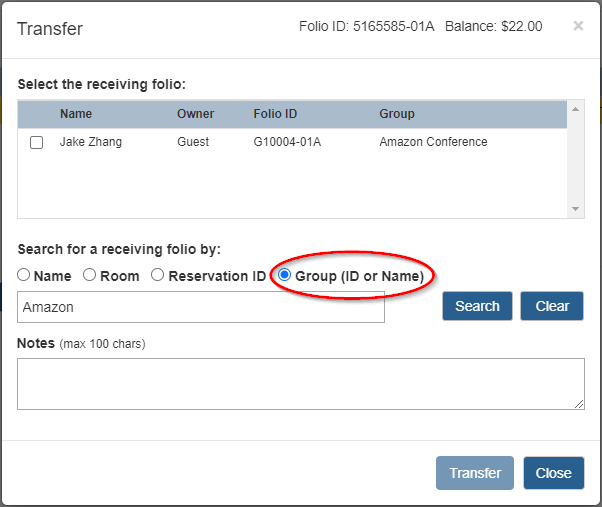
4.2 How to Manaually transfer charges from a single
reservation folio to a group folio?
- Open the Reservation Details window for the member reservation

- Go to Billing & Payment tab and open its folio
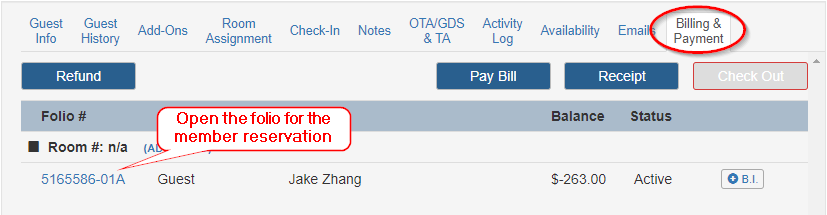
- Select the items you'd like to transfer, then click the Transfer
button
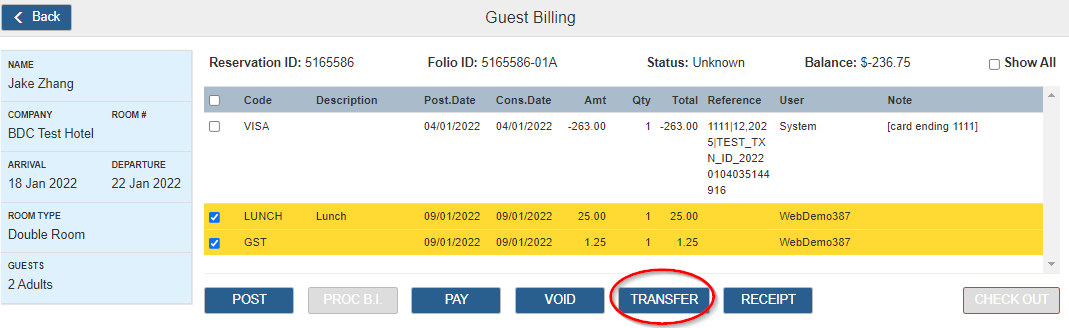
- Search for the receiving group folio by the group name or ID, then press the
Transfer button to complete the transfer
4.3 How to Setup a Billing Instruction to transfer
the charges from all member reservations to the group folio?
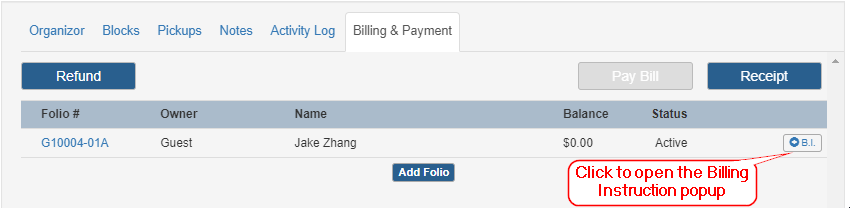
- Go to Billing & Payment tab for the Group Reservation Details window, click on the
"B.I." button to open the Billing Instruction popup
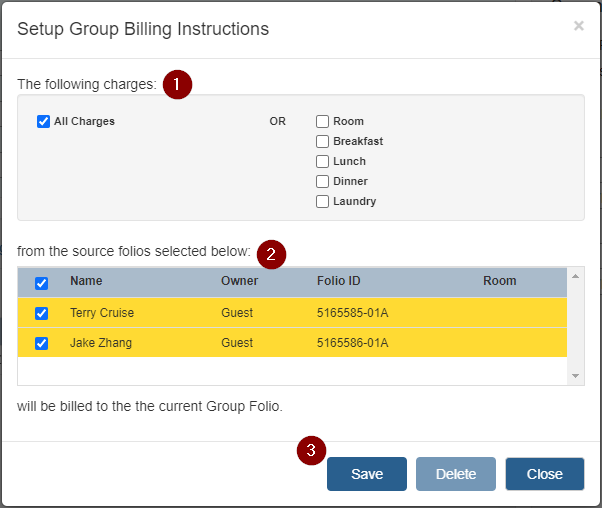
- In the Billing Instruction popup,
1. Select the type of charges to transfer to the group folio
2. Select the source folios from the list
3. Clise on the Save button the proceed.
Process Billing Instructions: Once the Billing Instruction is set, it will be automatically
processed upon checking out any member reservation that is attached to this Billing Instruction.
When the CHECK OUT button is pressed in the member reservation,
the charges from this member reservation will be transferred to the group folio, as defined
in this Billing Instruction.
The Billing Instructions will be automatically processed when you press the
PAY button as well.
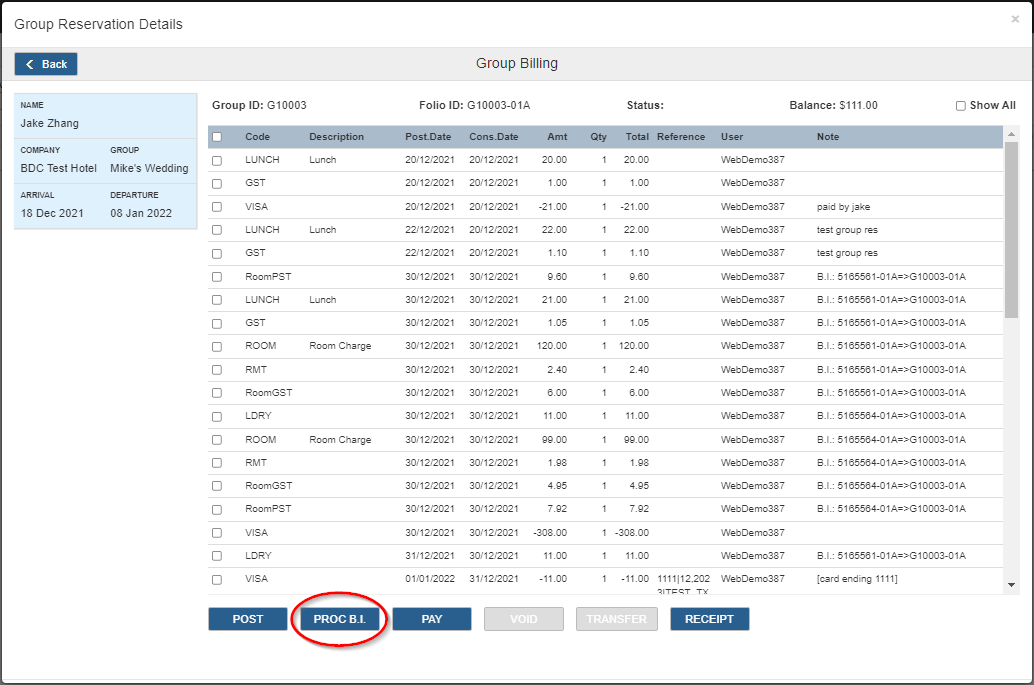
You can also open the group folio and press the PROC. B.I. button to
manually transfer the charges from all member reservations that are associated with this billing
instruction to the group folio based on the Billing Instruction.
4.4 Other billing & payment operations
5. Reporting & Night Audit
5.1 Reports for the group
- List of groups: you can download a list of groups filtered by the Group ID, Group Name,
Check-in/out date, etc. at the Group Reservations page. Tip: use "Quick Action" for predefined
search criterias such as "Today's Check-in/out", or "Booked Today", etc.

- List of pickup reservations: you can export a list of member reservations for a group,
including the guest names and their assigned room numbers etc, under the Pickups tab in the
Group Reservation Details window
5.2 Night Audit
The night audit process will check each active group reservations for their Release Date.
When a group reservation reached its Release Date, the system will return all the un-booked inventory
from the block back to the general inventory.
6. Group only Add-on
6.1 What is Group only Add-on?
Group only Add-on is an optional add-on to the Group Reservation module. It allows you to create
add-on products and services that are only applicable to the group reservations, e.g. a group
dinner, a bus service, etc. The inventory and availability of these add-ons are managed separately
from the regular add-ons that are available to all reservations.
6.2 How to set up Group only Add-on?
First, create the Add-on items in Setup >> Add-Ons (see section 1 in Managing Add-Ons.
Note: if you want this item to be only available for group reservations, select "Yes" for the "Manual/Group Only" option
when creating the add-on item. Otherwise, it will be available for both group and regular reservations.
Next, in the Group Reservation details window, you can select the add-on items that the guest will only see when they book
the group reservations online using the group code.
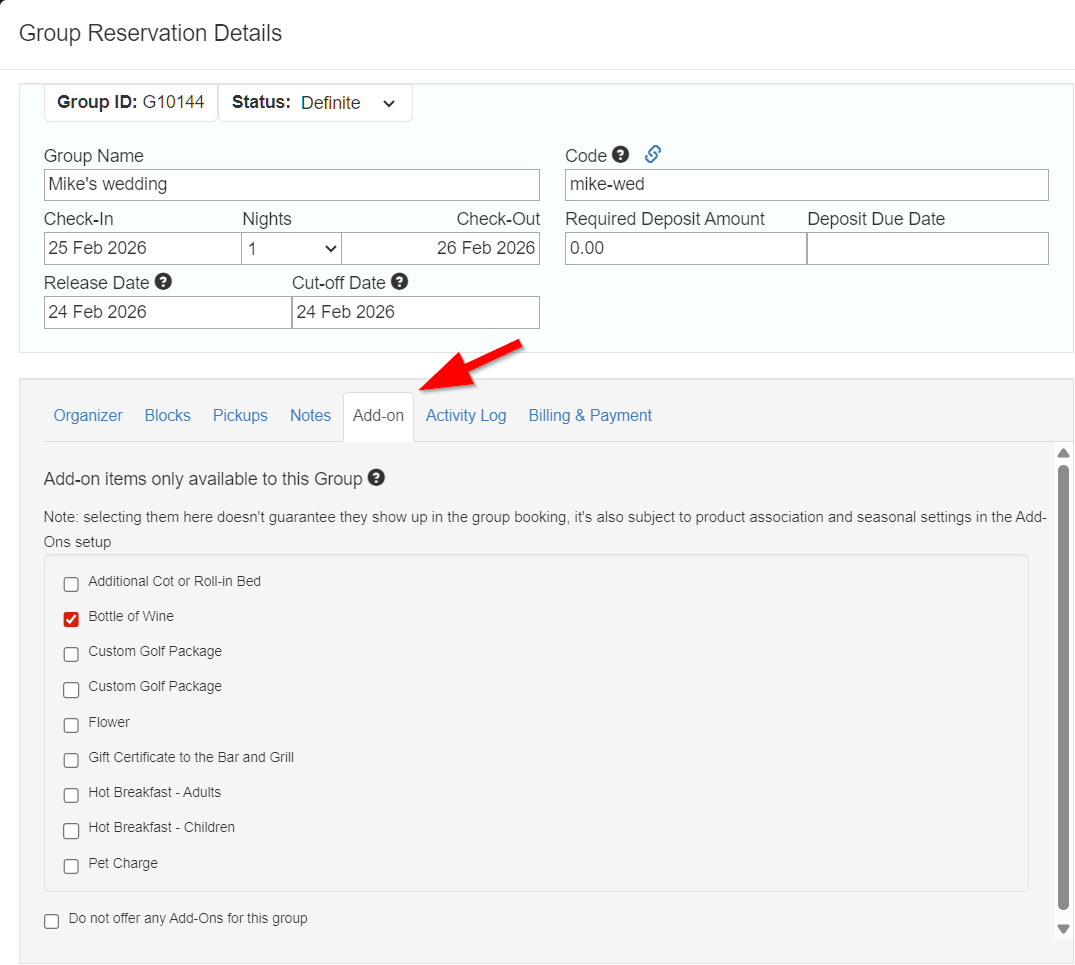
Note: selecting the add-on options here doesn't guarantee they show up in the group booking, it's also subject to product association
and seasonal settings in the Add-Ons setup
If you don't want to offer any add-ons to this group, toggle on the "Do not offer any Add-Ons for this group" option.