CHECK-IN/OUT & ROOM ASSIGNMENTS
This section describes the check-in/out process, and how to manage rooms and room assignments
1. Check-In/Out
1.1 How to check-in a guest?
Here is a typical Check-in process.
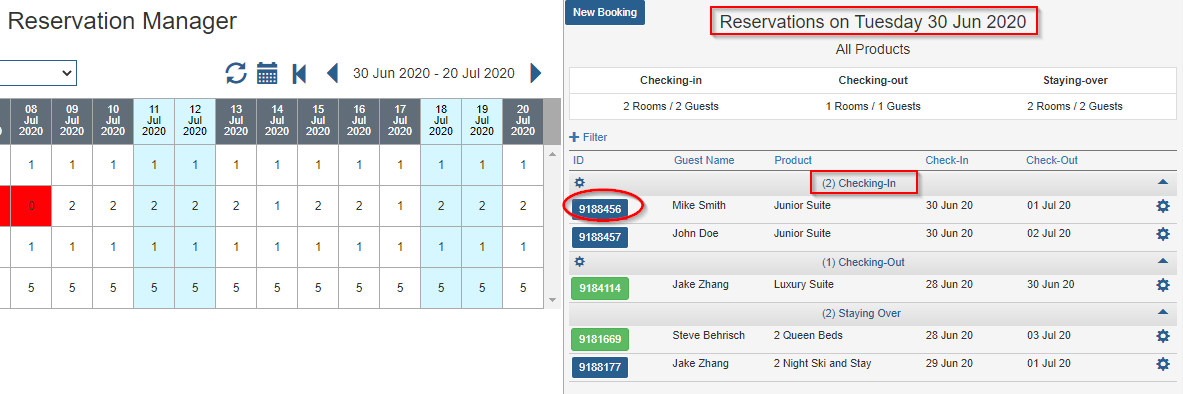
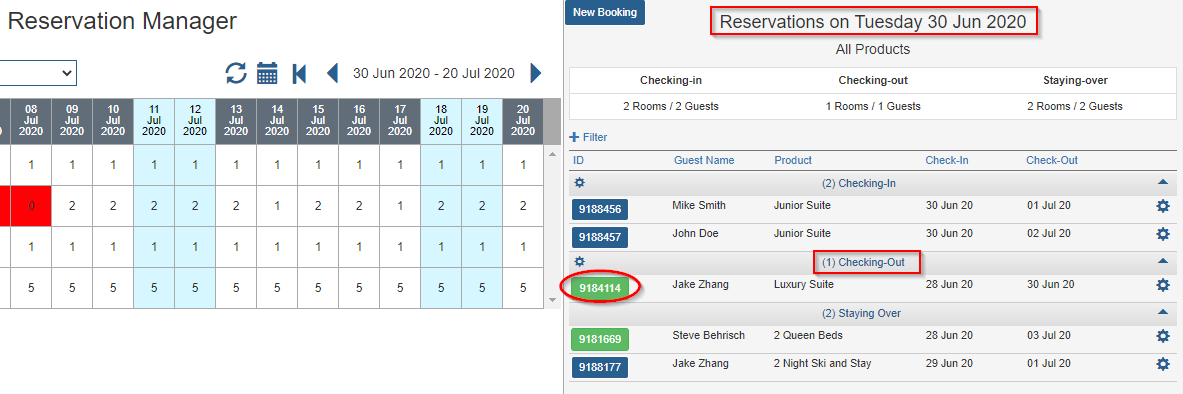
First go to the right side panel of the Reservation Manager,
where today's checking-in, checking-out and staying over reservations are listed in three
different sections. Click on the reservation ID
that you are checking-in, to bring up the Reservation Details window.
At the Reservation Details, go through the following tabs:
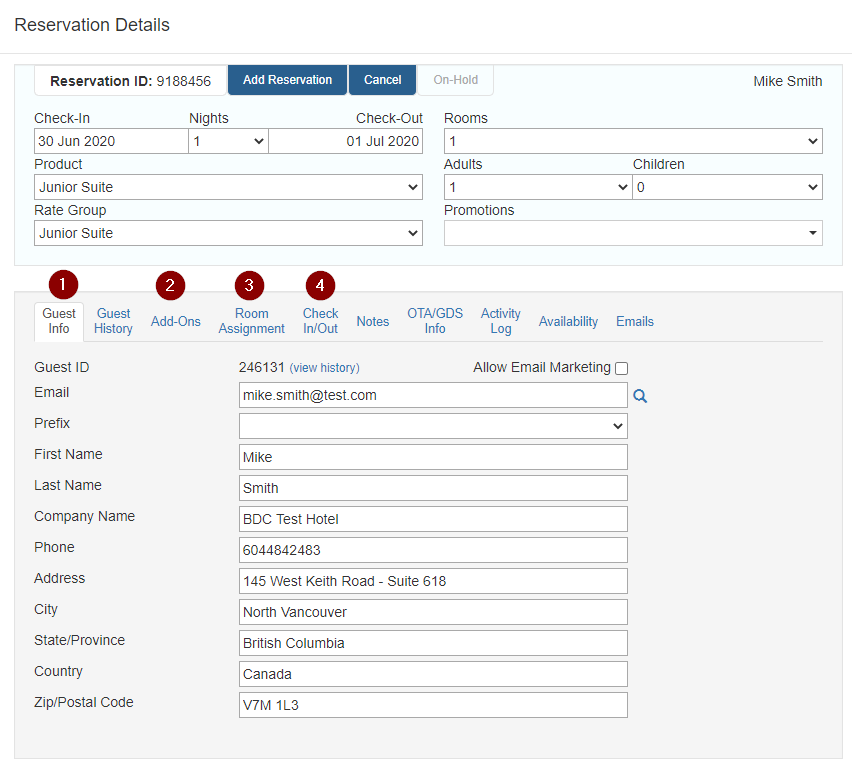
- Update guest contact information
- Check if guest would like to purchase any Add-ons for their stay
- Make room assignment(s) (details in the section below)
- At the Check-In/Out tab, you can
- leave notes to the housekeeping department if needed
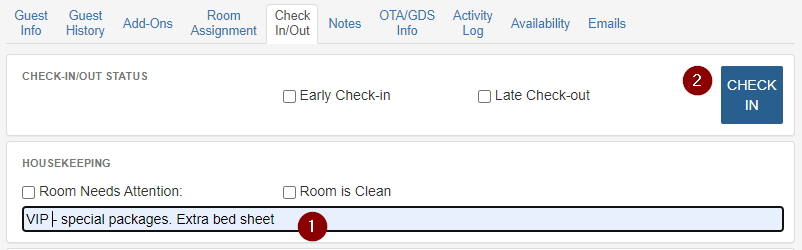
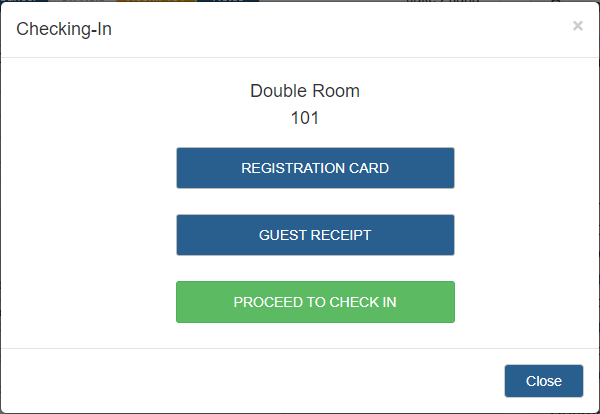
- Click the Check-in button to open the pop up to allow you print the Registration Card
- Click the PROCEED TO CHECK-IN button to complete the process
After a successful check-in, the reservation button in the Reservation Manager will appear
green
1.2 How to check-out a guest?
Here is a typical Check-out process.
First go to the right side panel of the Reservation Manager,
where today's checking-in, checking-out and staying over reservations are listed in three
different sections. Click on the reservation ID
that you are checking-in, to bring up the Reservation Details window.
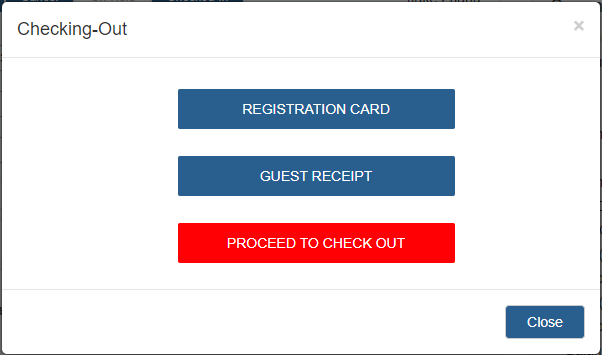
At the Reservation Details, go to the Check-In/Out tab, click on the Check-out button.

At the Reservation Details, go to the Check-In/Out tab, click on the Check-out button.
After a successful check-out, the reservation button in the Reservation Manager will appear
red
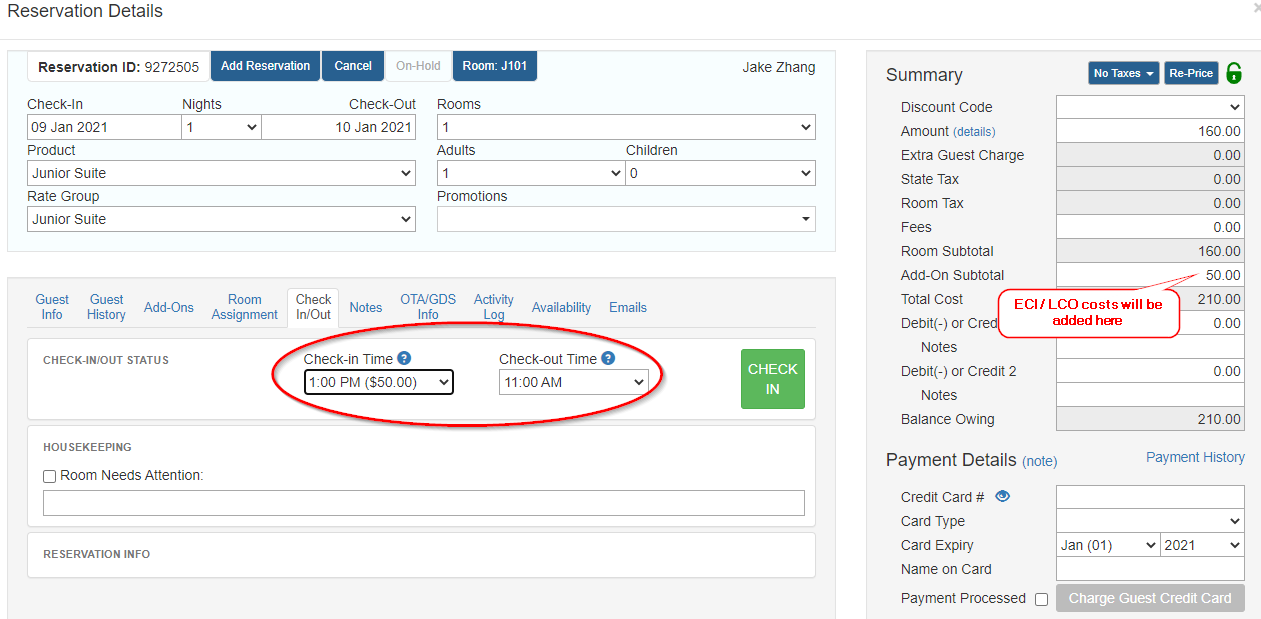
1.3 How to setup Early Check-In & Late Check-Out Times?
Early Check-In (ECI) and Late Check-Out (LCO) can be setup as Add-on Items and sold
to the guests as Add-on items. You can optionally configure multiple items with different
check-in/out times with different rates.
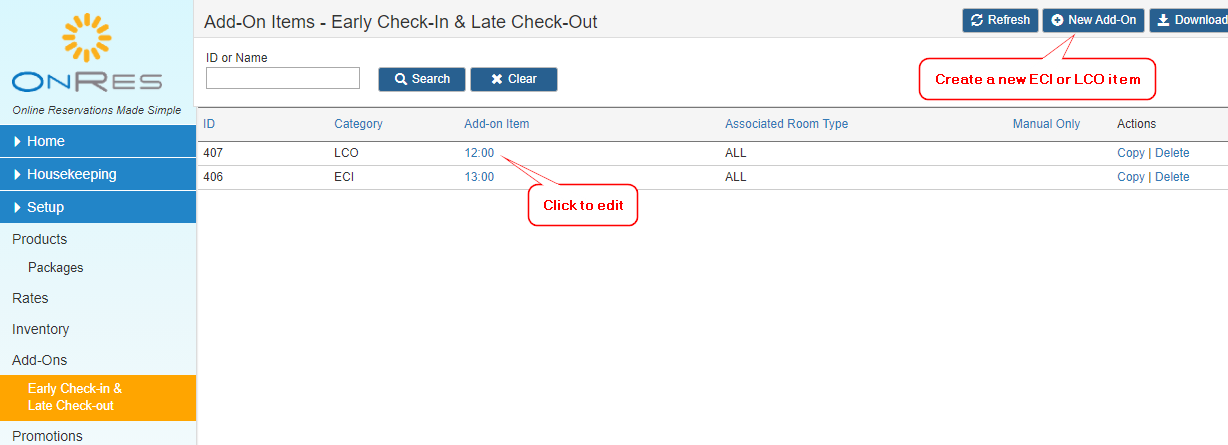
Set up: First go to Setup >> Early Check-In & Late Check-Out, which is a sub-menu
under Add-Ons. Click on New Add-On to create a new
ECI / LCO Add-on item.
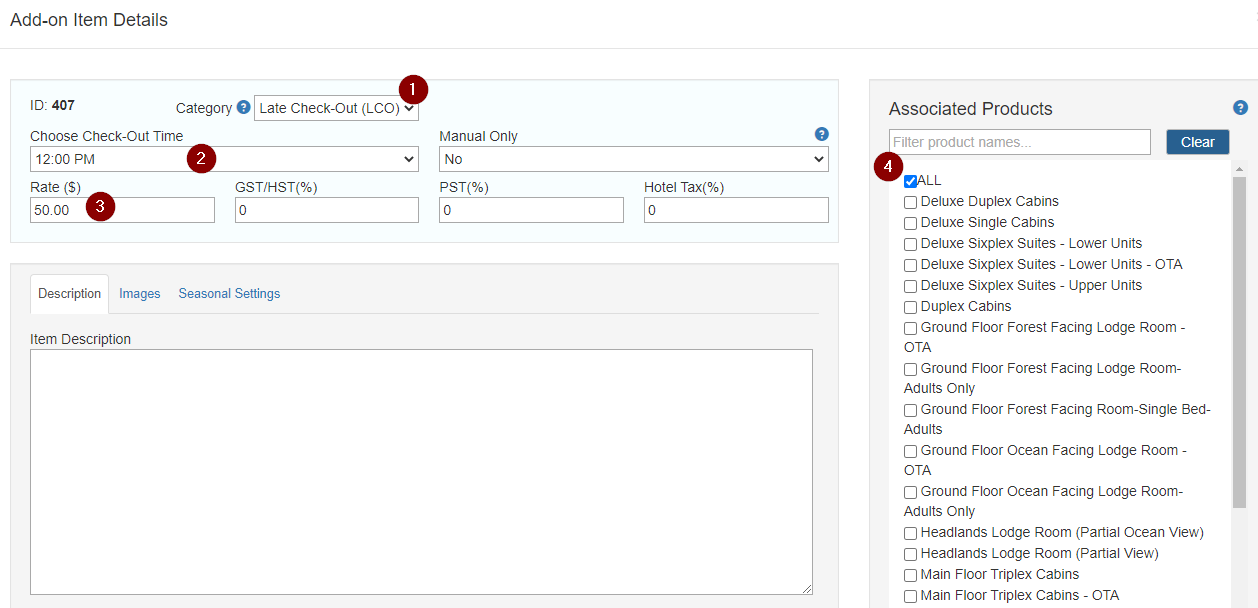
Follow the steps in the following screenshot to set up the details, then press Save.
Set Check-In/Out Time: After the ECI/LCO items are set up, when the guest requests
a different check-in/out time, you can go to the Reservation Details window, and choose
the desired time. The system will add the corresponding cost to the Add-On Subtotal accordingly.
When the new Guest Check-in/out Module is released (in the near future), the guest will
be able to choose the desired Early Check-In time (if the option is available) during the
online check-in process; or choose the desired Late Check-Out time (if the option is
available) during the online check-out process.
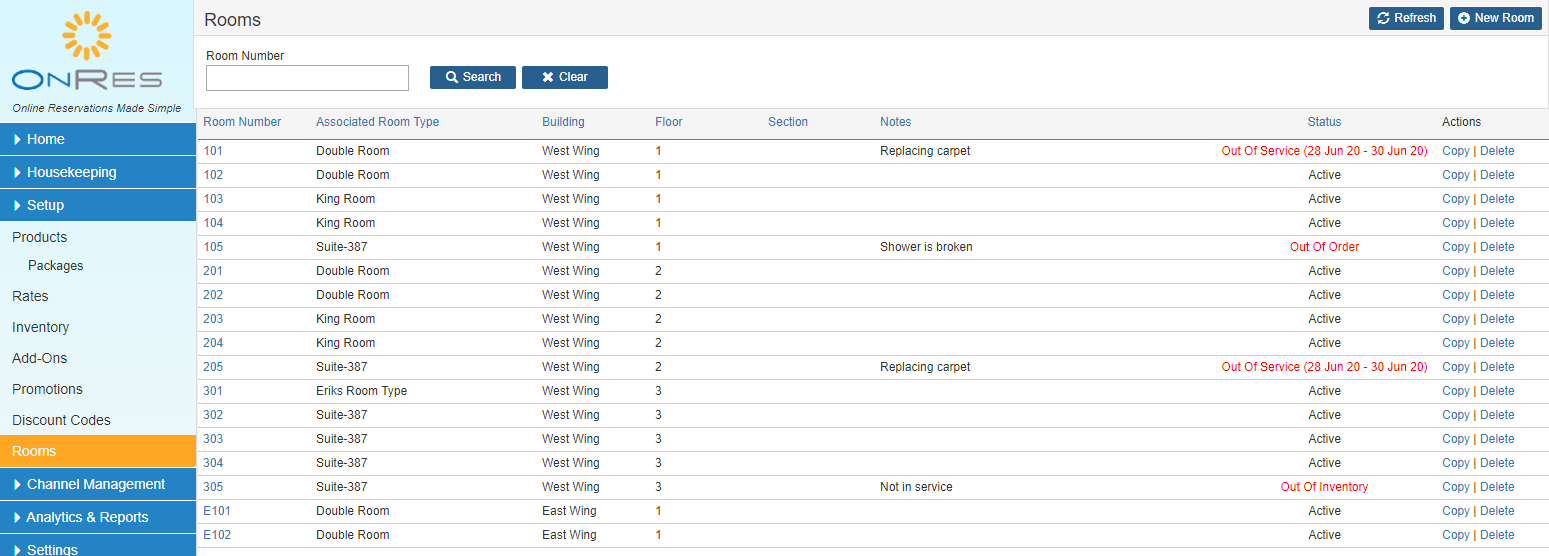
2. Room Setup
You can set up the rooms to make full use of the Checking-in and Room Assignment features.
Rooms can be viewed and setup at the Rooms Tab under the Setup section on the left side
navigation menu.
2.1 How to create and modify rooms?
Rooms are created and modified at the Rooms Setup tab (Setup >> Rooms)
Click on the
New Room
button to create open a Room Details popup window, where you can enter the Room Number, Notes,
and assign a Room Type to it.
You can set up the room amenities by toggling the check boxes in the Room Amenity section.
The list of Amenities are set up in Settings >> Property Info & Amenities section.
You can also set the current status to Active, Out Of Order or Out of Service.
You can also schedule a date range for Out of Service.
The system (Night Audit) will update the status when the scheduled time comes.
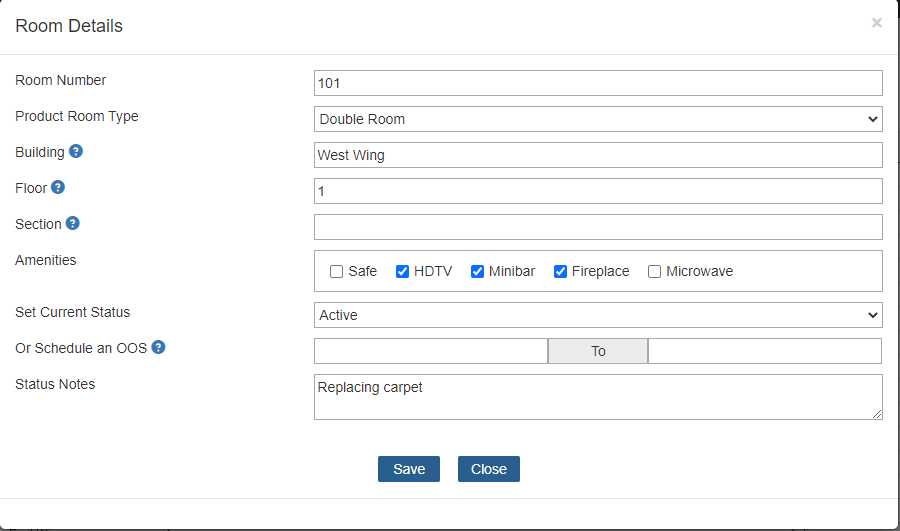
Copy a room: you can create a room more quickly by clicking on the "Copy" action link
to create a duplicate room, with a new name "Original_Room_Number_copy". The newly created
room will have the same attributes as the original one.
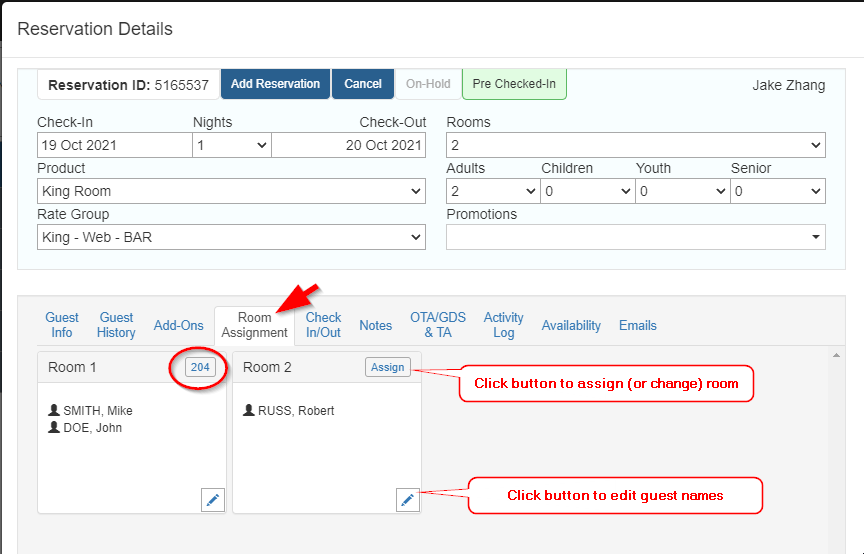
3. Room Assignment (from the Reservations Manager)
Rooms can be assigned to reservations at the Reservation Details page.
3.1 How to assign room from the Reservation Details page?
When you are at the Reservation Manager working on a particular reservation. Open the Reservation Details
and go to the Room Assignment Tab. Click on "assign" to open the Room Assignment page for each room

At the Room Assignment page, you can select the room from a list of available rooms, click SAVE to
confirm the assignment. If you would like to assign some dates to a different room, you can click
Split Room Nights button to add an additional date periods for
the additional room. Make sure these date periods don't overlap with each other.
4. Room Assignments (at the Rooms Manager)
Rooms assignments can be managed on a calendar (the Rooms Manager) at Home >> Rooms Manager
4.1 How to view room assignments on the calendar?
Open the Rooms Manager. By default it shows a 7-day range on the calendar. You have the option to
switch between 7, 14 and 21 days view by clicking on the
button.
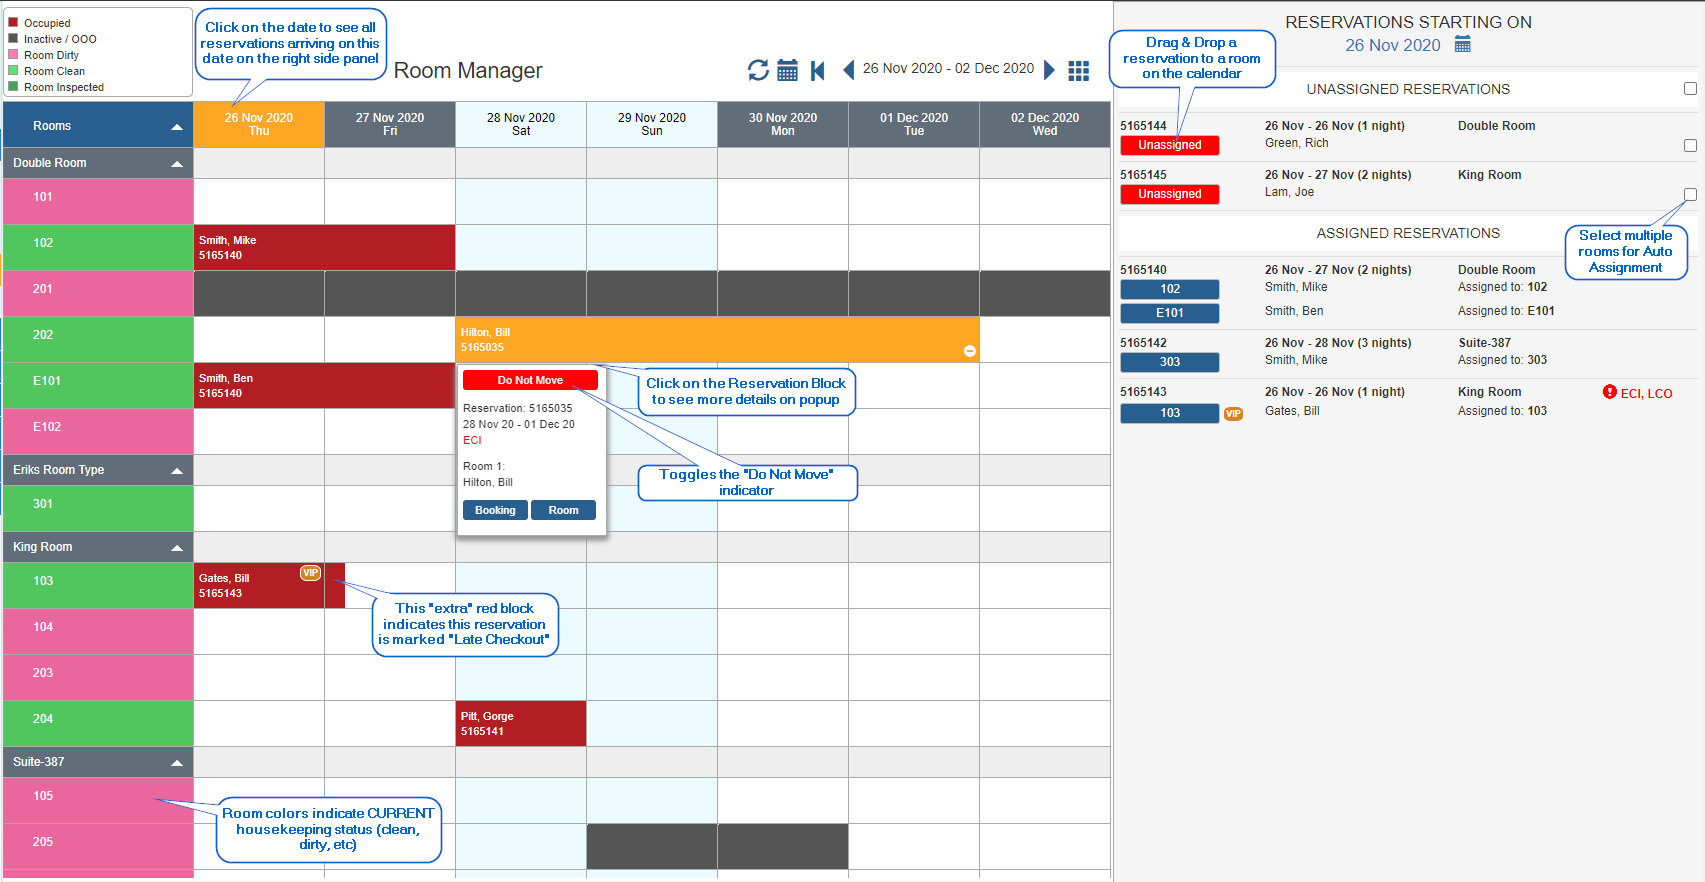
A few indicatioins:
- VIP: if guest that booked the reservation has a VIP status
- ECI: Early Check-in
- LCO: Late Check-out
- Do Not Move: if you decided to reserve this room for this reservation, you can mark it
as "Do Not Move" as a warning.
4.2 How to make/change room assignments on the calendar?
4.3 How to make auto-assignment?
The system allows you to select one or a group of reservations, and assign rooms to the selected
ones automatically. The system will try to assign the rooms next to each other or on the same
floor/section if possible.
To do so, first select the reservations.
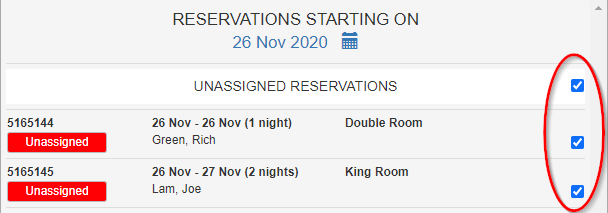
Then click the Assign button at the bottom of the page. You have the option to choose Clean room only.

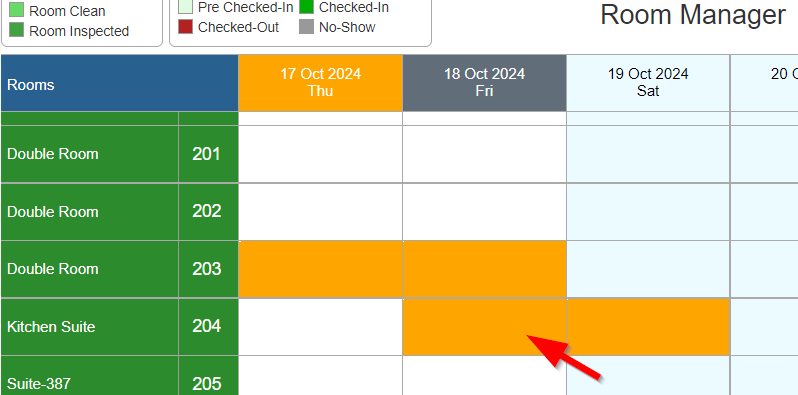
4.4 How to make reservations directly from the Rooms Manager?
Sometimes you may want to book a reservation on a particular set of rooms directly. For example, you have a double Queen
room and a King room that are next to each other, and you would like to book these two rooms together as a suite. You can
do this directly in the Rooms Manager, by selecting this two particular rooms, and the system allows you to create a
Master Reservation that consists of two child reservations for each individual room. To do so,
- Click to select a room on the Start Date and drag your mouse to the End Date (the day before the check-out date)
if it spans more than one night.

- Repeat the above action to select the dates for the second room
- Now you should see the selected rooms listed on the right side panel. If you would like to change the selected dates outside
the current view, you can click on the icon next to the Start or End date to change it.
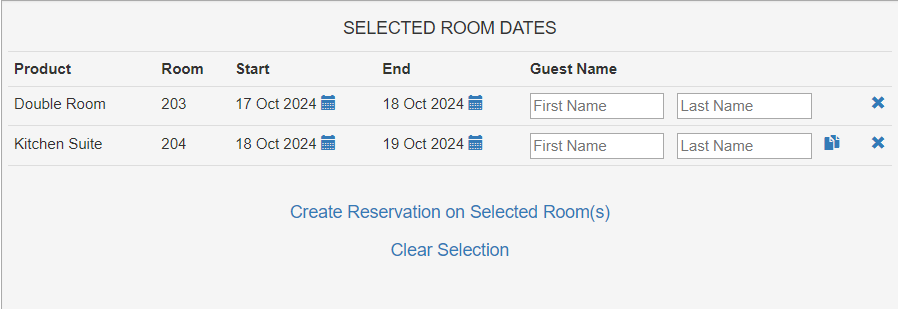
- Enter the Guest Names for each room. If all rooms are under the same name, you can click on the
icon to duplicate the first guest name to the other rooms
- Click the "Create Reservation on Selected Room(s)" button to create the reservation. After confirmation, the new reservation will show up on the calendar
- Note that the reservations will be created with default rates and default number of guests (1), but you can always open the Reservations and change them
after creation
- If you would like to cancel the selection at any time, click the "Clear Selection" button
5. Automatic Room Assignment on Booking
The system can automatically assign a physical room to a reservation at the time it is booked, so
you don't have to assign rooms manually for every reservation. This applies to reservations from
all sources – online Web Bookings, connected channels (e.g. Booking.com, Expedia, GDS,
SiteMinder), and reservations entered manually by your staff.
Requirements: this feature requires the Room Manager and is not available for B-Mode
(bed/hostel) accounts.
5.1 How to enable automatic room assignment on booking?
Go to Setup >> Web Booking Setup, scroll down to the Miscellaneous section, enable the
Automatically assign rooms when a reservation is created option, then click Save.
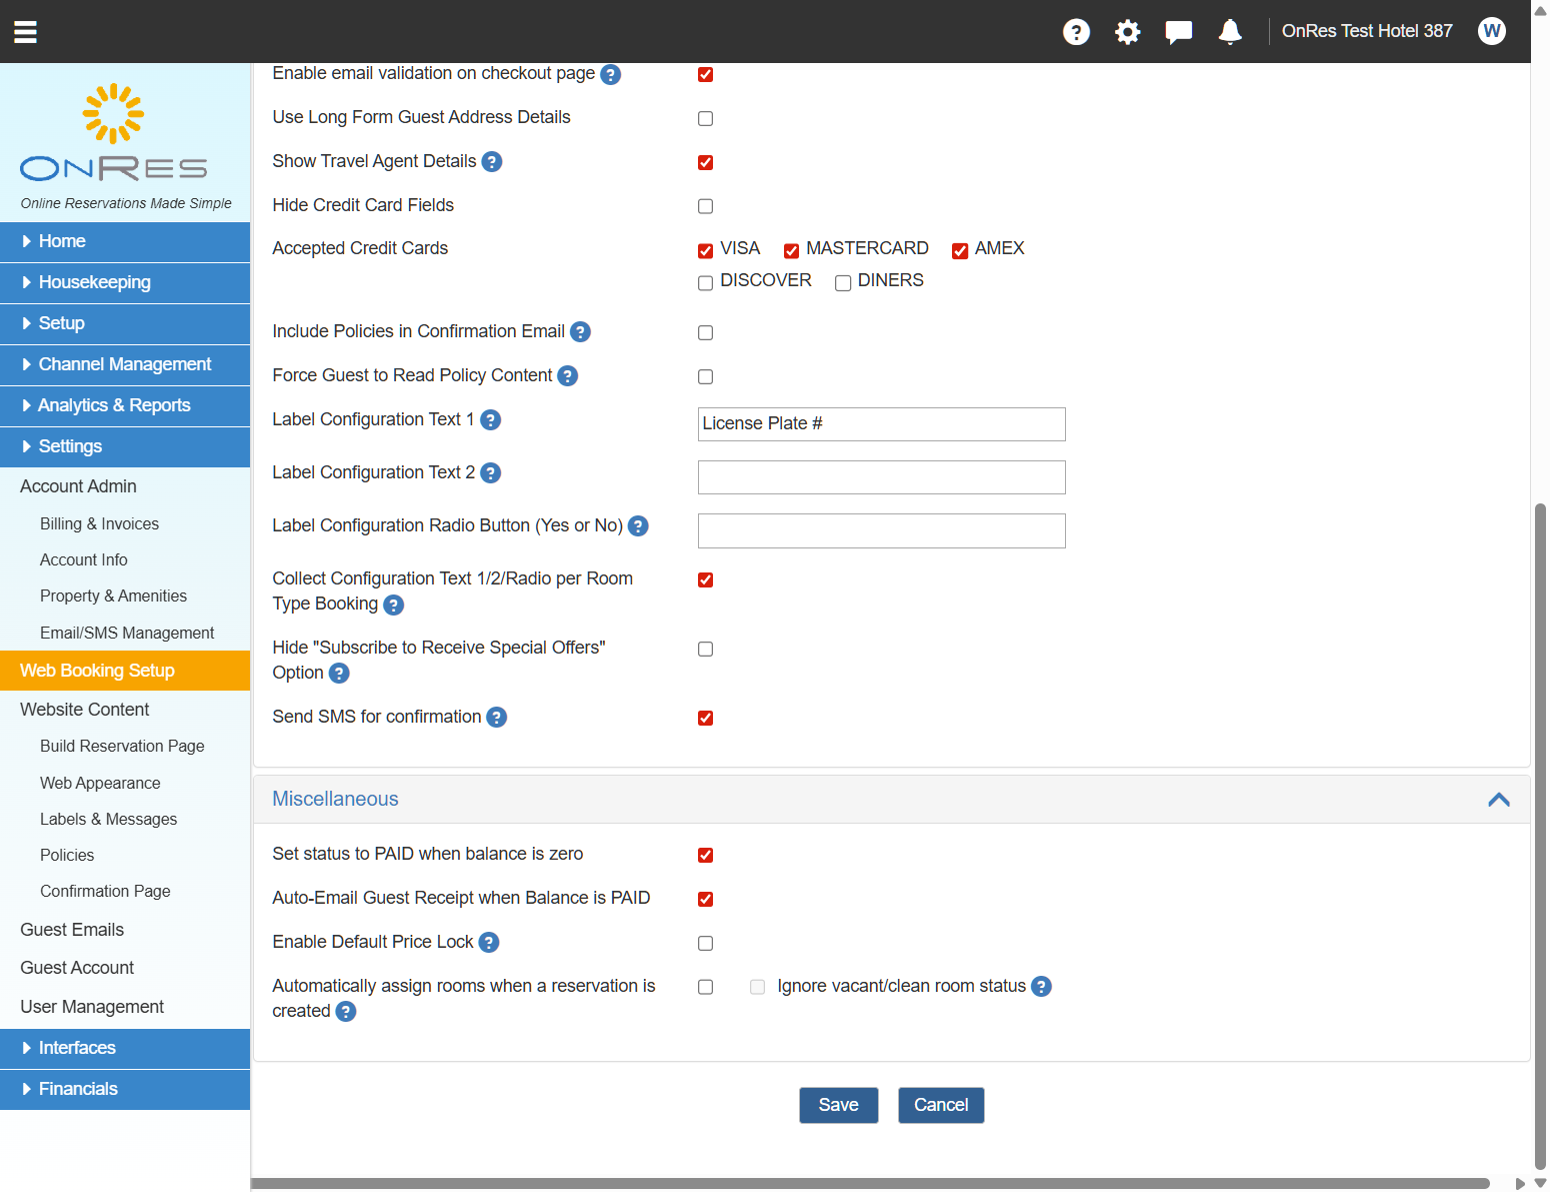
There is a sub-option, Ignore vacant/clean room status. By default the system only
auto-assigns rooms that are clean and vacant when the stay starts on or before today. If you are
not actively using the Housekeeping features, enable this sub-option so the system assigns any room
available by inventory, regardless of its clean/vacant status.
5.2 How does it work?
- On booking: when a new reservation is created, the system picks a suitable available
room (using the same logic as the manual auto-assign in Section 4.3) and assigns it.
- On modification: if a change to the dates or room type releases the existing
assignment, the system automatically assigns a new suitable room.
- On cancellation: the assigned room is released automatically and becomes available
again.
- If no suitable room is available: the reservation is still saved successfully –
it simply remains unassigned, and you can assign a room manually later.
When a room is successfully assigned, the room number is included in the vendor confirmation email
and shown in the Room Assignment tab of the Reservation Details window.