Managing Rates and Restrictions
First you will need to Setup Rates. Then Rates and Restrictions are
Managed at the Rates & Restrictions Manager
1. Setup Rates
Rates are managed in Rate Groups, which contains rate values and restrictions on a daily basis.
Click on the Rates tab under the Setup section of the left side navigation menu to open the Rate
Group List page.
1.1 How to view or find certain rate group(s)?
The Rates page lists all Rate Groups and their associations of the Products. You can perform
the following to help find certain Rate Group(s):
Sorting - click on a column head of the rate list to sort the rate groups by the column
Searching & Filtering - enter Rate Group ID, Name, or choose specific type to search/filter
the Rate Group list by ID, Rate Group Name, or its type.
1.2 How to create a new Rate Group?
Step 1 - Click on the New Rate Group button
to open the Rate Group Details pop-up window.
Step 2 - Fill up the necessary information in the form, choose the Product(s) that you
would this Rate Group to link to on the Associated Products area on the right side, then
press Save.
Note 1: a rate group will not be effective until it is linked to at least one product, and
valid rate values are set for the desired date range.
Note 2: OnRes 2.0 no longer supports Base Rate. The rate values needs to be defined on per-date
basis.
Copy - You can also create a duplicate of an existing Rate Group by click on "Copy"
in the Actions column on the Rates List page.
1.3 How to modify a Rate Group?
Click on the Rate Group Name and open the Rate Group Details window, where the details can be
modified.
2. Rates & Restrictions Manager - Managing Rates
Clist on the Rates & Restrictions tab under the Home section on the left side of the navigation menu to open
the Rates & Restrictions Manager page, where the rate values for any date(s) can be viewed and set here.
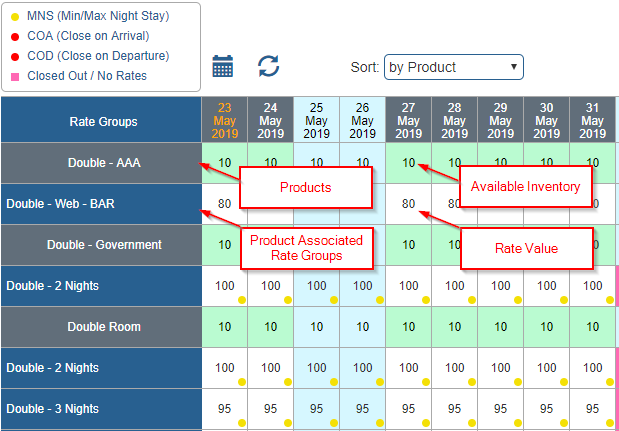
2.1 How to view Rates as sorted by Product?
By default, the Rate Groups are sorted by alphabatic order.
Select "Sort - By Product" on the top control panel to re-arrange the Rate Groups so the
Rate Groups that are linked to each Product are listed under each Product.
2.2 How to set and close out rates?
Select Date(s) - Hover or click on the a date block on the grid as the start date, or
Drag and Select a range of dates, and choose Set Rate
button in the pop-up
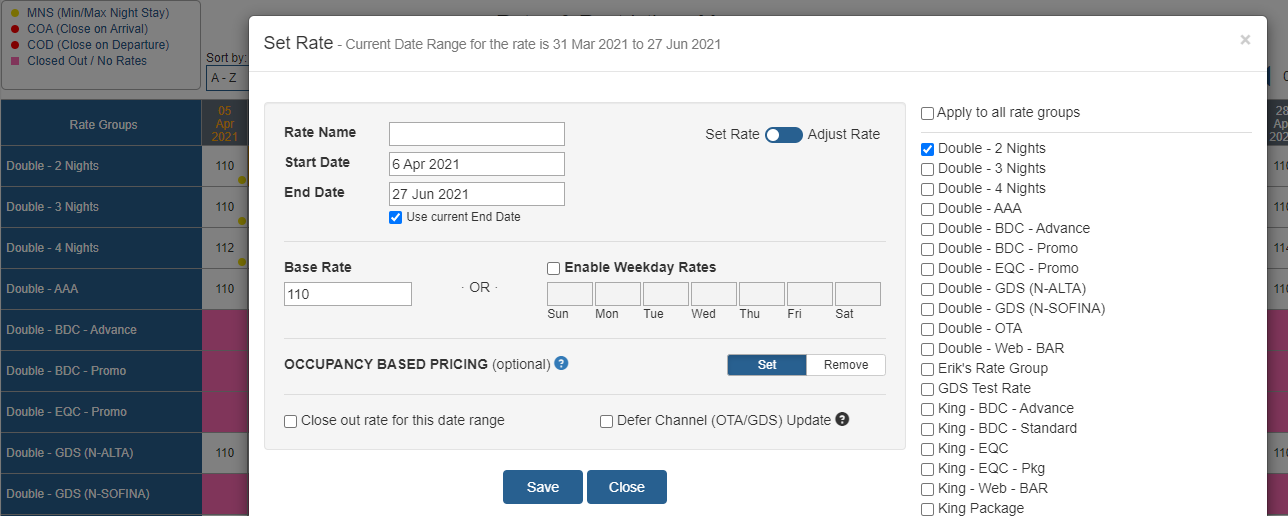
At the Set Rate pop-up window - set the starting and end dates. If there is already a
rate set on a date range previously, and you are going to replace the rate with the original
date range, you can also check the "Use current End Date" checkbox, which will populate the
current end date into the field.
Rate values can be set as a flat rate during the period or as a per day-of-week basis, if the
Enable Weekday Rates checkbox is checked.
Close out a rate for a date range - once the checkbox is checked, the rates in the date
range will be deleted.
Batch Update - The same date range and rate values can be applied to multiple rate groups
in a batch update as needed. Just select all applicable rate group(s) on the right side list
before Saving. Note that Filtering selection also applies to the list of rate groups showing
in this popup window
2.3 How to set Occupancy Based Rates?
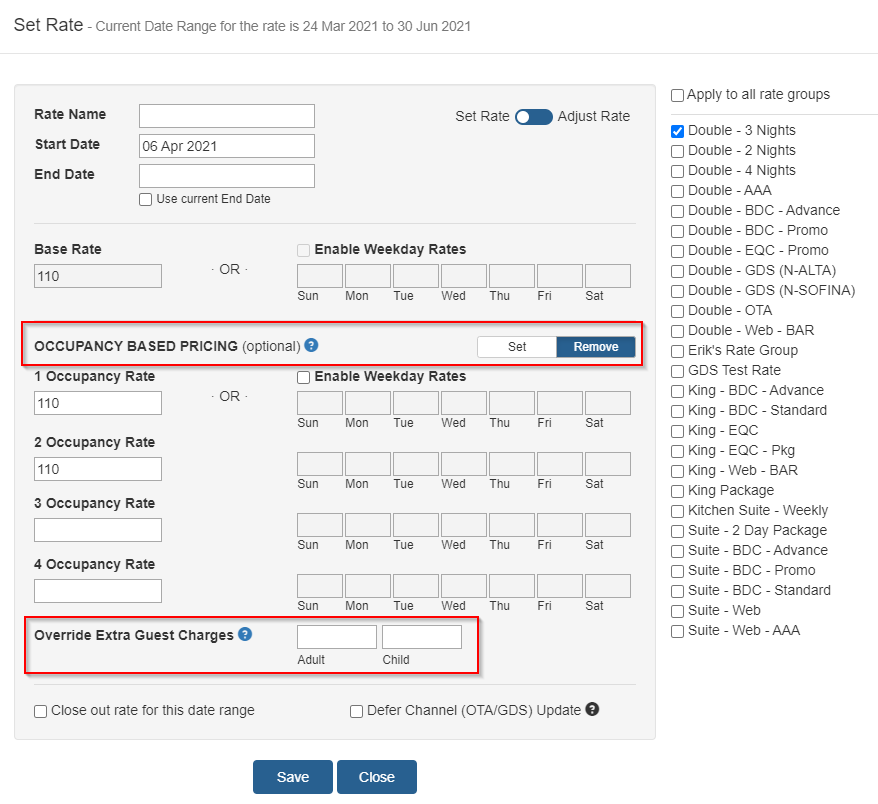
Click on the Set button to expand the Occupancy Based Pricing section. You can set the prices
for up to 4 occupancy (leave the rest boxes blank).
The price for any occupancy above that will be the last set Occupancy Based Rate, plus any
Extra Guest Charges if applicable.
For example, if you have set $100 for 1 and 2 Occupancy for a room with guest capcity of 4,
and have a $10 Extra Charge for each additional adult, then
- for 2 guests, the rate is $100
- for 3 guests, if the 3rd guest is an adult, the rate is $110
- for 4 guests, if the 3rd and 4th guest are both adults, the rate is $120
Extra Guest Charge
You can set the default Extra Guest Charges for this Rate Group at the Rates Setup section
(Setup >> Rates)
You can also set them on a day by day basis in the Override Extra Guest Charges
as shown in the above screenshot
To remove the Occupancy Based Rates, click on the Remove button and press Save
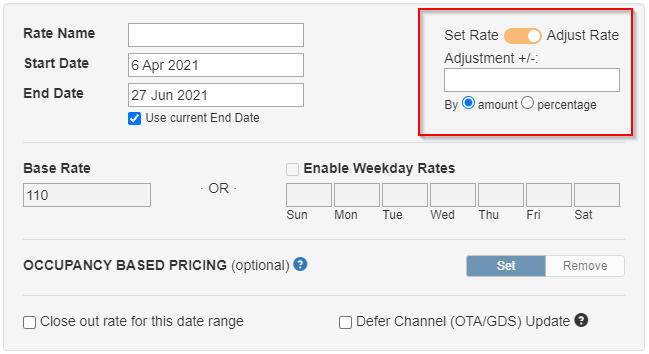
2.4 How to adjust rate values by dollar amount or percentage?
You can adjust a previously set rate value by dollar amount or percentage, e.g. to increase
the rate value for $10 or 5%, by clicking on the Adjust Rate switch, and enter the adjustment
value in the Adjustment +/- box.
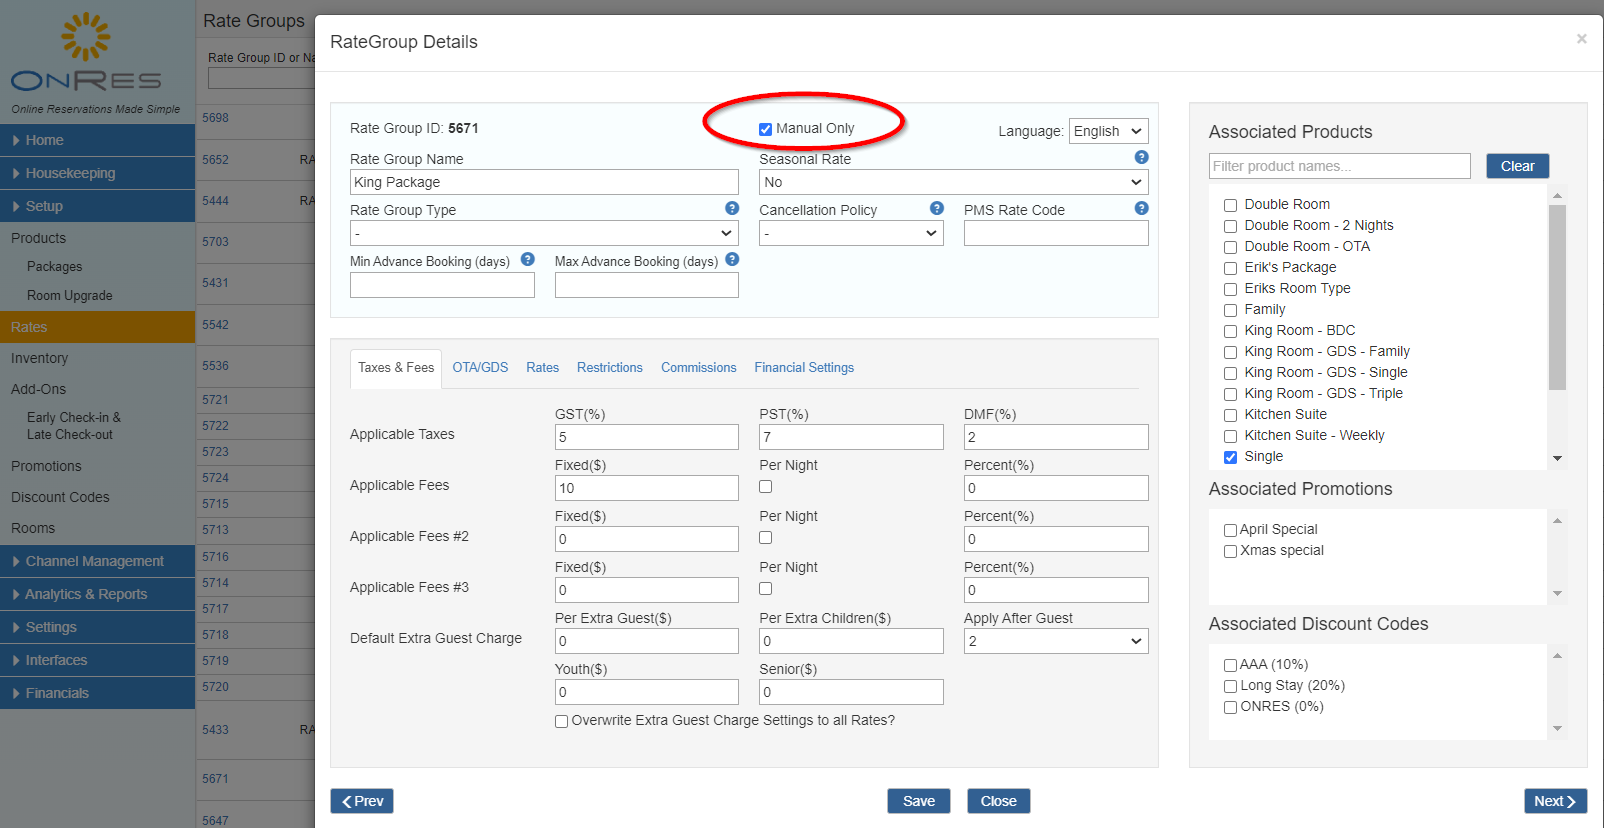
2.5 How to make a Rate Group bookable by manual reservation only?
Sometime you may want to have a rate group that is bookable from manual only and not visible
to guests from web search.
Go to Setup >> Rates, open the Rate Group Details window for the Rate Group of your choice,
check the Manual Only checkbox, and press Save. Now this rate group is no longer visible to
the guest booking, but you can still select it when you book a reservation manually.
2.6 How to set up LOS Based Pricing?
LOS (Length-of-Stay) based pricing is useful when you want to setup rates based on the guest's
length of stay, e.g. weekly rates, monthly rates, etc.
Traditionally we can create multiple rate groups attached with different LOS restrictions to
achieve this. e.g. see Section 4.1 below.
Now we have an easier way to manage different LOS settings in one Rate Group.
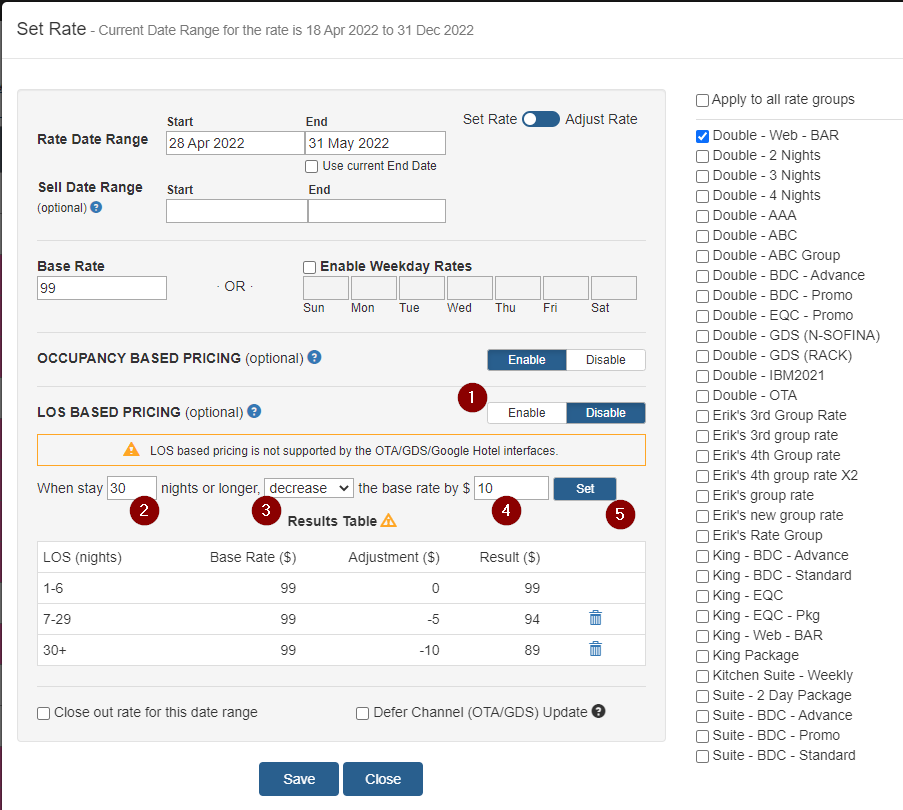
Step 1: -
Click the Enable button to enable LOS based pricing for this rate group
Step 2: -
Enter the minimum number of nights that is applicable to this price. E.g. for weekly rate, enter 7.
Step 3: -
Select "decrease" or "increaes" to deduct (or add) the offset amount (set in Step 4) to the Base Rate. E.g.,
If you would like the weekly rate to be $5 cheaper than the base rate, choose "decrease".
Step 4: -
Enter the offset amount based on the Base Rate. E.g.,
If you would like the weekly rate to be $5 cheaper than the base rate, enter 5.
Note: DO NOT enter a negative value.
Step 5: -
Press the SET button to add the setting to the list below, and review the Results Table. Note that
this table only demonstrates the offset amount based on the Base Rates. If Weekday Rates or
Occupancy Based Rates are in effect, the actual value after adjustment may be different from
what's showing in this table.
For example, if the Base Rate is $99 for 2 guests, $109 for 3 guests, then when the weekly rate is
set to be $5 cheaper, the actual resulting price is $94 for 2 guests and $104 for 3 guests. The actual
results for 3 guests will not be showing in the Results Table, but the guests will see the actual
result when they search online.
Note 1:
the system supports multiple LOS values to be set in one rate group.
E.g., you can manage your daily, weekly and monthly rates in one rate group.
Just repeat Step 2-5 above to add the LOS settings into the list.
Note 2:
LOS based pricing is NOT supported by the OTA/GDS interfaces. The system does not allow
LOS based pricing to be set to OTA/GDS rate groups.
3. Rates & Restrictions Manager - Managing Restrictions
Clist on the Rates & Restrictions tab under the Home section on the left side of the navigation menu to open
the Rates & Restrictions Manager page, where the restrictions for any date(s) can be viewed and set here.
3.1 How to view Restrictions?
Click on the  to
show the daily restrictions on the grid.
to
show the daily restrictions on the grid.
Or hover the mouse onto a date block to see the restriction on the particular date on the
pop-up.
E.g. 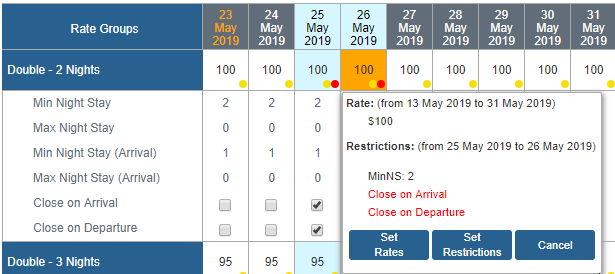
3.2 How to set restrictions?
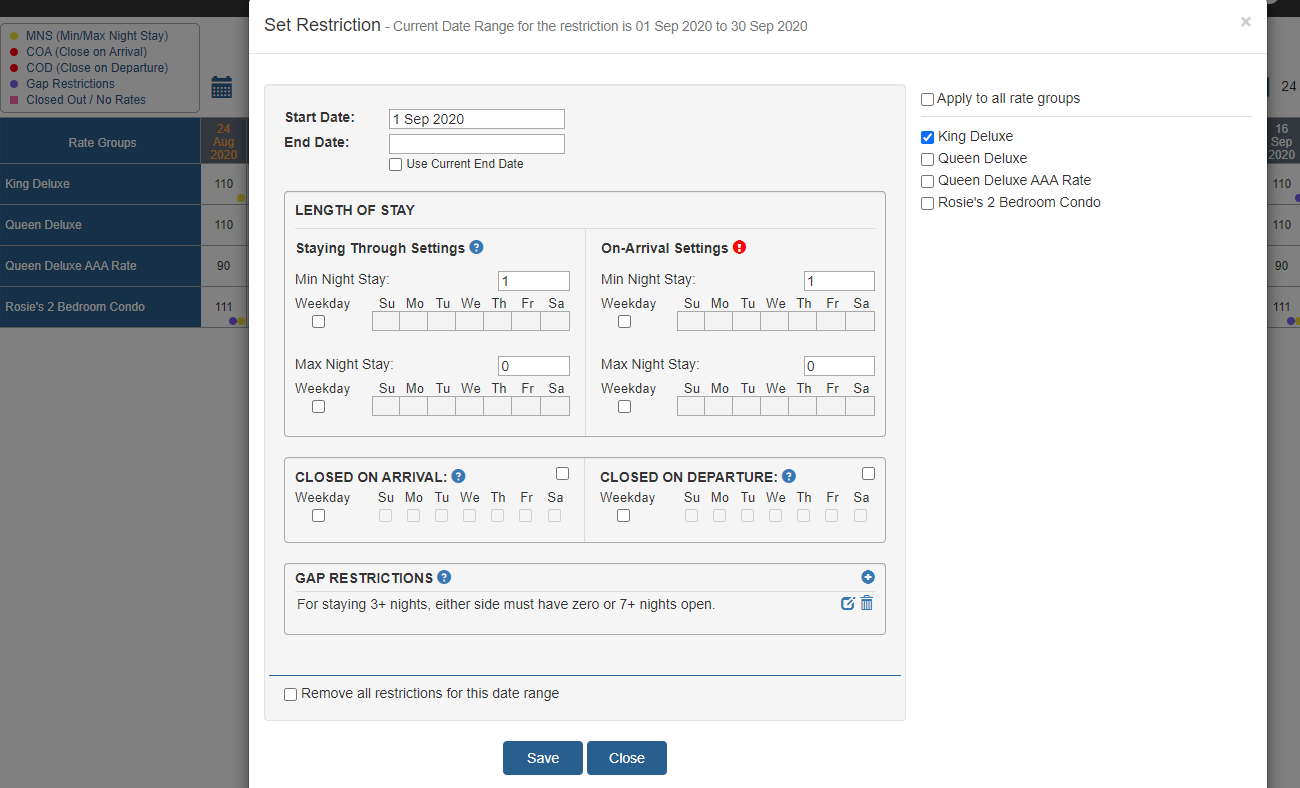
Select Date(s) - Hover or click on the a date block on the grid as the start date, or
Drag and Select a range of dates, and choose Set Restriction
button in the pop-up
At the Set Restriction pop-up window - set the starting and end dates. If there is already a
restriction set on a date range previously, and you are going to replace the restriction with
the original date range, you can also check the "Use current End Date" checkbox, which will
populate the current end date into the field.
Restrictions can be set as a flat value during the period or as a per day-of-week basis, if the
Enable Weekday Restrictions checkbox is checked.
Remove all restrictions for this date range - once the checkbox is checked, the restrictions
in the date range will be deleted.
Batch Update - The same date range and restrictions can be applied to multiple rate groups
in a batch update as needed. Just select all applicable rate group(s) on the right side list
before Saving. Note that Filtering selection also applies to the list of rate groups showing
in this popup window
3.3 What kind of restrictions can I set?
Min Night Stay / Min Night Stay on Arrival
Set the minimum number of nights that the guest has to stay for the reservation. You can set this
number per weekday by toggling on the "Enable Weekday" checkbox, and enter the proper number of
nights in the boxes for each weekday.
Min Night Stay "On Arriaval" means that this restriction is applicable to reservations
with Check-in date on the dates selected.
For example, if you want to make sure all reservations starting on Saturday have a minimum 2
nights restriction, you can
- Toggle ON the Enable Weekday checkbox for Min Night Stay
- Set the box for Saturday to 2, and leave the rest of the weekdays to 1
E.g. 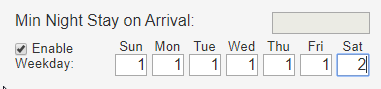
Max Night Stay / Max Night Stay on Arrival
Set the maximum number of nights that the guest can stay for the reservation. You can set this
number per weekday by toggling on the "Enable Weekday" checkbox, and enter the proper number of
nights in the boxes for each weekday.
Note: Setting this field to 0 means No Restrictions.
Max Night Stay "On Arriaval" means that this restriction is applicable to reservations
with Check-in date on the dates selected.
For example, if you want to make sure all reservations starting on Monday cannot stay for longer
than 4 nights, you can
- Toggle ON the Enable Weekday checkbox for Max Night Stay
- Set the box for Monday to 4, and leave the rest of the weekdays to 0
Closed On Arriaval - Disallow reservations to check-in on the selected dates. You can set
this restriction per weekday by toggling on the "Enable Weekday" checkbox, and toggle on
the check boxes for the specific weekday(s) that you want to close.
Closed On Departure - Disallow reservations to check-out on the selected dates. You can set
this restriction per weekday by toggling on the "Enable Weekday" checkbox, and toggle on
the check boxes for the specific weekday(s) that you want to close.
Gap Restrictions (B&B Mode accounts only) -
allow you to limit the number of open nights (gap or no gap) between each reservation
(See next questions for details).
3.4 What is Gap Restriction?
Gap Restrictions allow you to limit the number of open nights
(gap or no gap) between each reservation. This helps to avoid leaving short unbookable dates
between reservations.
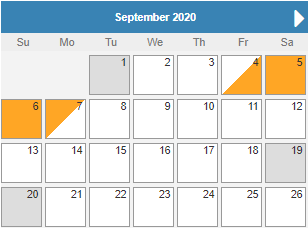
For example, suppose Sept 1st and Sept 19th are both booked. When a guest is trying to book 3 nights
between these two dates, and you have a Gap Restrication in place that requires a minimum gap of
7 nights on either sides (before and after the reservation), then the following 3 cases satisfy
the rule, while the last 2 cases don't.
(Note: it's implied that "no gap" is always allowed)
Start on Sept 2nd - no gap on one side, 14 nights open on the other side -
OK
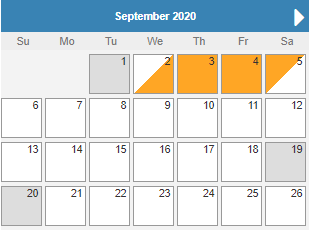
Start on Sept 16th - no gap on one side, 14 nights open on the other side -
OK
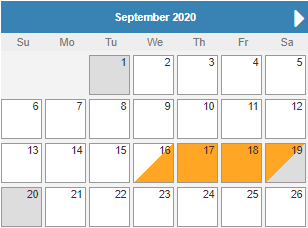
Start on Sept 9th - 7 nights open on the both sides -
OK
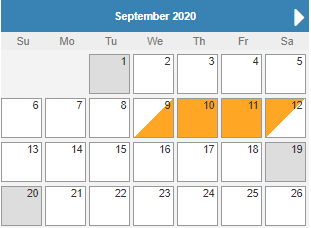
Start on Sept 4th - 2 nights gap on one side, 12 nights on the other side -
NOT OK
When the system can't find any availability due to the Gap Restrictions, your guests will see the
following message on the Search Result age. If within +/- 2 days of the
guest's original Start Date there are available dates that would satisfy the Gap Restrictions,
the system will show these suggested dates in the message as well.
See example screenshot:

Note: The Gap Restrictions feature is only available to B&B mode properties (there is only one
room available for each room type). And it is NOT supported by OTA / GDS interfaces.
3.5 How to set Gap Restrictions?
Similar to setting other restrictions, you can set Gap Restrictions at the
Set Restriction popup window.
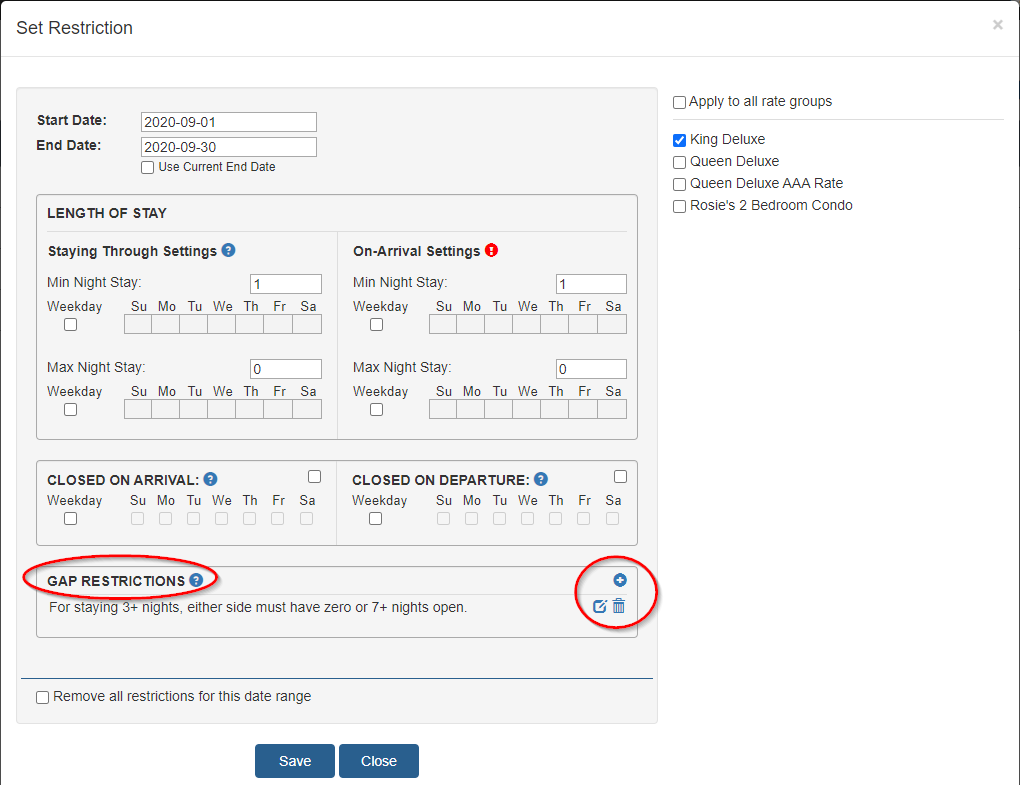
Then click on the button to create a
new rule, or the button next to existing
rule to edit it, or the button to delete it.
Then follow the steps:
Step 1 - Condition
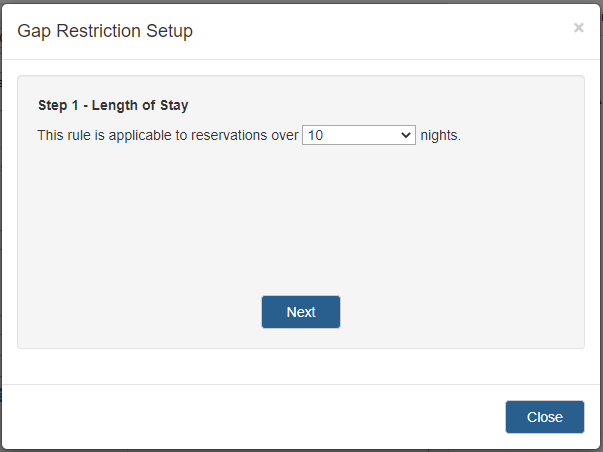
Step 2 - Gap Rules
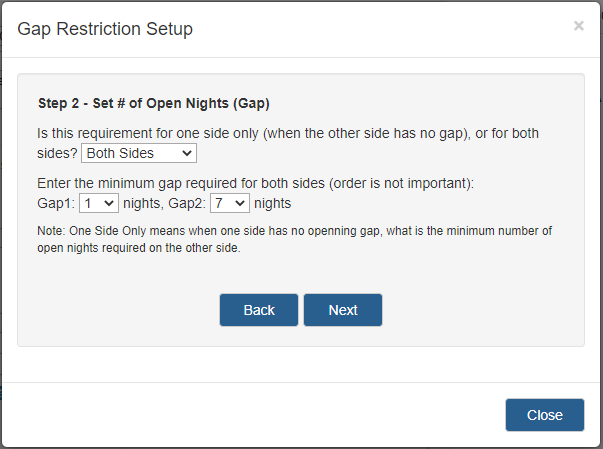
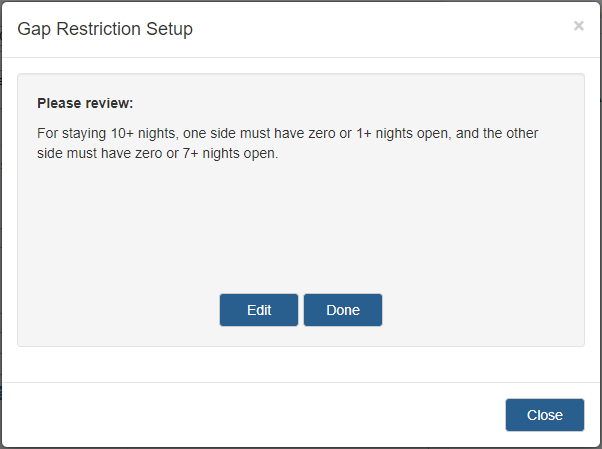
Step 3 - Review Changes
You can set multiple rules, where each rule is associated with a Condition (e.g.
a Minimum Night Stay) that specifies when is this rule applicable.
For example, the following 3 rules will cover 3 different scenarios:
- For staying any # of nights, either side must have zero or 7+ nights open.
- For staying 3+ nights, either side must have zero or 5+ nights open.
- For staying 10+ nights, one side must have zero or 1+ nights open, and the other side
must have zero or 7+ nights open.
Evaluation of the rules:
- For each rule, if the searched dates meets the Condition of a rule,
- then this rule is considered APPLICABLE;
- otherwise, it is considered NOT APPLICABLE.
- If none of the rules is applicable, then the searched dates will PASS.
- For each applicable rule, if the searched dates satisfy the gap requirements in this rule,
then this rule is satisfied.
- If any of these applicable rules is satisfied, then the searched dates will PASS;
- Otherwise, if there are applicable rules, but none of them is satisfied, then the searched
dates will NOT PASS.
4. Miscellaneous
4.1 How to setup Daily, Weekly or Monthly rates?
Note: if you are setting these Daily, Weekly or Montly rates for web rates only
(i.e. NOT for OTA/GDS), you can use the LOS Based Pricing feature to achieve this
(see Section 2.6 above). Otherwise, please follow the guide below.
If you want to have different Daily, Weekly and Monthly rates for your product, you can do
this using proper restriction settings.
First, create three rate groups and link them to your product. Name them respectively: e.g.
- Queen - Daily Rate
- Queen - Weekly Rate
- Queen - Monthly Rate
You can create the Daily Rate first, then copy and save them into the other two
(see Section 1.2 above)
Please note, all rate entries must be set on Per Night basis.
Then go to the Rates & Restrictions Manager and set the "Leng of Stay" Restrictions for each of these rate
groups as follows:
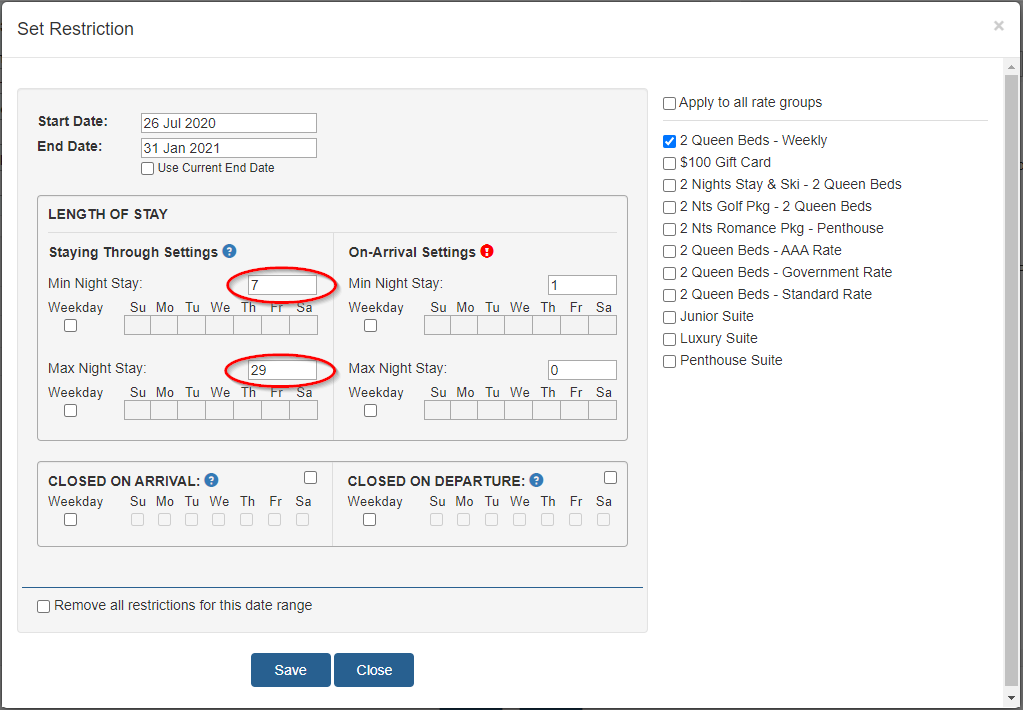
- Daily Rate - set Min Night Stay to 1, and Max Night Stay to 6
- Weekly Rate - set Min Night Stay to 7, and Max Night Stay to 29
- Monthly Rate - set Min Night Stay to 30, and Max Night Stay to 0 if there is no max
This way, when guests search for a room for less than 7 days, only Daily Rate will show up in the
search results. When search for 7 - 30 days, only Weekly Rate will show up in the search results.
When search for 30+ days, only Monthly rate will show.
Here is an example Restriction settings for the Weekly Rates: