Contactless and Upselling
OnRes supports contactless guest check-in and check-out, and provides opportunities for upselling during
the process, e.g. room upgrade, early check-in, and add-on selling during the guest check-in process, and
late check-out or extending a night during the guest check-out process.
1. Contactless Check-in
1.1 How does contactless check-in work?
As shown in the following diagram, the Contactless check-in process includes the following steps:
- Pre-Check-in
- Room Assignment
- Check-in

Pre-Check-in
In the early morning of the check-in date, the system sends an Pre-Check-in email (and a SMS if it's enabled)
to the guest. The guest
clicks the link in the email (or SMS) and logs into the system, where the guest is provided by the following
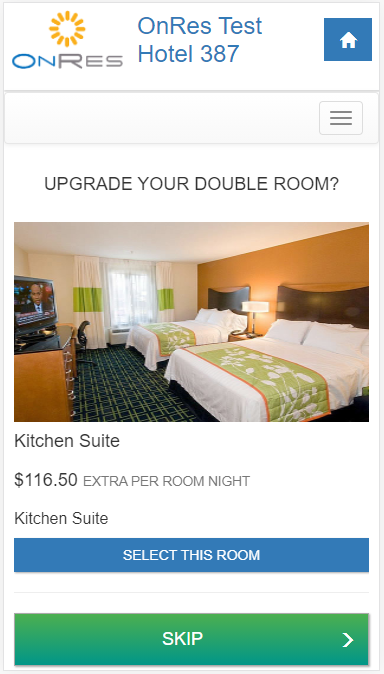
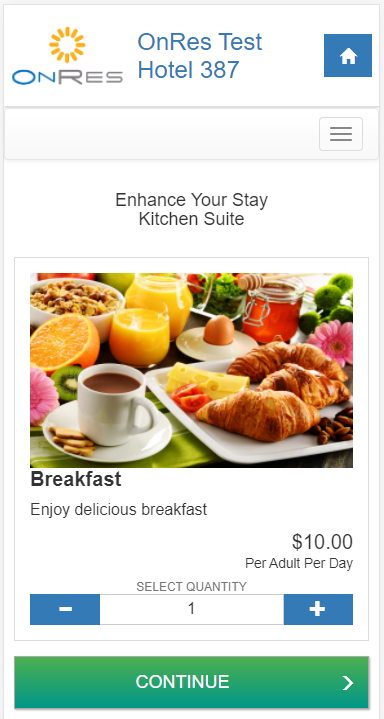
upselling options (if availability allows) while confirming the pre-check-in status:
- Room upgrade
- Early Check-in options
- Add-on items
The guest has the option to choose their preferred check-in time (including the Early Check-in times)
at a 30 minutes interval. The property also has an option to limit the number of check-in's per time
slot. If enabled, the guest will not be able to choose a time slot if it's already full (see
"How to setup guest check-in" section below for details).
When guest completes the Pre-Checked-in status, the system emails a confirmation to the guest and
a notification to the property.
Room Assignment
Upon receiving the Pre-Checked-in notification, the property can either manually assign a room or
let the system automatically assign a room to the reservation.
For automatically assignment, the system checks the availability of the room and its housekeeping
status every 15 minutes. If the guest has requested Early Check-in, the system will assign a room
as soon as there is a clean room available, and notify the guest via SMS text messages. Otherwise,
the system will make the room assignment at the designated check-in time. If for any reason, the
system is not able to assign a room by the designated check-in time, the system will notify
the guest to contact the property directly or check-in in person.
Check-in
At the designated time of check-in, the system sends an email and a SMS text message to the guest
to notify it's time to check-in. The guest then logs into the system from their mobile device, where
the guest views the assigned the room number, and fills and signs the digital Registration Card.
Once completed, the guest is confirmed to have checked in, then the guest can pick up their room
key from the front desk.
1.2 How to setup guest check-in?
Guest check-in related settings can be found under Settings >> Guest Account
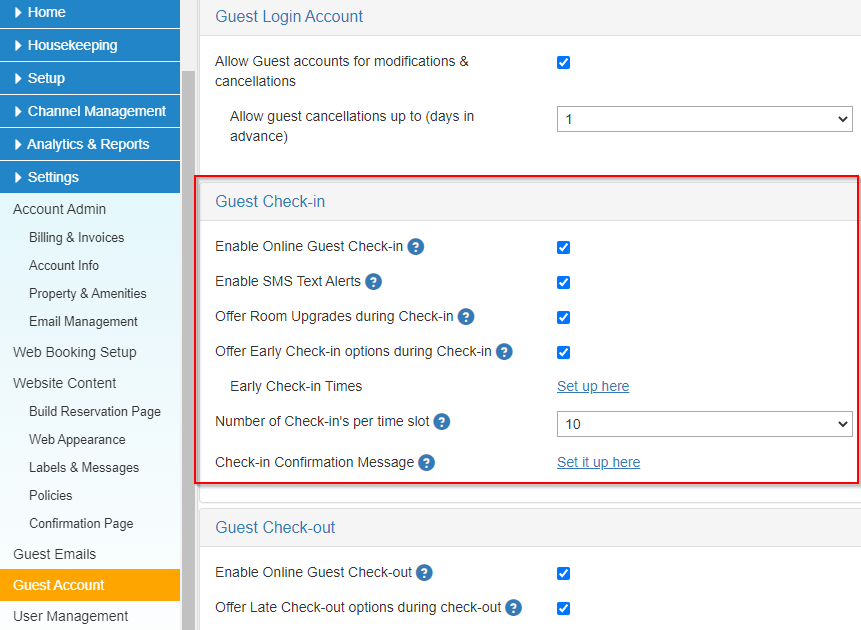
- Enable Online Guest Check-in
When enabled, the system will email guest in the morning of
the check-in date, prompting to start the online check-in process
- Enable SMS Text Alerts
When enabled, the system will not only email guests but also send
SMS text messages to confirm their Early Check-in requests or notify their check-in times
- Offer Room Upgrades during Check-in
When enabled, the system will provide Room Upgrade
options during Guest Pre Check-in. You will also need to set up Product Tiers in the Setup >> Room
Upgrades section (see "How to setup Room Upgrades" in the section below)
- Offer Early Check-in options during Check-in
When enabled, the system will provide Early
Check-in (ECI) Time options during Guest Pre Check-in. You will also need to setup the Early Check-in
options under Setup >> Early Check-in / Late Check-out
(see "1.3 How to setup Early Check-In & Late Check-Out Times?" at this
Help Page for details)
- Number of Check-in's per time slot
Limit the max number of Guest Check-in's that the system is allowed to process per time
slot (30 minutes). If set, when the a time slot is full, the system will stop offering this Check-in
time to future Pre Check-in's on that day
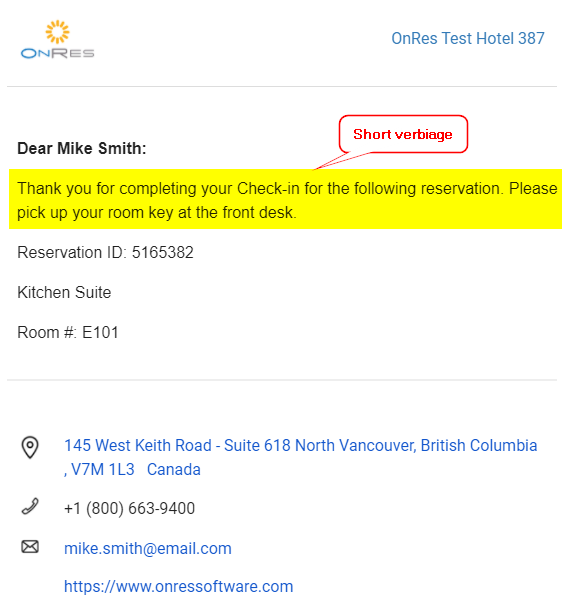
- Check-in Confirmation Message
Set a short verbiage to instruct guests who just finished check-in online for next steps.
E.g. "Please pick up your key at the front desk". No need to provide greeting or property
name and contact information, as they will be provided by the system. See example below:
1.3 How to setup Room Upgrades?
Room Upgrades are set up at Setup >> Products >> Room Upgrade
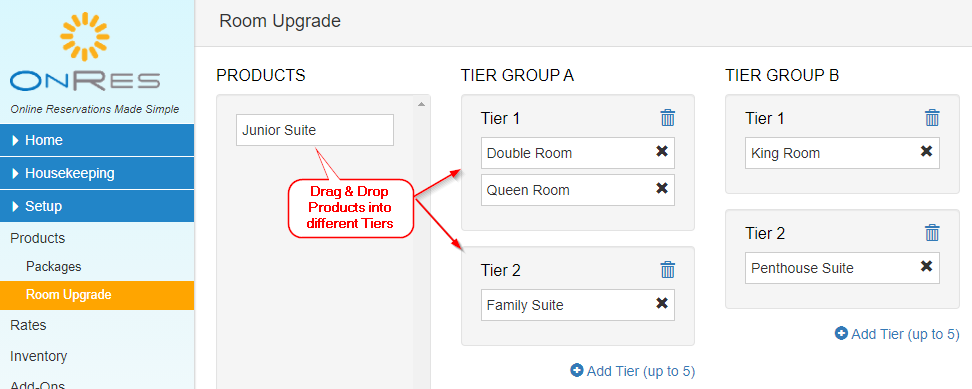
Drag and drop the Products into different Tiers to provide options for guests to
upgrade their room from a lower tier to a higher tier during the Pre-Check-in process.
Upgrades are offered for the lower tier to higher tier within the same Tier Group only.
For example, a product in Tier 1 of Tier Group A can be upgraded to a product in Tier 2, 3, ...
of Tier Group A, but not any one in Tier Group B.
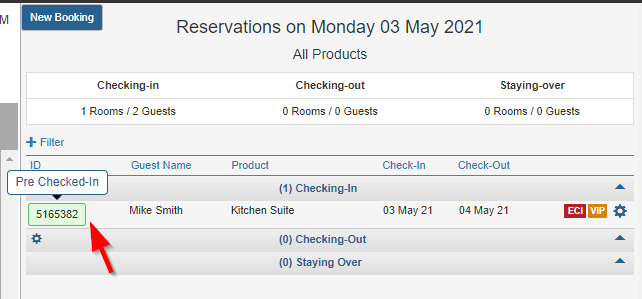
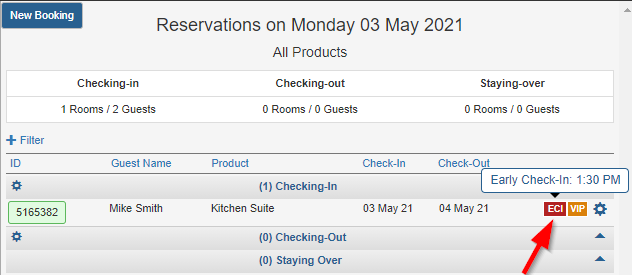
1.4 How do I know if a guest has Pre-Checked-in or requested Early Check-in?
The reservation status is indicated by the reservation buttons background color, and look for
the "ECI" indicators
In Reservation Manager:
In Rooms Manager:

In Housekeeping >> Room Status:

1.5 How much revenue is generated by upselling?
You can find the upselling revenue report in the Analytics & Reports >> Upsell Report section
2. Contactless Check-out
2.1 How does contactless check-out work?
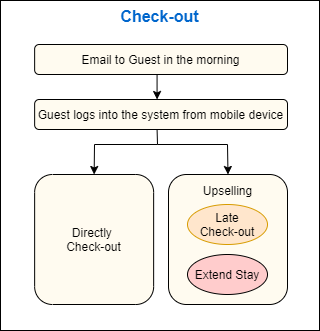
As shown in the above diagram, the Contactless check-out process includes the following steps:
- Email to Guest in the morning of the day of check-out
- Guest logs into the system from their mobile device
- According to configuration and availability, the system offters the option to either check-out later
(purchase a Late Check-out), or extend their stay for up to 2 nights.
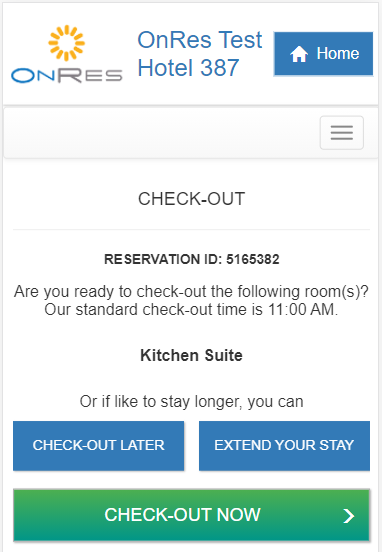
- Direct Check-out
If the guest chooses to check-out directly and confirms the charges, a check-out confirmation email
with receipt attached will be sent to the guest, and a notification email will be sent to the property.
- Late Check-out
If the guest chooses to check-out later, the system will calculate the new charge and prompt the guest
to confirm. Once confirmed, a check-out confirmation email indicating the Late Check-out time with
receipt attached will be sent to the guest, and a notification email will be sent to the property.
Note: Late Check-out is only offered when the number of available rooms on the day of check-out reaches
certain threshold, which is configured in Settings >> Guest Account section (see "How to setup guest
check-out?" section below)
- Extend Stay
If the guest chooses to extend their stay, the system will calculate the new charge and prompt the guest
to confirm. Once confirmed, a confirmation email indicating the new chenck-out date will be sent to the
guest, and a notification email will be sent to the property.
2.2 How to setup guest check-out?
Guest check-out related settings can be found under Settings >> Guest Account

- Enable Online Guest Check-out
When enabled, the system will email guest in the morning of the check-out date, prompting to start the
online check-out process
- Offer Late Check-out options during check-out
When enabled, the system will provide Late Check-out (LCO) Time options during Guest Check-out.
You will also need to setup the Late Check-out options under Setup >> Early Check-in / Late Check-out
(see "1.3 How to setup Early Check-In & Late Check-Out Times?" at this
Help Page for details)
- Min Availability when stop selling Late Check-out
Set minimum availability for each inventory product - System will stop selling LCO if the availability
is lower than this limit
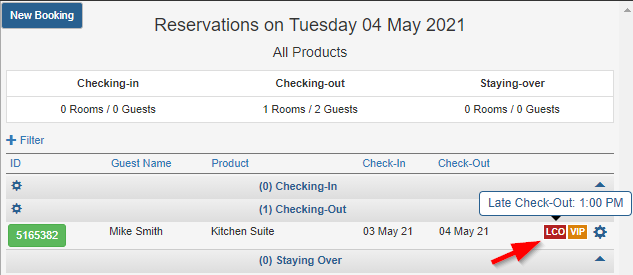
2.3 How do I know if a guest has requested Late Check-out?
It's indicated by the "LCO" indicators.
In Reservation Manager:
In Rooms Manager:
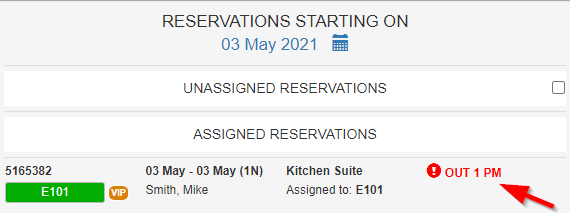
In Housekeeping >> Room Status:

3. SMS Communications
3.1 Which communications are through SMS?
Once this feature is enabled, the guest will receive SMS messages in addition to emails for the following communications:
- Reservation Confirmations - once the reservation is confirmed by the system, the guest will receive a short SMS with brief details about the reservation.
Professional and Enterprise accounts will also receive a link to view the full reservation details online.
- Pre-Check-in notification - in the morning of the check-in day, the sytsem will send pre check-in notifications for eligible accounts via SMS messages.
- Early Check-in confirmation - if the guest purchased Early Check-in during pre check-in, the guest will receive Early Check-in notification via SMS to notify
whether the Early Check-in request is confirmed and when the room is ready.
- Check-in time notification - when it's time to check-in, the guest will receive notification via SMS with a link to access the online check-in process
- Check-out notification - in the morning of the check-out day, the system will send check-out notifications to the guests, providing options for Late Check-out
purchases or extending their stay options if applicable.
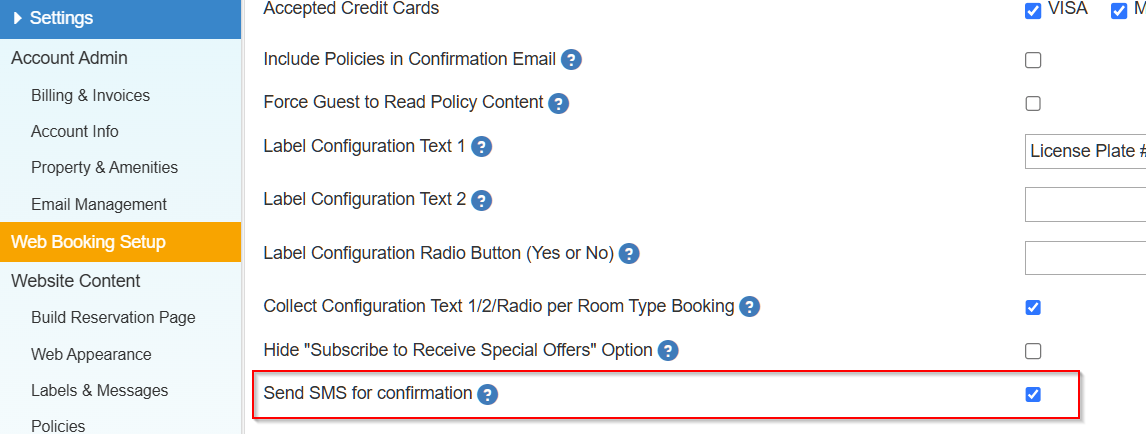
3.2 How to enable SMS communication?
Go to Settings >> Web Booking Config then toggle the "Send SMS for confirmation" checkbox to enable SMS communication.