Financial System
1. Overview
1.1 What does the Financial System do?
OnRes Financial System allows you to manage all financial aspects of your hotel operation,
such as processing advance deposits, guest billing, and revenue posting, payments processing,
and financial reporting. More specifically, it provides the following functionalities.
- Manage Guest Bills (Folios)
- Post charges (room charge, add-on, laundry, etc) to a folio manually or automatically
(by the automated Night Audit process)
- Generate seperate bills for Guests, Companies and/or Travel Agents
- Transfer bills to pre-approved Accounts Receivable accounts
- Generate Invoices/Receipts based on Folios
- Track the posting records in the three ledgers: Advanced Deposit Ledger, Guest Ledger, and
the Accounts Receivable (A/R) Ledger.
- Manage Payments
- Supports multiple payment types, including cash, cheque,
credit cards and debit cards
- Supports two credit cards on file
- Supports Direct Billing to pre-configured Accounts Receivable (A/R) accounts
- Integrate with Payment Gateway for automatic payment processing
- Track financial transactions and produce financial reports
- Provides Financial Journals
- Produce payment reports
- Produce ledger verification reports
1.2 Get Started
To use the Financial System, start with the following steps. Please read through
the HELP sections below for details.
- Configure the Financial System
- Enable the automated Night Audit process
- Learn how to manage guest billing (Folios)
- Learn about various financial reports
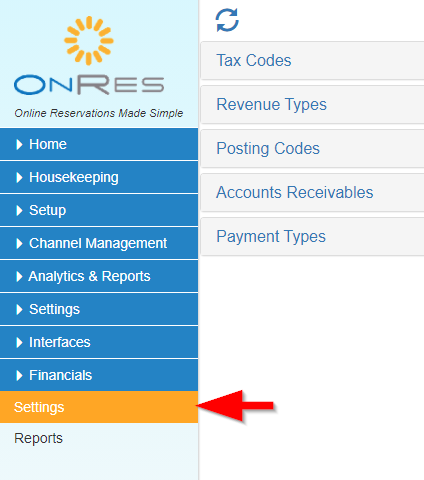
2. Configurations
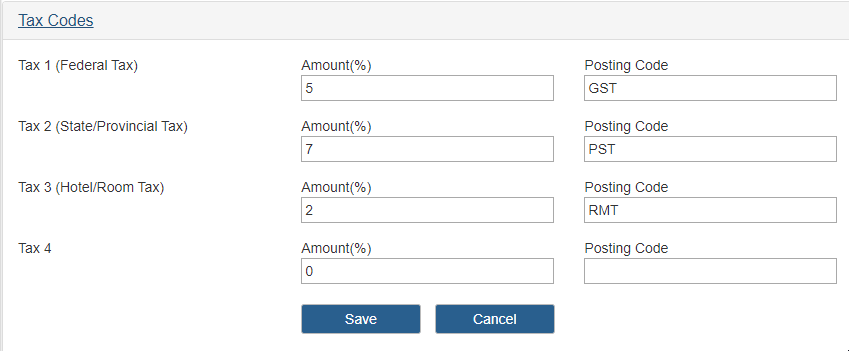
2.1 Tax Codes
Set up the Tax Codes at Financial >> Settings page
Tax Codes are used to generate tax postings based each time a posting code to
which the tax code is attached is used. All taxes will be posted as an additional charge,
i.e. they appear as a separate entry in the financial jounal and separte line items on the invoice/receipt.
OnRes supports up to 4 taxes. Each one is associated with a unique Posting Code.
For any entry that is not needed, leave the Amount and Posting Code sections empty.
Note: all codes must be letters, numbers and dashes (or underscores) only, max 15 characters,
no space is allowed
2.2 Revenue Types
Revenue Types are used to group Posting Codes for the Management Report.
Typical Revenue Types are: Room, F&B, Laundry, Telephony, PayTV, etc, but you can also create more
detailed types as needed, such as:
Instead of just Room, you can create Corporate Room Revenue, Group Room Revenue, Transient Room Revenue etc.
Instead of just F&B, you can go with
Room Service Breakfast, Room Service Lunch, Room Service Dinner, Room Service Night, BuffetRest Breakfast,
BuffetRest Lunch, BuffetRest Dinner, FancyRest Lunch, FancyRest Dinner, MiniBar, Lobby Coffee,
Lobby HighTea, Bar Lunch, Bar Dinner, Bar Night, etc.
Different reports can be produced based on these revenue types.
Note: all codes must be letters, numbers and dashes (or underscores) only, max 15 characters,
no space is allowed
To add new code, click on the Add Code button
To edit an existing code, click on the icon
To delete a code, click on the icon

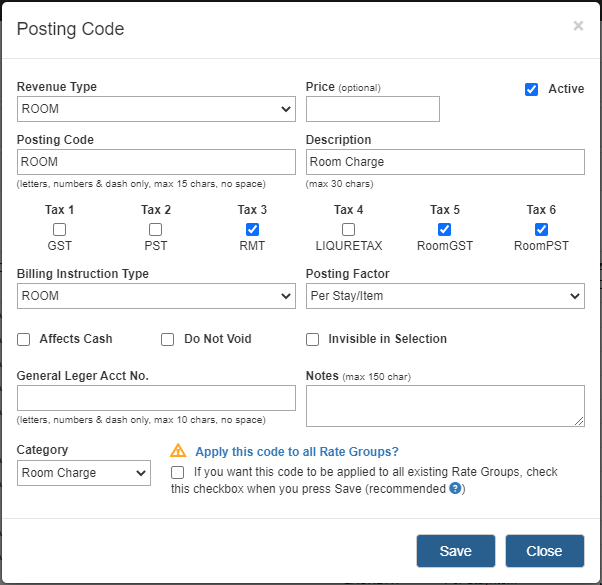
2.3 Posting Codes
Posting Codes are used to post charges on a folio. Different charges need different codes.
Here are some example codes that are typically used:
- Room Charges - typical codes can be "ROOM", or "10001"
- Breakfast - typical codes can be "BFST", or "10002"
- Laundry - typical codes can be "LDRY", or "10003"
- Bar Charges - typical codes can be "BAR", or "10004"
- Paid Out - typical codes can be "PO", or "20001"
Note: all codes must be letters, numbers, dashes or underscores only, max 15 characters,
no space is allowed
To add new code, click on the Add Code button
To edit an existing code, click on the icon
To delete a code, click on the icon
Note: once a code has been used, i.e. charges have been posted with this code, it should never be
deleted to ensure an accurate audit trail.
Field Descriptions:
- Posting Code: unique alphanumeric code (with dashes or underscores) that identifies a revenue or tax
charge (max 15 characters)
- Description: short description (max 30 characters). Description will appear on the
invoices, receipts and reports
- Tax 1-4: check the checkbox for each tax that is associated with the posting code
- Billing Instruction Type: Billing Instructions are a set of rules defined to instruct the system
to transfer charges from a guest folio to another folio automatically. OnRes supports 5 pre-defined
instruction type codes: ROOM, BREAKFASST, LUNCH, DINNER, LAUNDRY.
Here you can set different Posting Codes
to the Billing Instruction Types that they belong. For example, you may have 3 different Posting Codes
for different types of breakfast: breakfast buffet, breakfast through room services and a take-away breakfast,
and you can set all 3 codes to the same Billing Instruction Type "BREAKFAST". Details about how Billing
Instructions work is described in a later section.
- Posting Factor: The options are: Per Stay, Per Night, Per Adult, Per Child, Per Adult Per Night,
and Per Child Per Night. The posting factor is used for Posting Codes associated with Add-on Items. When
set up properly,
the Night Audit process, which is responsible to post daily charges to the guest folio, uses the posting
factor to calculate the posting amount for the add-on items on the reservation.
For example, when a Posting Code "BREAKFAST" is
set with the factor "Per Adult Per Night", then the Night Audit process will calculate the amount by
multiplying the breakfast price by the number of adults and post it to the guest folio.
- Revenue Type: associate the posting codes to the Revenue Type configured in the previous section.
This allows the posting codes to be grouped by revenue type for the Management Report.
- Affects Cash: this is specifically for the PaidOut posting code.
Paid outs are transactions where cash is taken out of the cash drawer to pay for a specific item,
for instance the taxi fare for an arriving guest. To avoid posting a positive cash payment, a PaidOut
posting code should be created and used whenever cash is taken out of the cash drawer. The Affects Cash
checkbox should be checked for this specific posting code.
- Do Not Void: Certain postings should not be voidable. A paid-out for instance. When
cash was taken out of a till to pay something for a guest, the posting shouldn't be voided,
instead, the payment type “Cash” should be used to put money back in the cash drawer, because
voids are not shown on receipts, whereas “Paid out” and “Cash” are.
- Invisible in Selection: certain Posting Codes, used by the system, should perhaps never be used
manually. If this is checked, the code will not appear in the list of codes for manual posting
- General Leger Acct No.: for backoffice integration
- Notes: notes can be instructions on how to use the posting code and they show on the Posting window
as Posting Code Remarks. They do not appear on receipts.
- Category: categories are used by the system to group the charges for calculating subtotals to display
in cost summaries. For example, during the self check-out process (see the HELP page for
CONTACTLESS AND UPSELLING for details), there is a cost summary page
where subtotal of room cost, add-on cost, fee & taxes will be displayed. This category setting will help
the system to group the costs and display them correctly.
Current categories are: Room Charge, Add-on Charge, and Applicable Fee.
If this posting code doesn't belong to any of these three category, leave it blank.
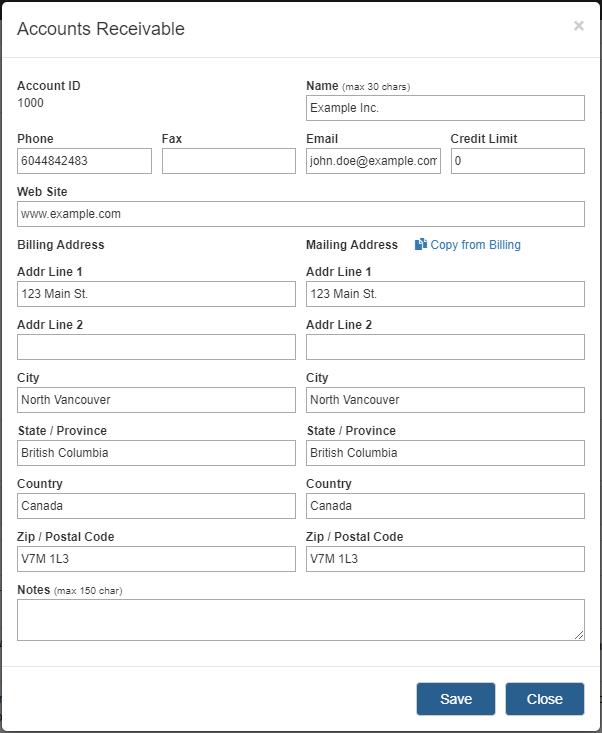
2.4 Accounts Receivable Accounts
Accounts Receivable Accounts identify companies and travel agents that have been deemed credit worthy
by the hotel. Once the A/R account has been created, the A/R Account ID is attached to the company or travel
agent profile in Contact Manager. When a reservation is created for which the company or agent has
indicated they will pay some or all of the charges, the company or agent profile needs to be entered on
the reservation so the reservation is associated with the A/R Account ID (A/R Acct #) (See Section 4.9
for details). This allows you to create a folio for the company or agent which can then be transferred to
Accounts Receivable using the Direct Billing payment method at the end of the guest’s stay.
On the A/R account a Credit Limit can be entered. This is currently informational only and will play
a role once we implement our own A/R module.
When generating a receipt for a Company or Travel Agent, the billing address on the A/R account will
appear on the folio if an A/R account ID is associated with the Company or Travek Agent.
To add new account, click on the Add Account button
To edit an existing account, click on the icon
To delete an account, click on the icon
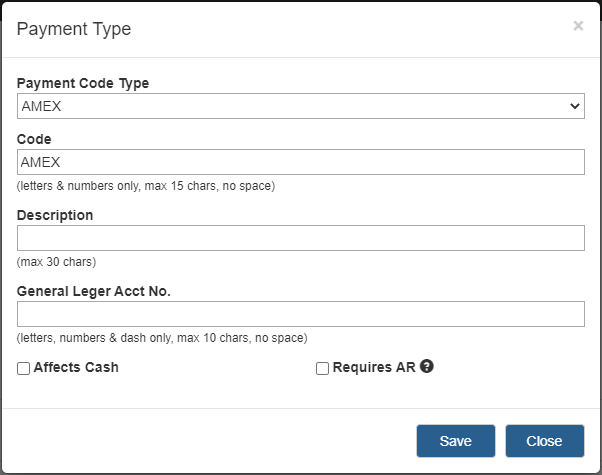
2.5 Payment Type Codes
Payment types are used to process a payment to a folio. Typical examples are:
Cash, Visa, Master, Amex, Diners, Direct Bill (if you allow credit to any A/R account).
For cash payment types, check the Affects Cash checkbox, so this includes cash, cheque and any
foreign currency payment type you may want to create.
Although not exactly a payment type, to be able to close a bill so the guest can be checked out,
a payment type should be created for Direct Billing. This payment type will transfer the balance of a
folio to Accounts Receivable for collection. Please check the Requires A/R checkbox for the Direct
Billing payment type.
For credit card payment types, check the Is Credit Card checkbox. This will invoke the
functionality that is needed to process Credit Card payment when such a payment type is used
To add new code, click on the Add Code button
To edit an existing code, click on the icon
To delete a code, click on the icon
Note: all codes must be letters, numbers, dashes or underscores only, max 15 characters,
no space is allowed
2.6 Associate Posting Codes to Rate Groups
Important: In order for the Night Audit process to post room charges to the folios, you must associate a Posting
Code to every Rate Group. If you have Applicable Fees set up in your account, you must associate
a Posting Code to the fees as well.
You can set this globally (to all Rate Groups at once) when configuring the Posting Codes.
First, set the Category to Room Charges, then a question with a checkbox will appear:
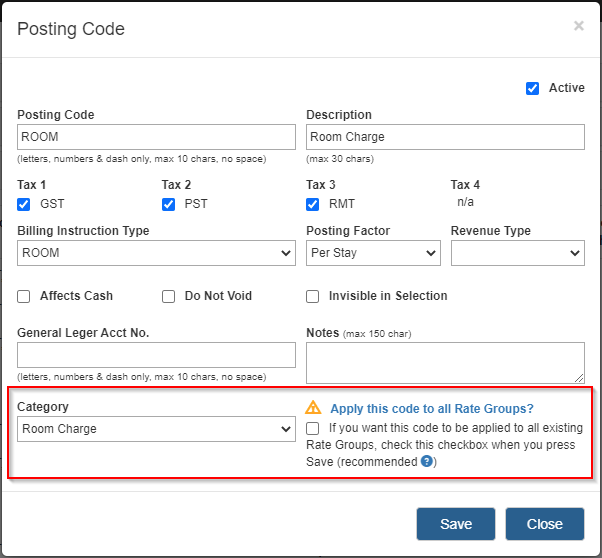
Then make sure the checkbox is checked when you save this posting code. The system will apply this code
to all existing Rate Groups. If any Rate Group has a different posting code associated already, it will
be overwritten.
Similarly, if this posting code has a category of "Applicable Fee", then you can apply this code to
all Rate Groups at once by checking the checkbox for the question
"Apply this code to all Rate Groups with Applicable Fee?" before you save.

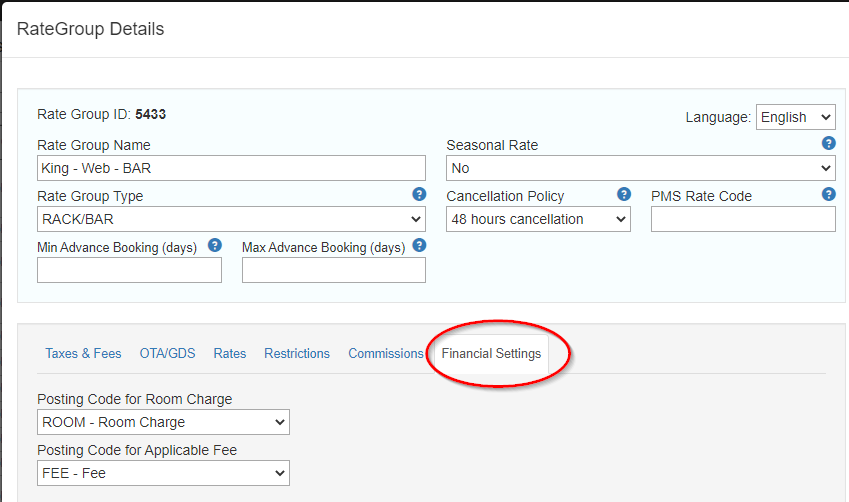
Note: if you would like to associate different Posting codes per Rate Group, perhaps with different
revenue type codes for more detailed reporting, you can do it through Setup >> Rates.
Open the Rate Group details window and set the Posting codes for Room Charge and Fees under the Financial
Settings tab
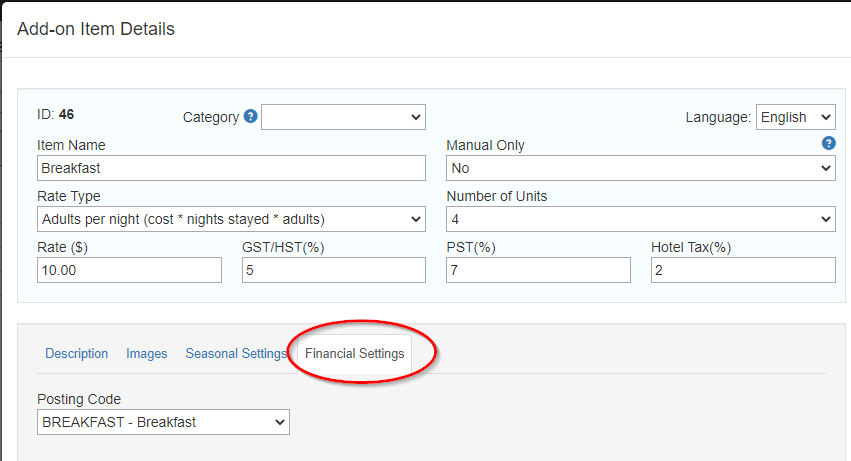
2.7 Associate Posting Codes to Add-on items
Important: In order for the Night Audit process to post add-on charges to the folios, you must associate
a Posting Code to every Add-on item.
You can do it at Setup >> Add-Ons. Open the Add-On Item details window and set the codes under the
Financial Settings tab
3. Night Audit
3.1 Enable Auto Nightly Audit
The Night Audit performs the following financial related tasks
- For each reservation that's checked-in, post room charges for the day
- For each reservation that's checked-in, post add-on item charges for the day
- Process Ledger Verification and generate verification report
It is important that night audit is done every night when there is no more check-in activity for the day.
While you can choose to run the audit manually every night, it is recommended to enable the automatic
Night Audit function so the system performs the task for you at the designated time.
The Night Audit feature can be accessed at Analytics & Reports >> Night Audit.
More details can be found at this HELP page

4. Manage Reservation Bills (Folios)
4.1 How to open / create a folio?
A default Folio is automatically created when a reservation is made. For a multi-room reservation, each room
has its own folio.
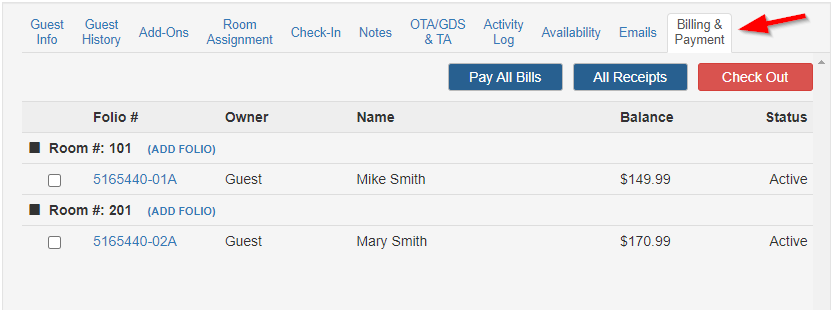
Open the Reservation Details window, the folio is under the Bill & Patments tab. Click on
the Folio # to open the Folio.
Create additional folios for a Company or Travel Agent
Sometimes you may want to create another folio for the room, e.g. you can post all room charges to
a folio for the company (whose profile is linked in the reservation), and all other charges,
such as food & beverage to the guest folio.
You can do that by clicking on the "ADD FOLIO" link button and select the owner of it.

The Folio IDs will follow the pattern of [RESERVATION ID]-[ROOM INDEX][A,B,..]. For example,
When you have two rooms in the reservation,
- the Folio ID for the default Folio of the 1st room will be XXXXXXX-01A
- the Folio ID for the 2nd Folio of the 1st room will be XXXXXXX-01B
- the Folio ID for the default Folio of the 2nd room will be XXXXXXX-02A.
- the Folio ID for the 2nd Folio of the 2nd room will be XXXXXXX-02B
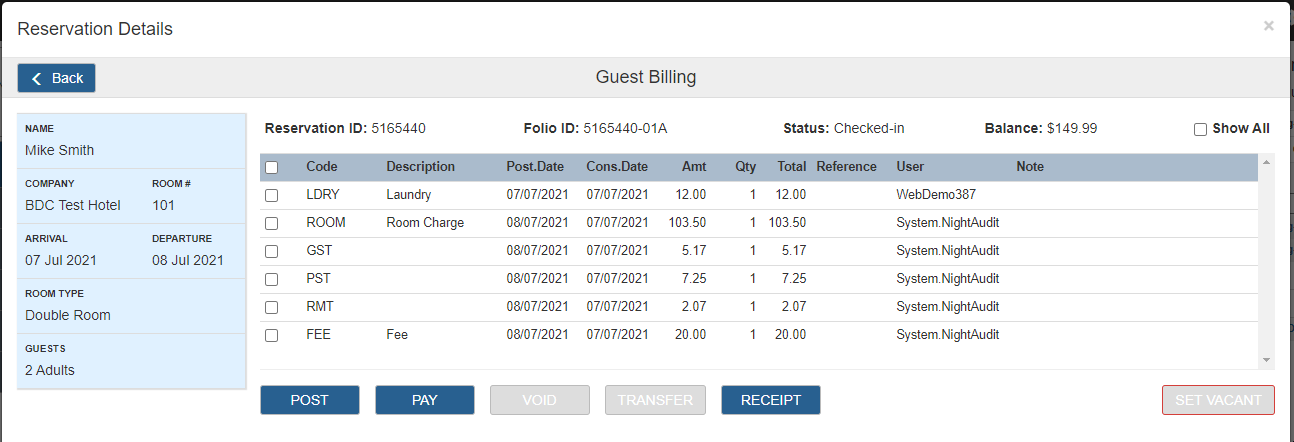
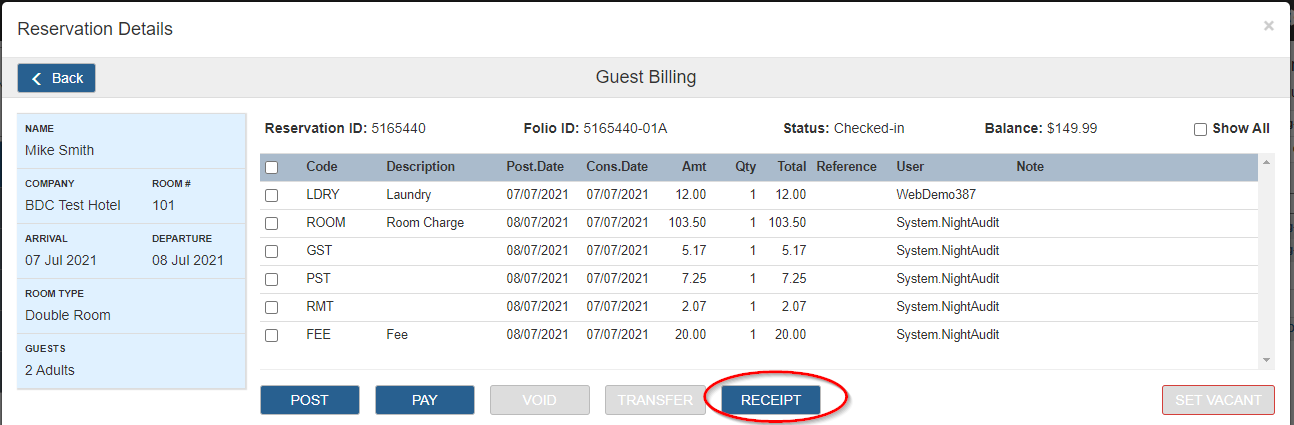
Once the folio is open, you can perform the following tasks:
- POST - post charges manually. Any incidental charges the guest incurs during their stay
can be added to the folio using this option.
- PAY - process payment.
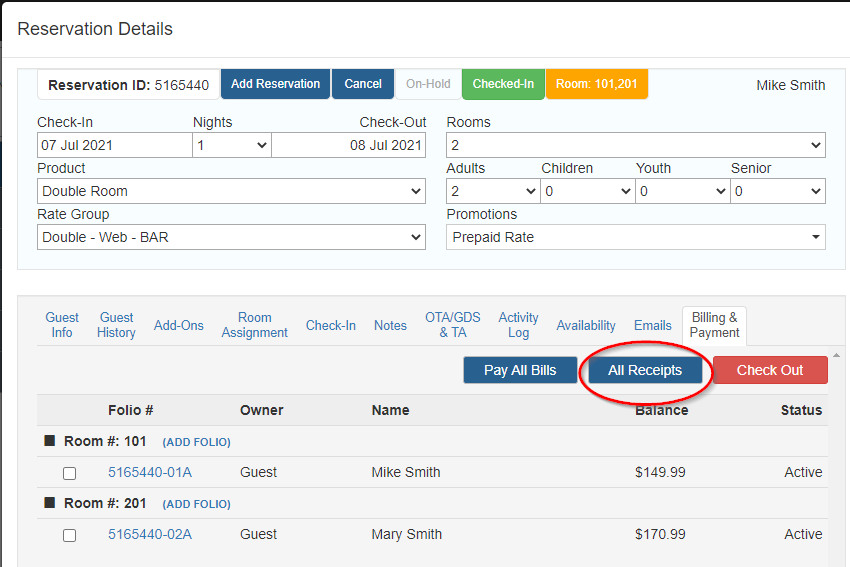
Note: when you have multiple folios, you can go back to the Reservation Details window and
click the Pay All Bills button to pay for all folios under the reservation
at once.
- VOID - void selected entries. Use this option to correct mistakes. Voided transactions do not show
on receipts, but they remain on the folio for audit trail purposes.
- TRANSFER - transfer selected entries to another folio
- RECEIPT - generate a receipt for this particular folio (for printing or emailing)
Note: when you have multiple folios, you can go back to the Reservation Details window and
click the All Receipts button to print all receipts for the reservation
at once.
- CHECK OUT - Check out the guest from the room.
Note: when you have multiple rooms in one reservation, this button will become
SET VACANT which sets the Housekeeping Status to VACANT for this room.
You can check-out all rooms at the Reservation Details window
4.2 How to post charges to a folio?
If the Night Audit is enabled with the Auto mode, the room and add-on charges will be posted to each
folio for every checked-in reservation automatically, but if the guest incurred any incidental charges, e.g.
a room service meal or laundry, you can open the folio and click the POST
button to post the charges manually.
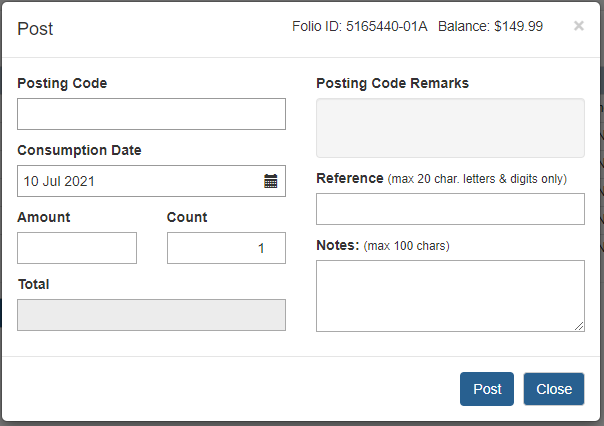
On the Post popup window, click on the Posting Code box and select a code from the list. You can type part
of the code to filter the list. Enter the Amount and Count, the system will calculate the total.
Note: since this is a manual post, the Posting Factors are not counted into the calculation.
For example, if you are posting a BREAKFAST with a Posting Factor of "Per adult per night", the posting
factor is counted into the calculation, so you must enter the actual # of breakfast purchased in the
Count field.
Reference - for auditing purposes, enter a ticket number, an external invoice number or
transaction number here. It will appear in the invoice/receipt.
Notes - you can enter notes related to this posting for internal use.
It will not appear in the invoice/receipt.
4.3 How to make payment?
Pay a single folio
Open the folio and click the PAY button to process payment for the folio
you just opened.
Pay all folios within the same reservation
At the Reservation Details window, click the Pay All Bills button
to process payment for all folios in this reservation.
Pay all folios within the Master Reservation
At the Master Reservation window, click the Pay All Bills button
to process payment for all folios in this master reservation.
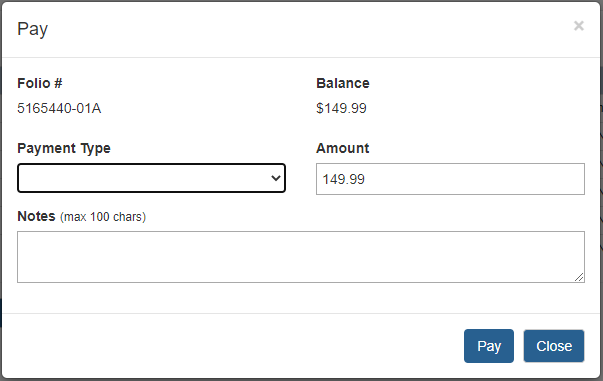
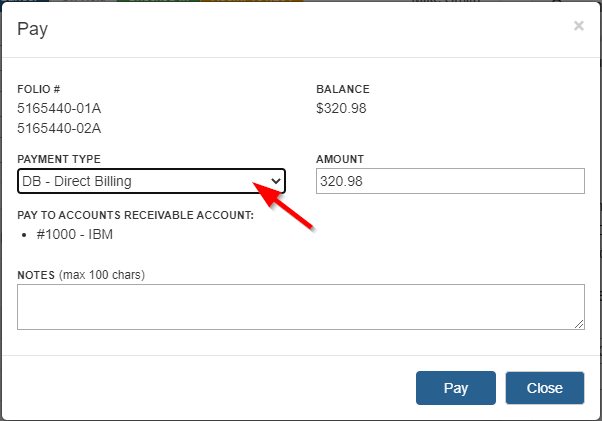
On the Pay popup window, select the Payment Type from the dropdown list.
When a credit card type is selected, the guest's credit card number will appear below for confirmation.
If there are 2 cards saved on the reservation, they will be listed as options for you to select which card
this payment will go to.
When this reservation is associated with a Company Profile or a Travel Agent profile that has an
Accounts Receivable (A/R) account associated, the Direct Billing option will be provided in the Payment
Types list.
If your account is linked to a Payment Gateway interface, when the Pay
button is clicked, the system will connect to the Payment Gateway and charge the card in real time.
Reference - you can enter something like an external invoice number or transaction number here.
When a Payment Gateway is connected, the transaction number will be recorded in this field.
Notes - you can enter some notes related to this payment for internal use.
It will not appear in the invoice/receipt.
4.4 How to void a posting?
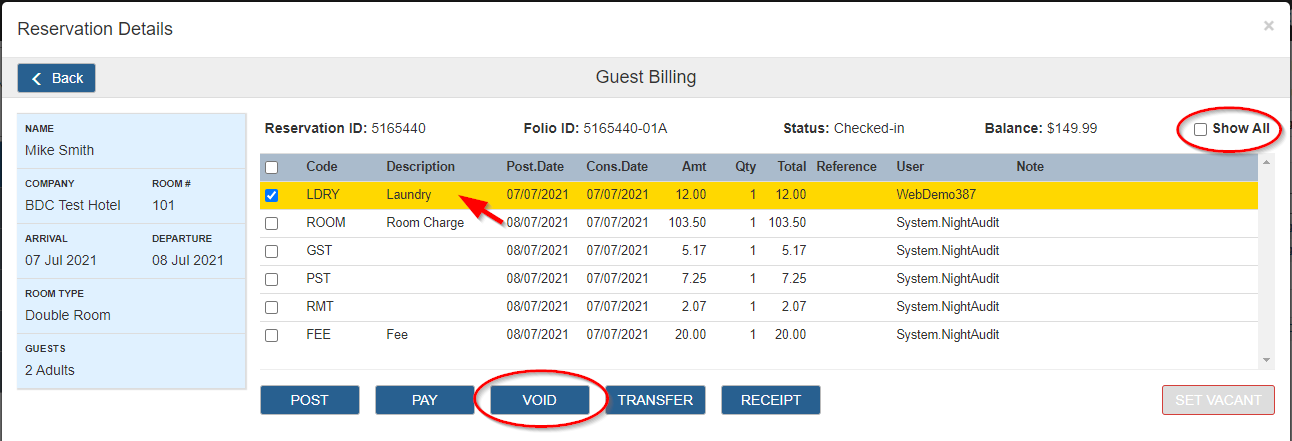
First, open the folio and select the entry that you would like to void. If there are tax entries
associated with the charge, they will be automatically selected too.
Then click on the VOID button to open the popup
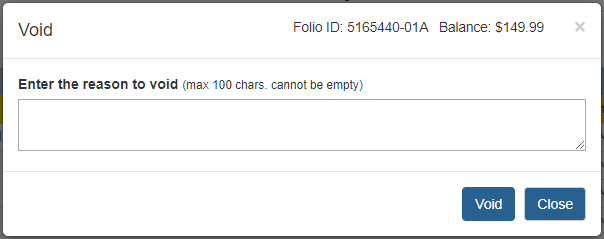
Then enter the Void Reason (mandatory) and click the Void button to proceed.
Voided entries will no longer show on Folio by default, but you can check the "Show All" checkbox to view
them.
Note: If an entry is associated with a Posting Code that has the "DoNotVoid" flag set, the
void isn't allowed.
4.5 How to transfer a posting to another folio?
A posting can be transfered from one folio to another by the following means
- Manual transfer - described in this section
- Automatic transfer (by setting up the Billing Instructions) - described in the next section
Manual transfer
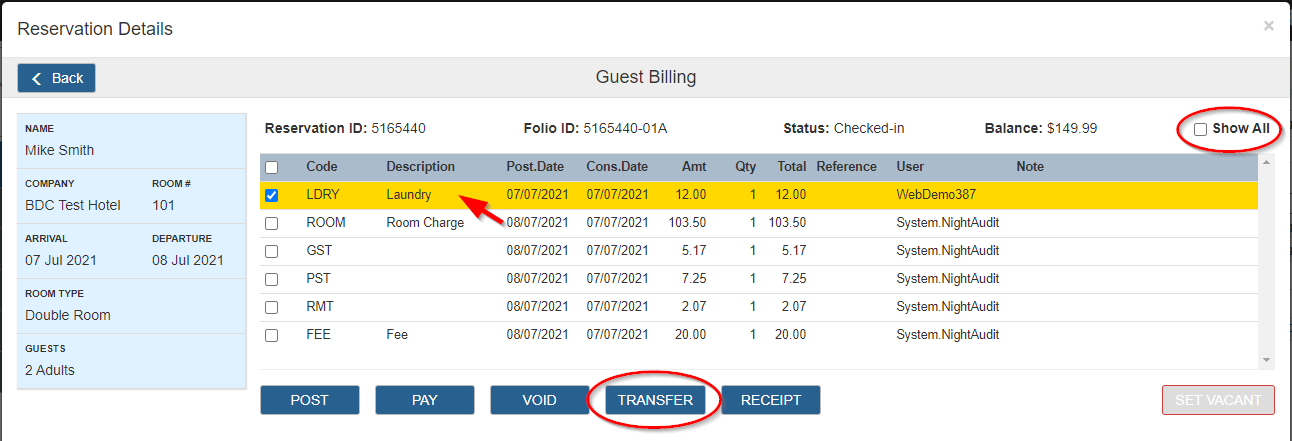
First, open the folio and select the entry or entries that you would like to transfer.
If there are any associated tax entries, they will be automatically selected too.
Then click on the TRANSFER button to open the popup
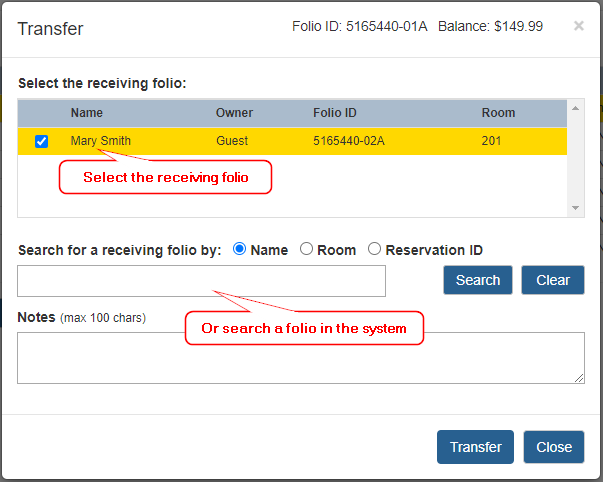
Step 1 - select the receiving folio for the transfer. By default, the other folios within the
same reservation will be listed as the receiving folios. If you'd like to transfer to another folio
that's not in the list, you can enter the Guest Name, Room # or Reservation ID to search.
Step 2 - enter notes if needed (optional)
Step 3 - click the Transfer button to proceed.
Transfered entries will not show in the original Folio by default, but you can check the "Show All"
checkbox to view them.
4.6 How to setup Billing Instructions for automatic transfers?
Sometimes you may want to have two separate bills for a reservation, for example, a bill for the guest
and a bill for the company or a travel agent. And you may want all room charges go to the company
bill and all other charges to the guest's own bill.
In these scenarios, Billing Instructions may come in handy to allow charges to be transfered to
your desired folios automatically. Billing Instructions are basically a set of rules defined on
a source folio (e.g. the folio for the guest) to instruct the system to transfer charges from the source
to a receiving folio (e.g. the folio for the company) automatically at the time when
you make a payment (i.e. when you press the Pay Bills button).
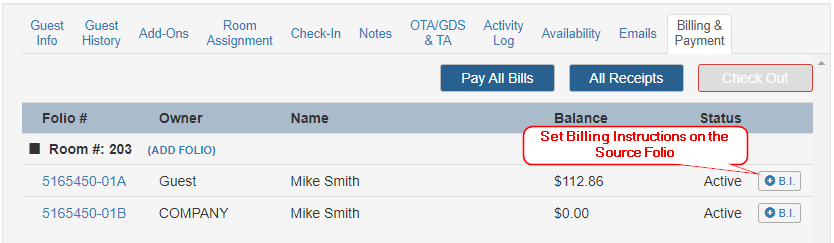
1. To create or modify the Billing Instructions:
- Click on the
B.I. button
next to the Source Folio to open the popup.
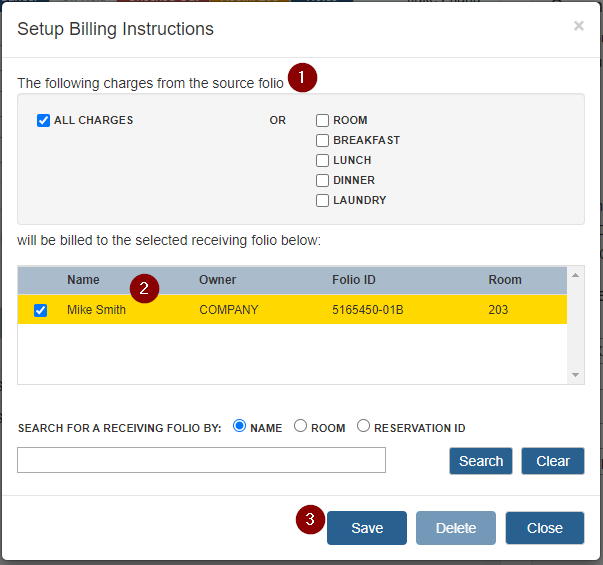
- On the Setting up Billing Instructions popup,
- Select what type of charges you need to transfer to the receiving folio. Once chosen, the
Posting Codes that are associated with these types (described in Section 2.3 Posting Codes)
will be transfered when the Billing Instructions are processed.
- Select the receiving folio that the charges will go do. The other folios within the
same reservation will be listed by default. If you want to transfer to a folio that is not
in the list, you can use the Search button to search
for any other folios that are currently IN-HOUSE.
- Press the Save button to save the changes
2. To delete an existing Billing Instruction:
- Click on the
B.I. button
next to the Source Folio to open the popup.
- Press the Delete button to delete the current Billing Instruction
3. To process the Billing Instructions:
When the Billing Instructions are processed, the system will select the postings from the source folio
based on the instructions and automatically transfer them to the receiving folio.
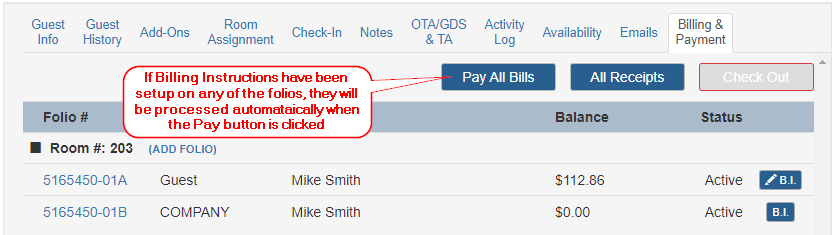
If Billing Instructions are setup on any folio, when you pay all bills at the Reservation Details window,
or open a single folio and pay in the Guest Billing window, the Billing Instructions will be automatically
processed before you can open the Payment popup.
Depending on whether there are any pending transactions in the Source folio that haven't been transfered
to the receiving folio, the system will display messages like
- "Billing Instruction processed and balance updated", or
- "Billing Instruction processed - no pending transactions to process"
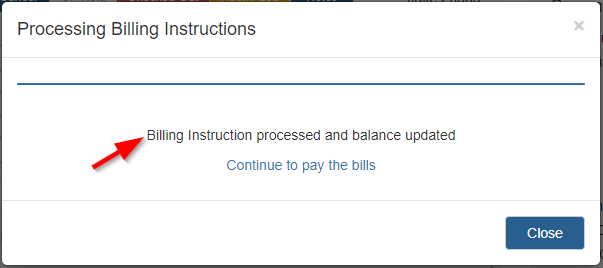
Then you can click "Continue to pay the bills" to continue with the payment, or close the popup
window and open the source (or receiving) folio to review transfered postings and balances if needed.
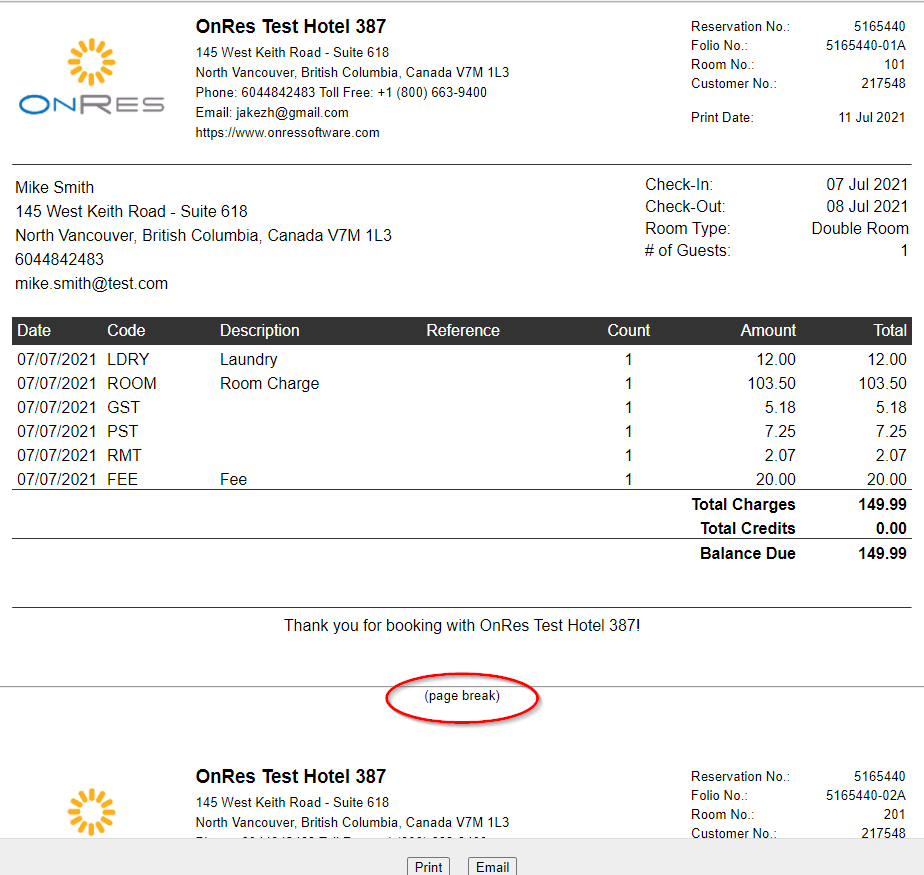
4.7 Receipts
Postings for each folio will be listed on the respective receipt. Each folio will produce
its own receipt with its own transactions.
You can generate receipts for each individual folio by openning each individual folio, and then
clicking on the Receipt button at the Guest Billing window
Or you can generate receipts at the reservation level when there are multiple folios in
the reservation. Go to Reservation Details window, click on the
All Receipts button.
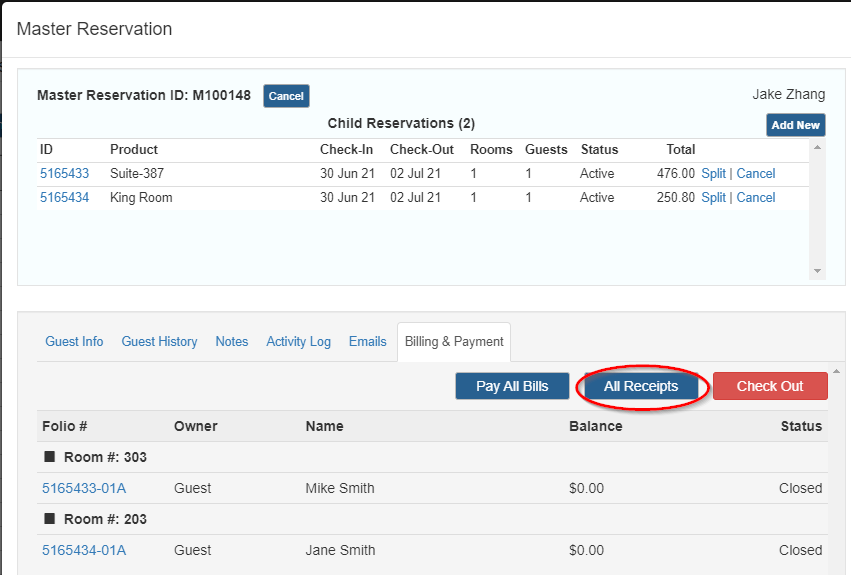
If this is a Master reservation, you can also generate receipts at the Master reservation level.
Go to Master Reservation Details window, click on the All Receipts button.
When there are multiple folios present for the room, the folios are listed on multiple pages. You may see
a line marked as "(page break)" between the folios. This will not show on the actual receipts (in PDF or print).
Instead, when you click on the Print button,
they will appear as actual page breaks on the document.
4.8 Check-out
When all folios for a reservation have a balance of zero, the
CHECK OUT
button is activated.
You can check-out the reservation at the Reservation Details window, the Master Reservation Details
window, or the Guest Billing window (when there is only one folio in this reservation)
When there are multiple rooms in the reservation, you cannot check-out the entire reservation (all rooms)
at the Guest Billing level, but you can instead set the room to VACANT for a particular room by clicking
on the SET VACANT button. This will sets the Housekeeping status to VACANT
for this room, and housekeepers will be able to see the status in the Housekeeping module.
To check-out the reservation (or a master reservation), you can click on the
CHECK OUT button at the Reservation Details window
(or the Master Reservation window).
4.9 How to bill a reservation to an Accounts Receivable (A/R) account
Assume the A/R account is associted to a company (for Travel Agents, they are similar - details in the
later paragraphs). You will need to do the following steps
- Create an A/R account in Financial Settings (see Section 2.4 Accounts Receivable Accounts above)
- Create a Payment Type "Direct Billing" (or any name of your choice) with the "Check AR" flag set
(see Section 2.5 Payment Type Codes above)
- Create a company profile and link it to the reservation
- Link the company profile to the A/R account
- Create a separate folio for the company
- select Payment Type "Direct Billing" when making the payment.
Ad 3: Create a company profile and link it to the reservation
Open the Reservation Details window, click on the button
in the Company Name field to select one from a list of existing company profiles.
You can also click on the "Create a new profile" button to create a new profile
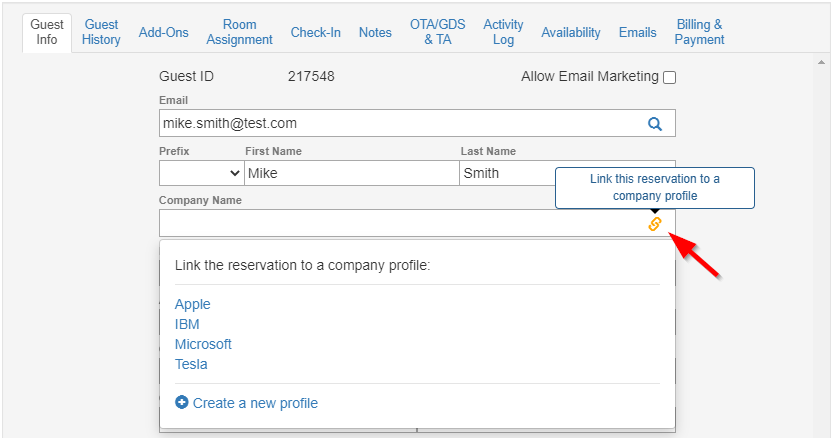
You can also create a company profile at the Contact Manager
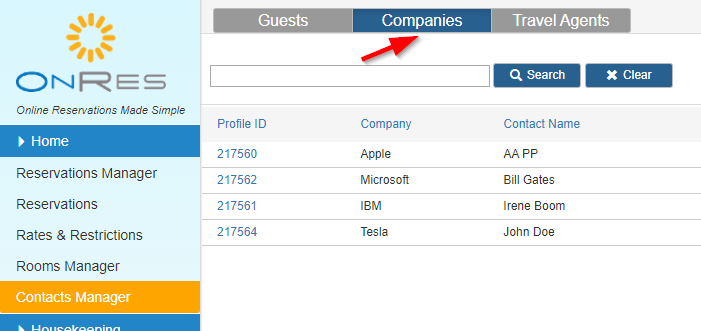
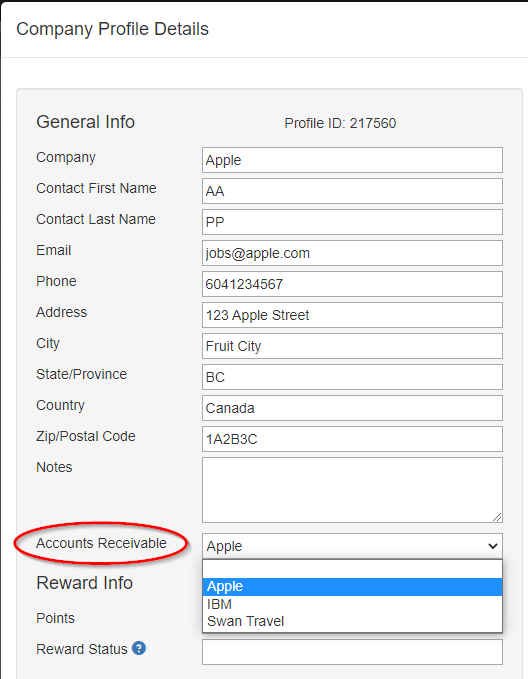
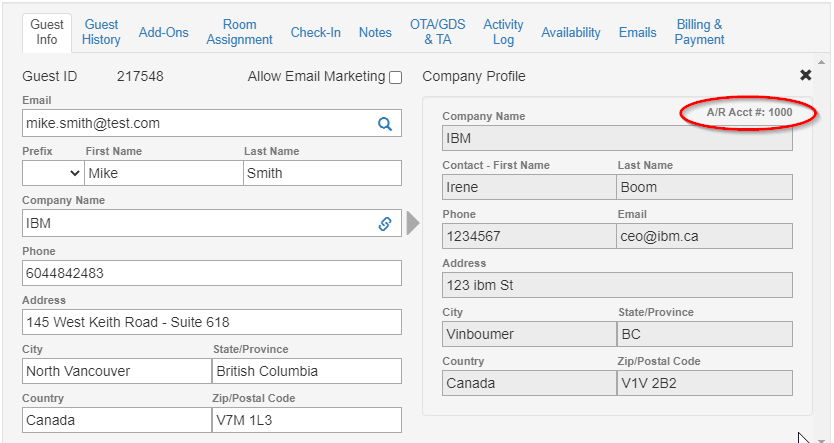
Ad 4: Link the company profile to the A/R account
Open the profile details of the company profile in the Contact Manager, set the Accounts Receivable field.
You must already have the A/R accounts configured in the Financial Settings section.
After linking the company profile to the A/R account, you will be able to see the A/R Acct # in the Reservation
Details window:
Ad 5: Create a separate folio for the company
Details can be found in Section 4.1 above
Ad 6: Select Payment Type "Direct Billing" when making the payment
Assuming you have a Payment Type "DB" (Direct Billing) configured in the system, when an A/R account is
associated to the reservation, you will be able to select it when you process payment. Then
the system will post the payment to the A/R Ledger instead of the Guest Ledger.
To bill a reservation to a Travel Agent profile
Follow similar steps above. You can link a Travel Agent profile to a reservation by entering the
TA informaiton under the OTA/GDS & TA tab
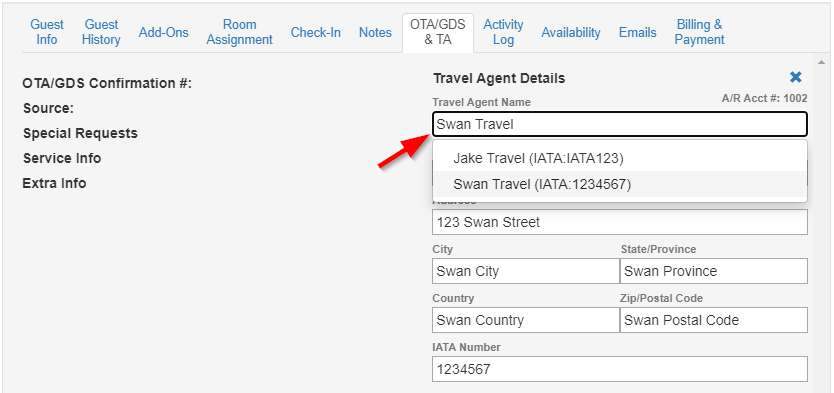
When you enter the TA name in the Travel Agent Name box, a list of existing TA profiles will show in the
dropdown list. Select one from the list, or enter the new information for a TA profile.
Note: the TA profile is identified by its IATA number, which is a mandatory field
4.10 How to associate a credit card with a folio?
When there are two credit cards saved on the reservation, e.g. a card for the guest's bill and a card
for the company's bill, you can associate each folio with a card of your choice.
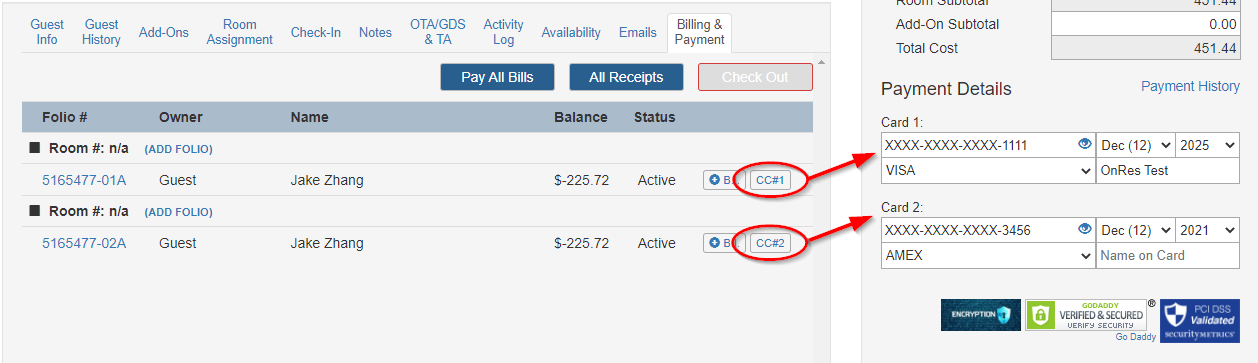
By default, the first card (CC#1) is associated with all folios. To change it, click on the button
and select a different card from the dropdown list, then press Save.
5. Financial Reports
5.1 Reports produced by Night Audit
The OnRes Financial System uses double entry accounting to ensure all transactions are processed correctly.
Charges and payments are posted to folios and a counter posting is performed automatically by the system to
the:
- Advance Deposit ledger for all future reservations
- Guest Ledger for all in-house guests
- Accounts Receivable Ledger for all direct billing
The Night Audit process produces a Ledger Verification report every night, with the daily total
posting amount for the three ledgers against the respective ledger amount.
Since these are counter postings it is important to verify on a daily basis that the Posting and
Ledger amounts add up to zero. If they don’t please investigate the issue and correct it.

5.2 Other Financial Report
You can find other financial related reports in the Financial >> Reports section. Currently there are
- Journal - All financial postings for a given date range
- Payments - All payment records for a given date range
- Ledger Verification - Summary for Postings and Ledger tables for verification
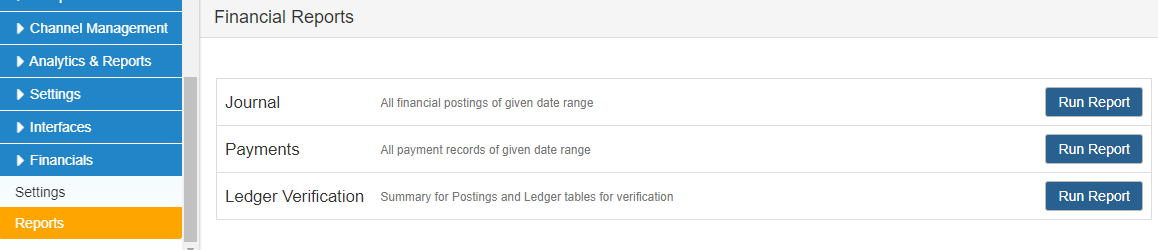
To run the report, click on the RUN REPORT button and enter the desired
date period, output format, and press Download Report button or
Email Report button to produce the report.
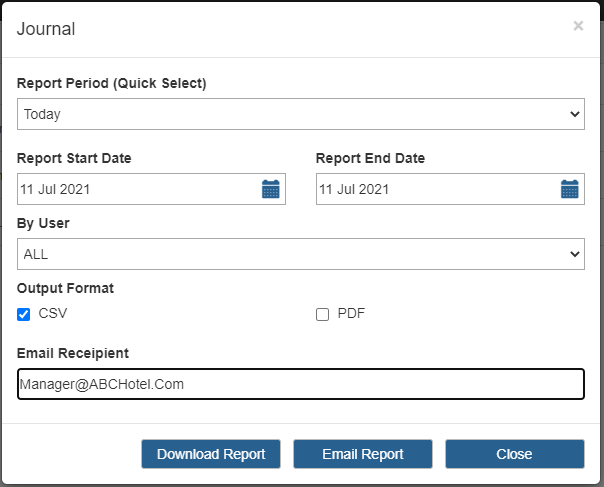
You can also generate the report of entries done by a particular user by selecting the User ID (or Name) from
the By User dropdown list.