SETUP ONRES 2.0 BOOKING PROCESS
OnRes 2.0 Booking Process is a set of feature-rich booking pages that provide guests a better experience
in their online bookings. You can see a
DEMO
of how the booking process works.
What is new in 2.0 Booking Process?
- The new Booking Widget supports display of Availability and Best Available Rates on calendar
- The new search results page contains some new information that is not available in 1.0:
- Product Summary
- Room Amenities
- Room Size, Bed Type and Room View
- Supports the new Promotions feature
- Supports the new Multipe Room Type Booking feature
- Supports Flexible Stay — multi-segment itineraries when a single room type cannot cover the full dates
- Supports enhanced Guest Confirmation Emails
- Works on any platform and devices (e.g. PC, Mac, iPad, mobile phone)
Here are a few guidlines to help you set up your booking process to best utilize the new features.
1. Setup Product Details and Summaries
1.1 Where is Product Summary displayed in the search results and how to set it?
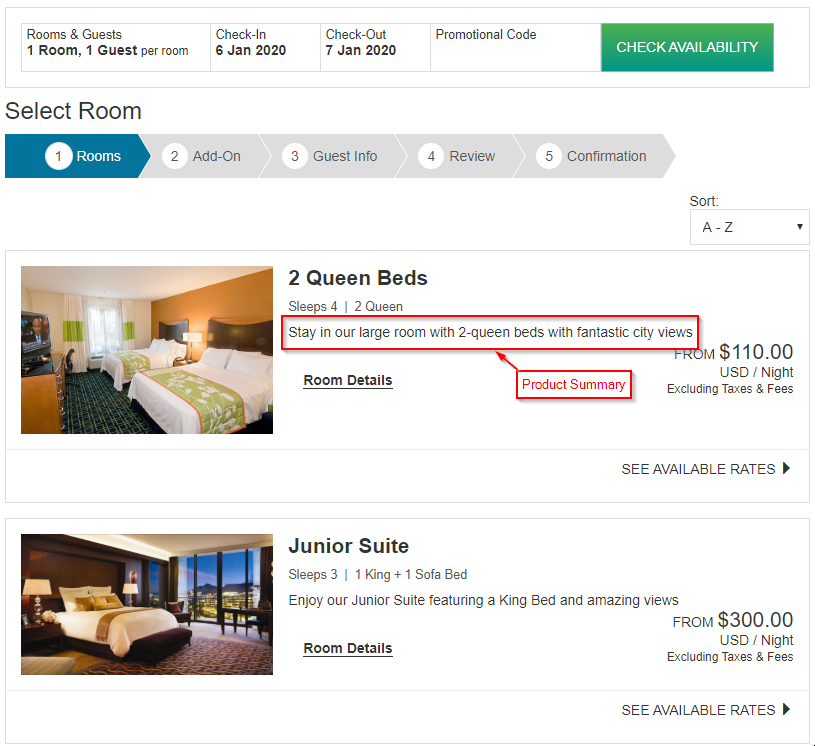
Product Summary is a short description shown on the search result page:
It can be set at the Product Details window under the Setup tab
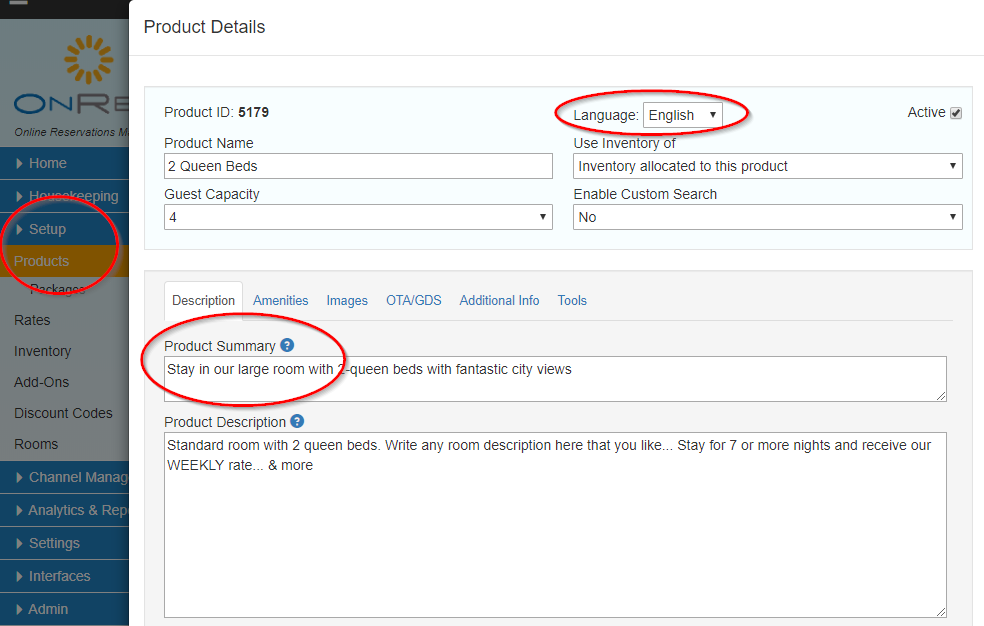
Multiple Languages: for accounts that support multiple languages, some of these attributes need to be set per language.
To set them in a different language, choose the Language dropdown list to choose the language, then edit the fields and save.
1.2 Where is Product Description displayed in the search results and how to set it?
Product Description is a detailed description shown on the pop-up when you click on the "Room Details" link.
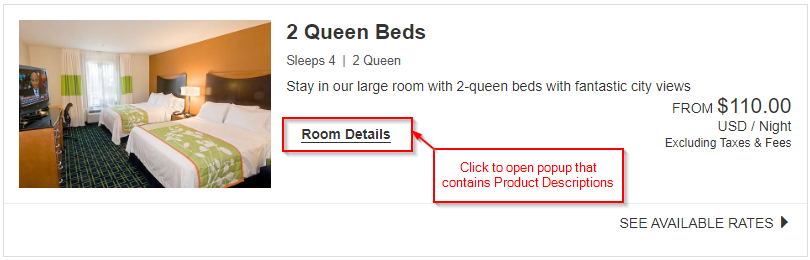
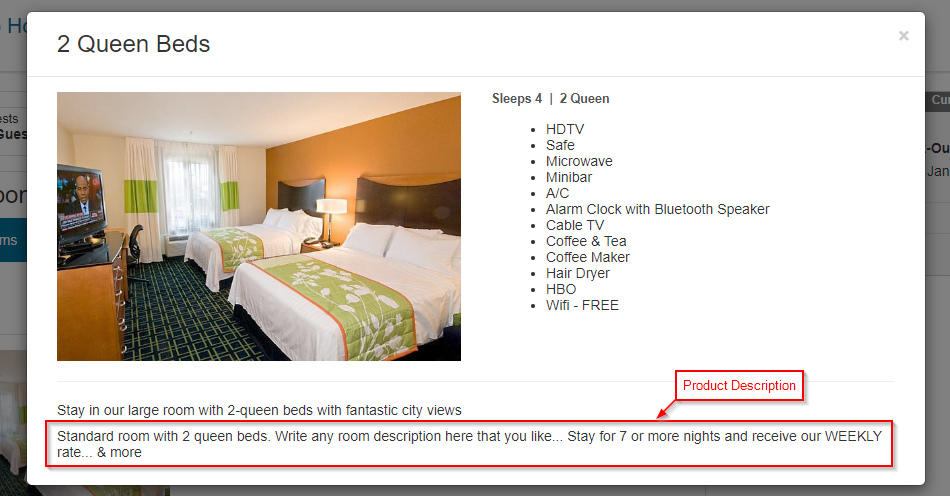
It can be set at the Product Details window under the Setup tab
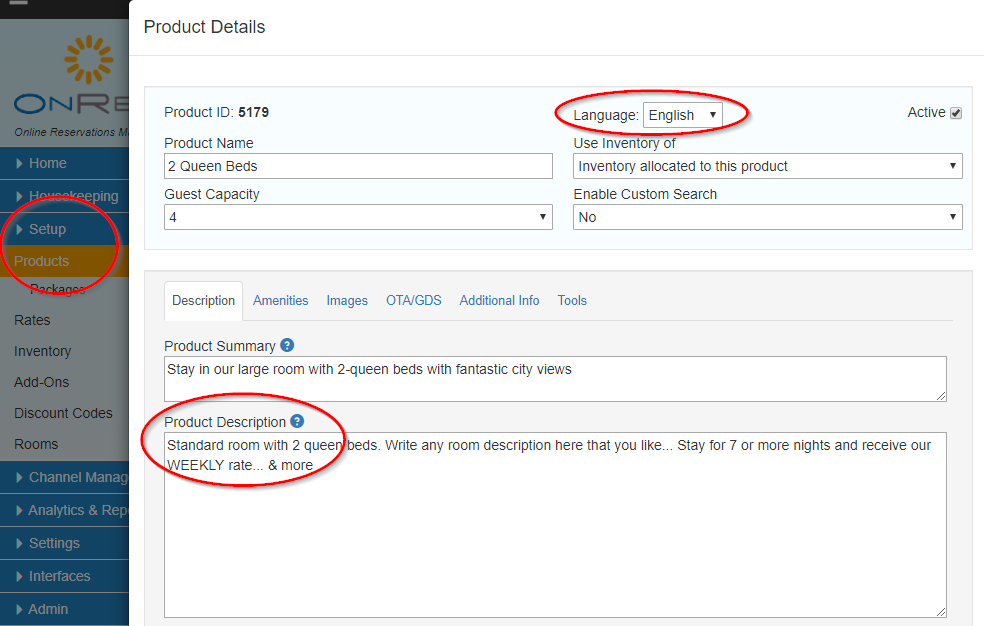
Multiple Languages: for accounts that support multiple languages, some of these attributes need to be set per language.
To set them in a different language, choose the Language dropdown list to choose the language, then edit the fields and save.
2. Setup Product Photos
Product photos can be added to your product by either setting the image URL or uploading (best option)
2.1 How to upload a product photo?
Product photos can be uploaded at the Product Details window under the Setup tab
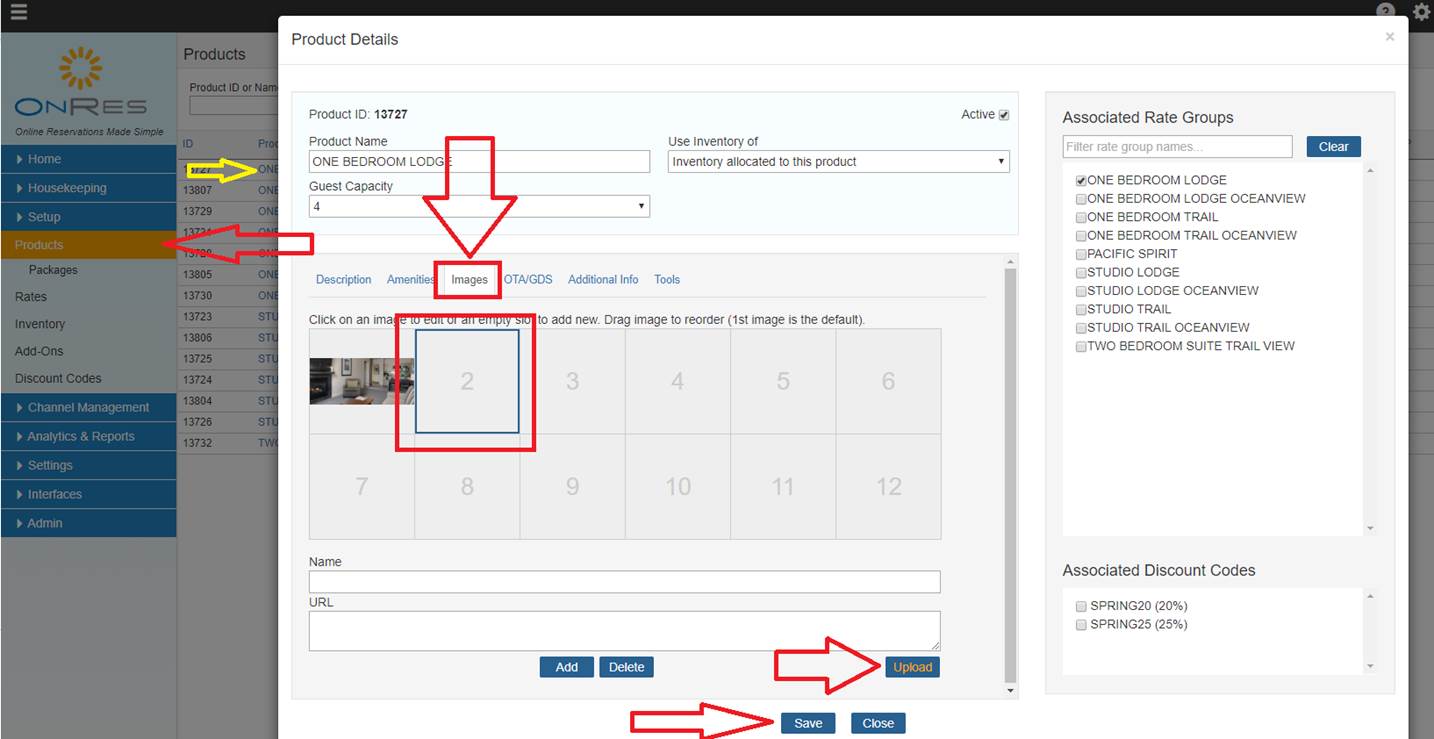
- Click to select the first empty slot in the image tab
- Click on the Upload button
- Select the image files from your computer, and click Open
- Images will be uploaded to the server and a thumbnail image will be displayed
- Repeat the above steps to add more images, then click
Save to save the uploaded photos
2.2 How to add a product photo by its URL?
If a product photo is already hosted somewhere else, it can also be added to OnRes by setting its URL in the Product Details window
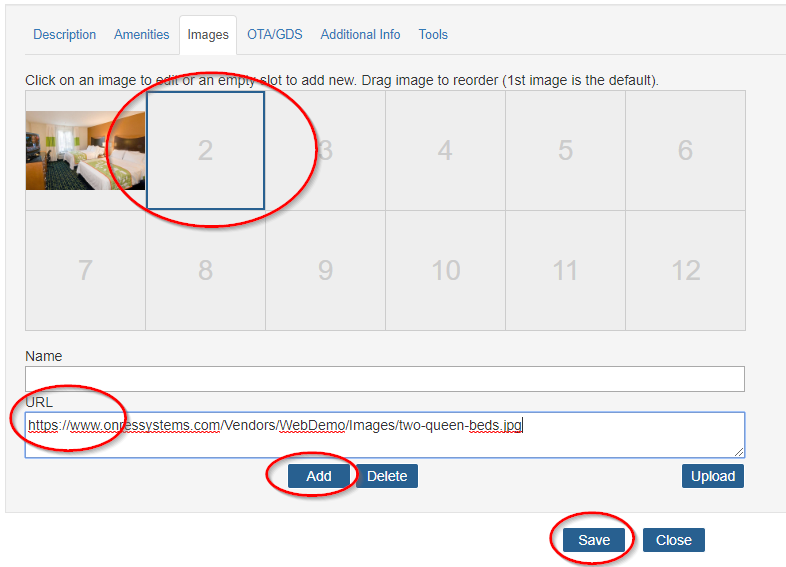
- Click to select the first empty slot in the image tab
- Enter the URL into the URL field
- Click button Add to add the photo
- Repeat the above steps to add more images, then click
Save to save the changes
2.3 How to change a product photo?
- Click the slot to select the image
- Click Delete to delete this image from this slot
- Follow step 2.1 or 2.2 to add the new image again
- Click Save to save the changes
3. Setup Room Amenities
You can setup room amenities and display them in the search results. To setup room amenities, you need to:
- Create all room amenities that your products (room types) have
- Map the room amenities to a specific product
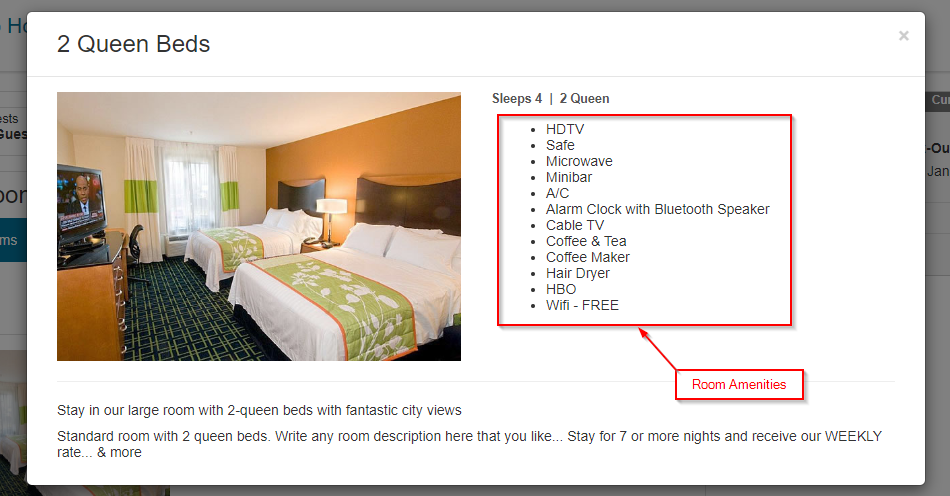
3.1 Where are the Room Amentities displayed in the search results?
Room Amenities are displayed in the Room Details popup
3.2 How to create Room Amenities?
Room Amenities are created at the Property & Amenities section under the Settings tab
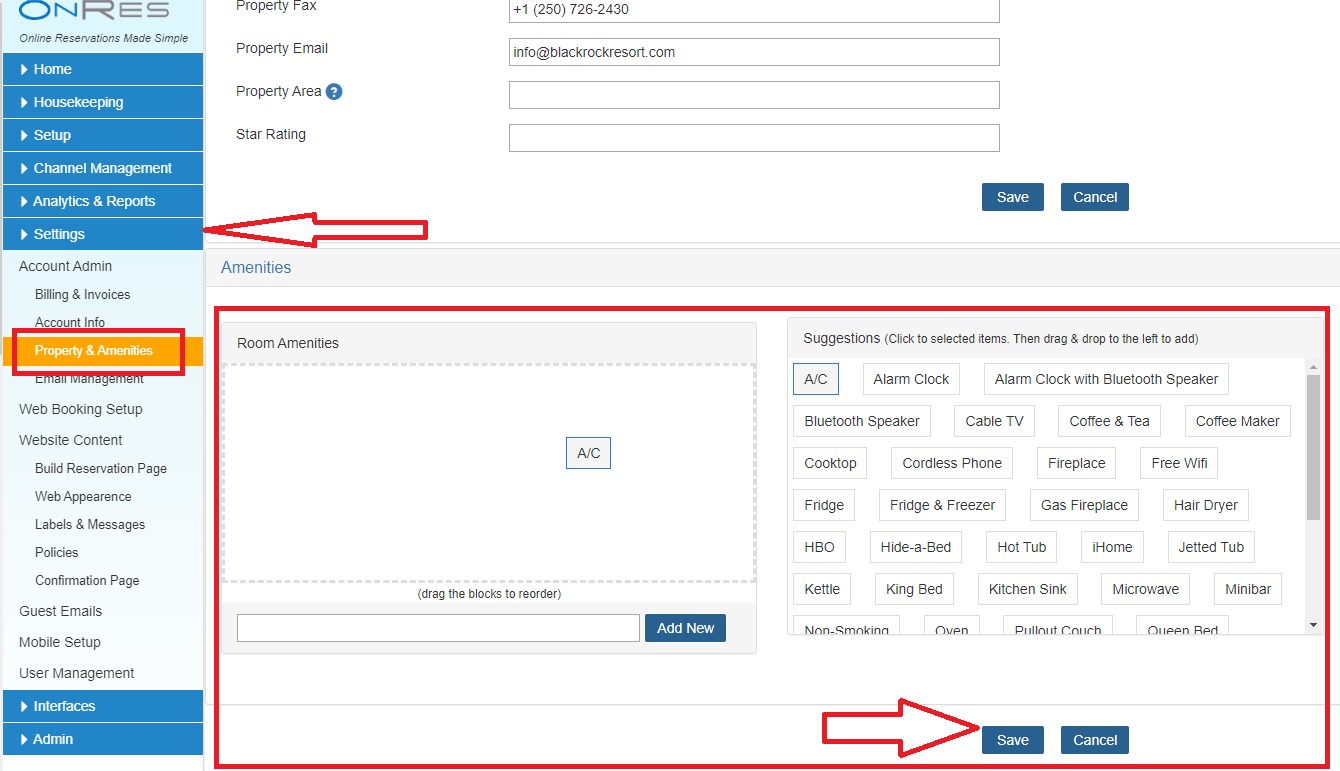
You can either drag and drop the items from the Suggestion List on the right side of the screen into the
Room Amenities area for your account, or type into the text box below and click button
Add to add into the list.
Item Order: You can drag the items in your Room Amenity list to set the order of display in the search result.
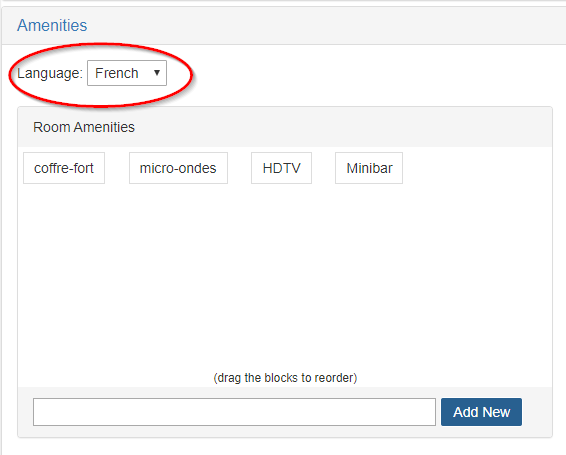
Multiple Languages: for accounts that support multiple languages, the amenities need to be set per language.
To set them in a different language, choose the Language dropdown list to choose the language, then add the items and save.
3.3 How to map Room Amenities to a specific product?
The room amenities for each product can be mapped in the Amenities tab of the Product Details window
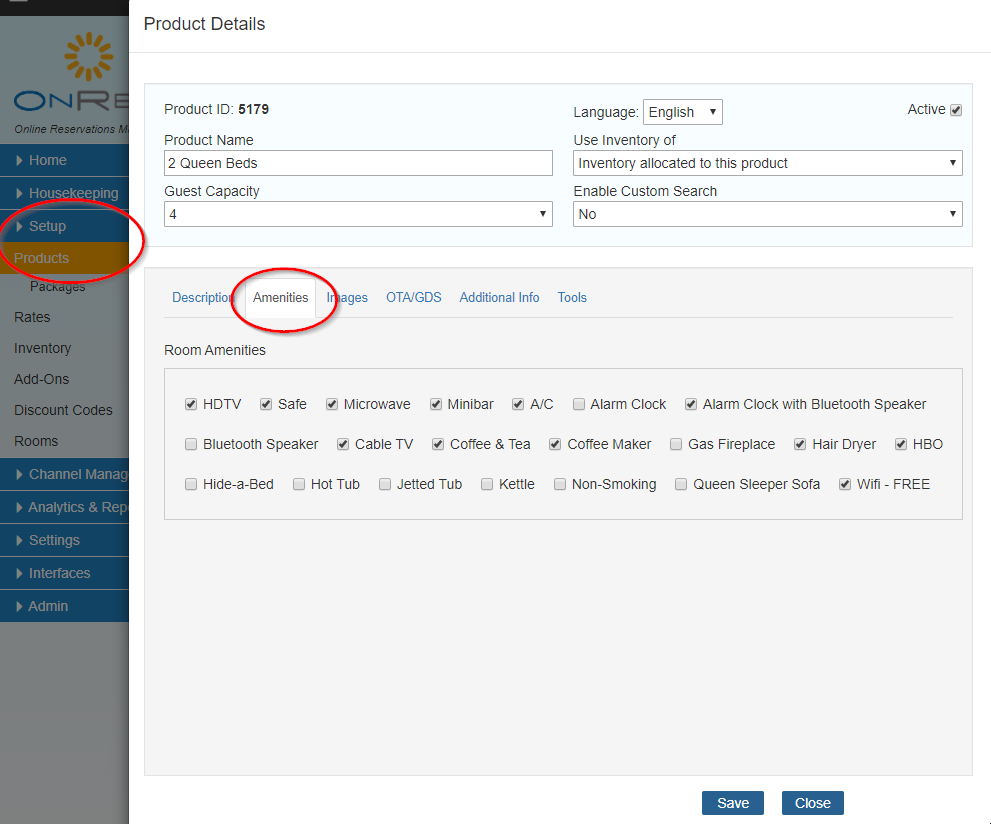
Toggle the check boxes to set or unset the amenities for a specific product.
Click Save to save the changes afterwards.
4. Setup Product Room Size, Bed Type, and Room View
4.1 Where are these room attributes displayed in the search results, and how to set them?
Bed Type is shown on the search result page as shown below. Room Size and Room View will be included to the search results in the future release.
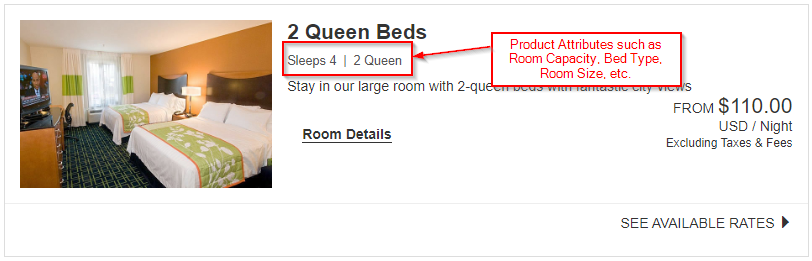
It can be set at the Product Details window under the Setup tab
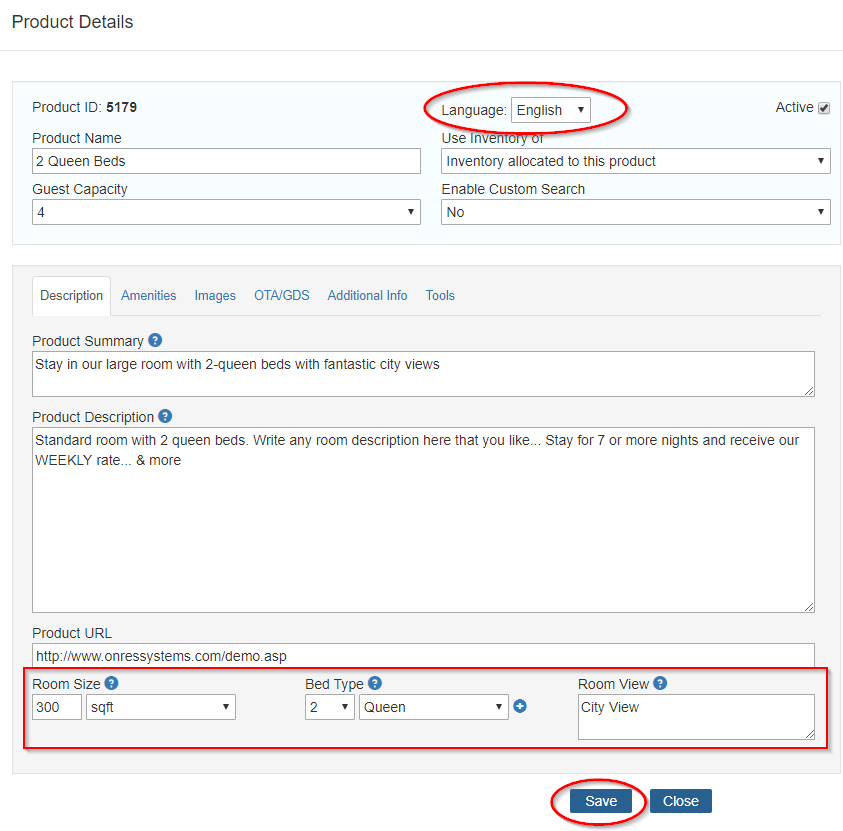
Multiple Languages: for accounts that support multiple languages, some of these attributes need to be set per language.
To set them in a different language, choose the Language dropdown list to choose the language, then edit the fields and save.
5. Show Lowest Best Available Rates on the Booking Widget Calendar
5.1 What is this feature?
This feature allows guests to view the lowest available rates on the booking widget calendar. This helps to streamline the
booking process and increase the conversion rate.
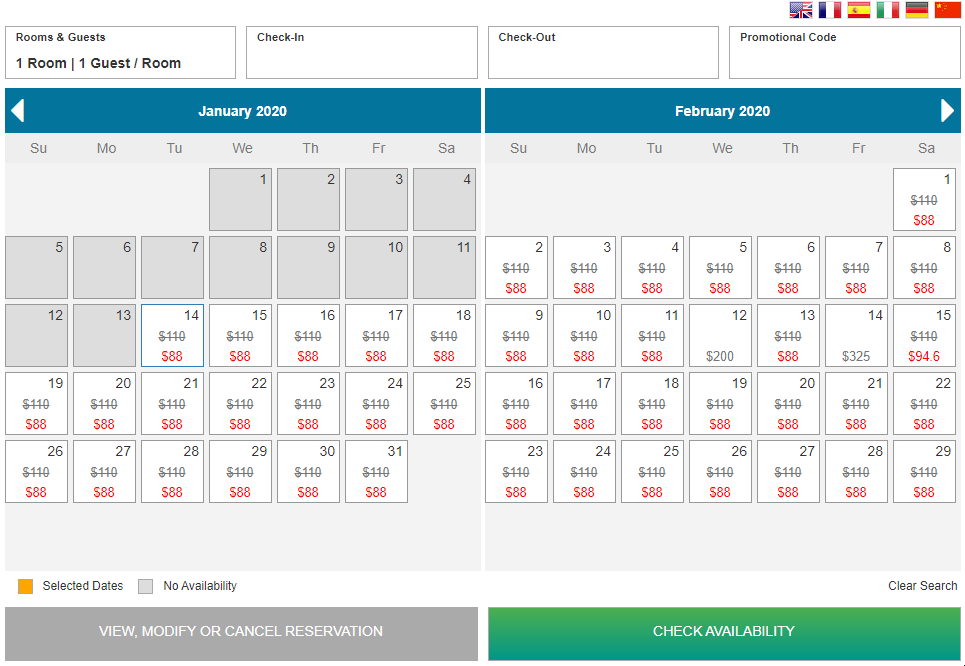
Once enabled, the calendar will be populated with the lowest available rates of your selected Rate Groups, including promotional
rates.
Note that the displayed rates is dertermined based on the selection of the number of rooms and guests.
5.2 How to set it up?
You can follow the steps below to set up this feature:
- Enable the feature at the Web Booking Setup page under the Settings section
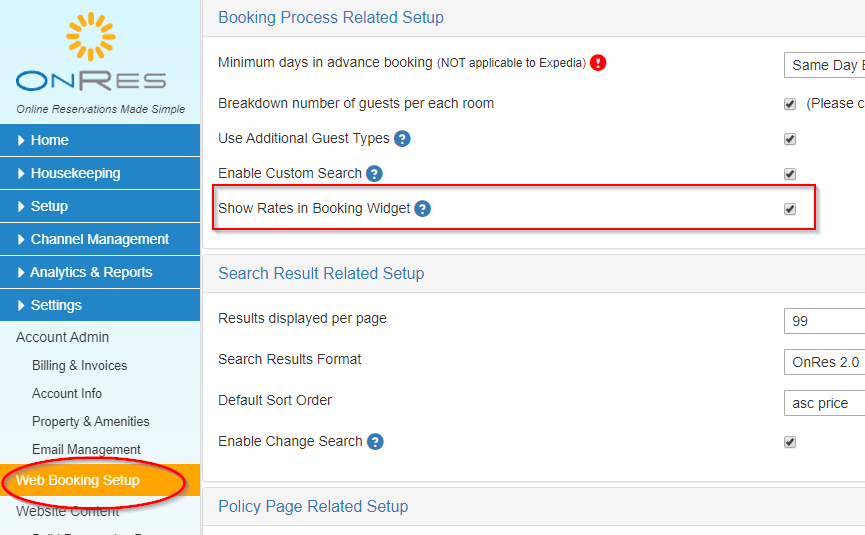
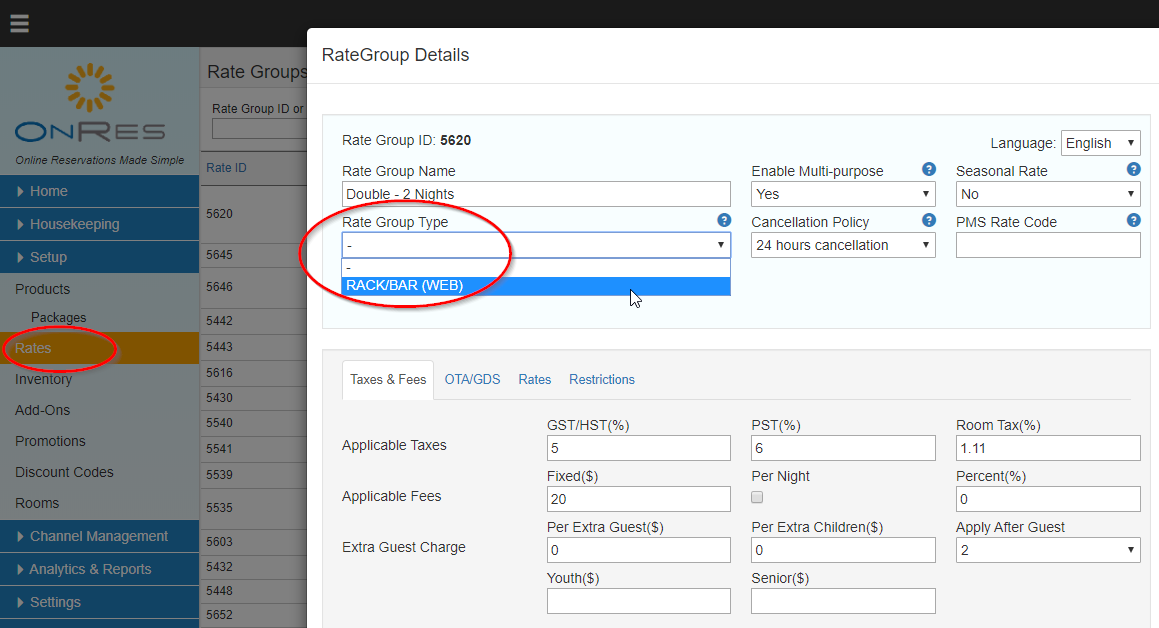
- Select the Rate Groups that you would like to show on the calendar. Open the Rate Details window in the Rate Setup page.
Select the "RACK/BAR(WEB)" as the Rate Type. Only Rate Groups that have their Rate Type set as this will be taken into
the calculation of finding the lowest rates on the calendar.
6. Show Room Availability on the Booking Widget Page
6.1 How does it work?
This feature allows guests to view the room availability on each date on the booking widget page.
There are two ways to display the room availability:
- Show Availability of All Room Types in the Booking Widget Calendar (the Date Picker). E.g.
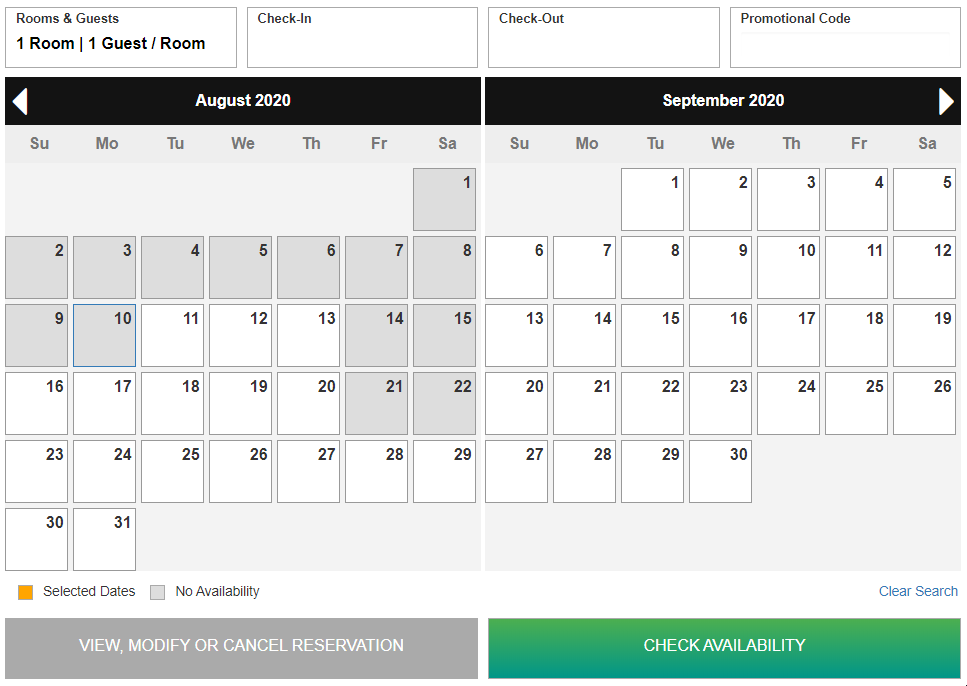 (the grey blocks indicate the dates that are sold out)
- Show individual Availability Calendar for each Room Type below the Booking Widget Calendar. E.g.
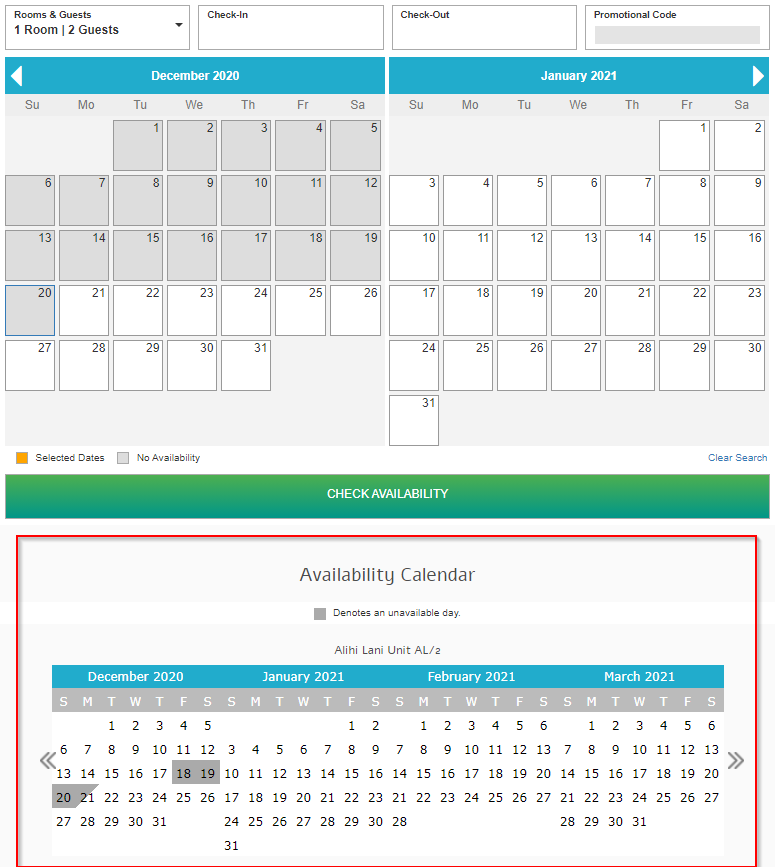
Note: For the first way (showing on the Date Picker), please be aware that when the booking widget
calendar is showing availability for multiple room types, and when the user is looking for multiple nights
stay, sometimes it may show that there is availability on some dates, but when the user selects these dates
and run an actual search, the system may respond that there is no availability on selected dates.
This is because when multiple nights are requested, some room type may be only available on a portion
of the selected dates, whereas the other room types may be only available on the other portion of the dates.
Therefore on the booking widget even it appears that there are avaiability on these dates, but
no single room type is able to accommodate all the dates requested.
6.2 How to set it up?
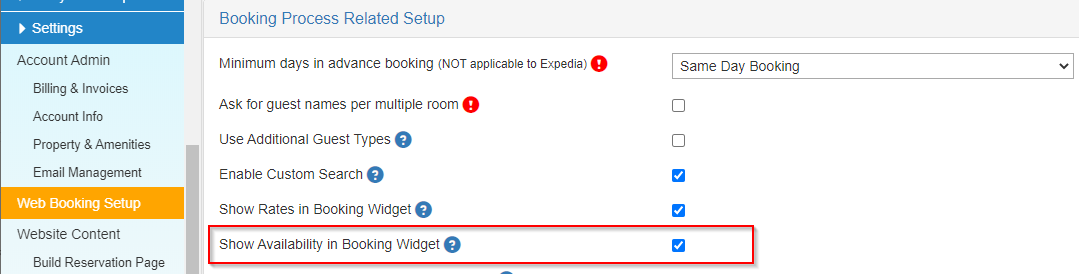
To show All Room Availability on the Booking Widget Calendar (the Date Picker) -
you can enable this feature at Settings >> Web Booking Setup:
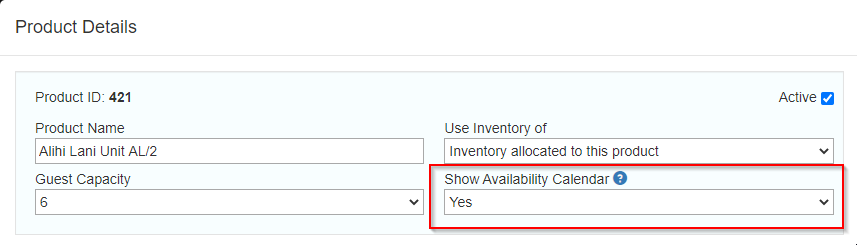
To show individual Availability Calendar for each Room Type below the Booking Widget Calendar -
you can go to Setup >> Product, open Product Details page, and select yes for the Show Availability Calendar
option, for each product that you would like to show the Availability Calendar.
7. Show Custom Message on the Booking Process Pages
7.1 What is a custom message and where is it displayed?
You can display a custom message on the top of the booking widget and the search result pages. It can
be an important notice that you would like the bookers to know before they start the booking process.
For example, you can display a notice regarding health & safety procedures that are currently
in effect at your property.
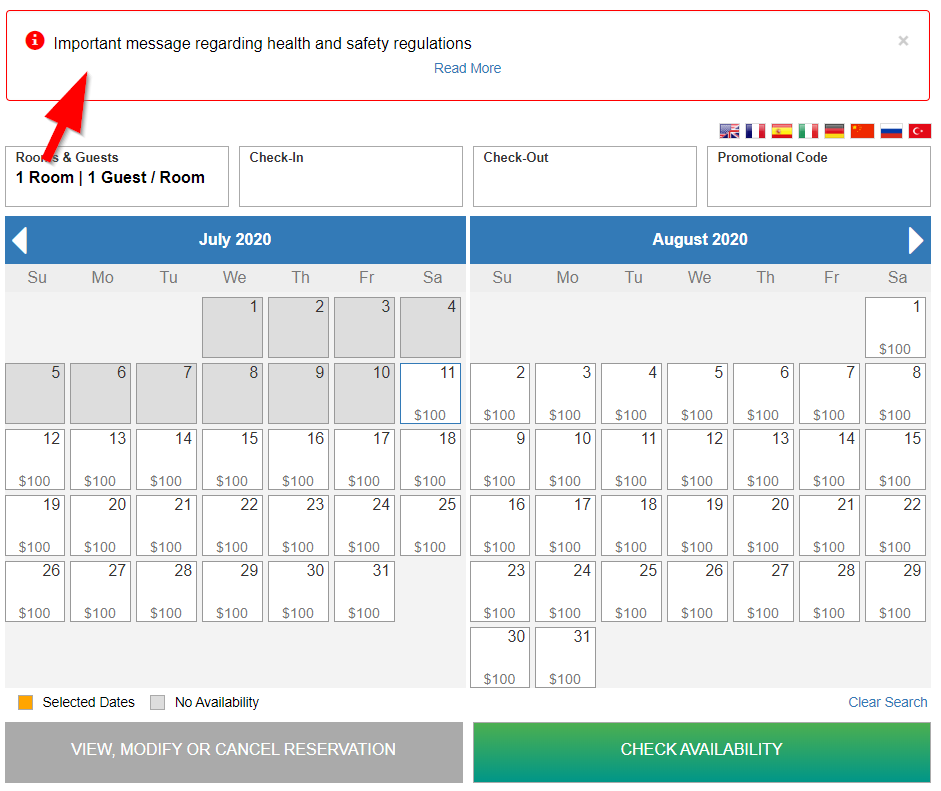
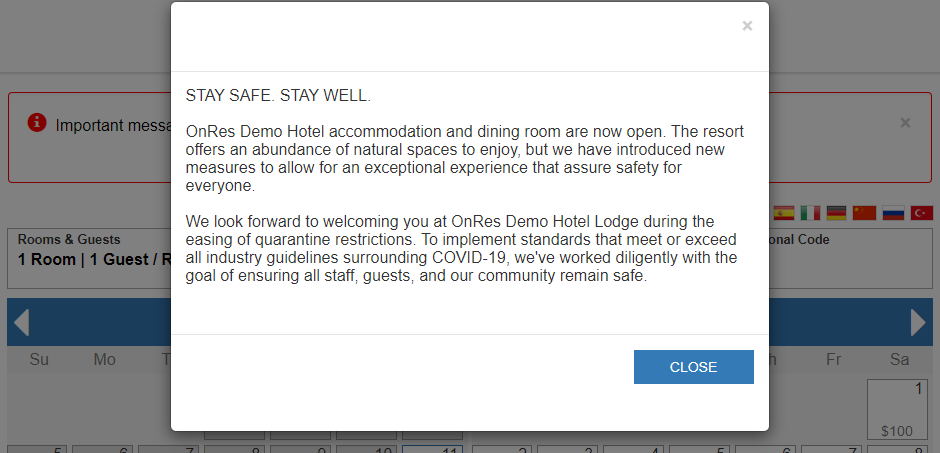
The custom message consists of a brief summary and message details (if necessary). Users can see
the message details when they click on the Read More link. If there is no Detailed message set,
then there will be no Read More link in the message box.
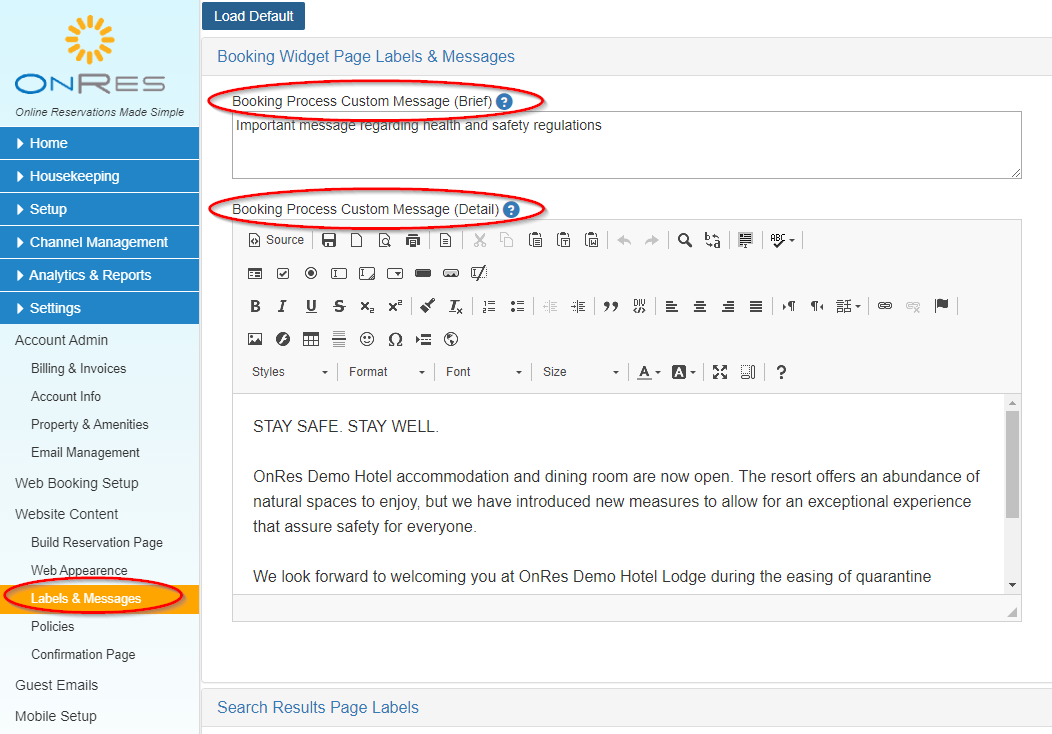
7.2 How to set up custom message?
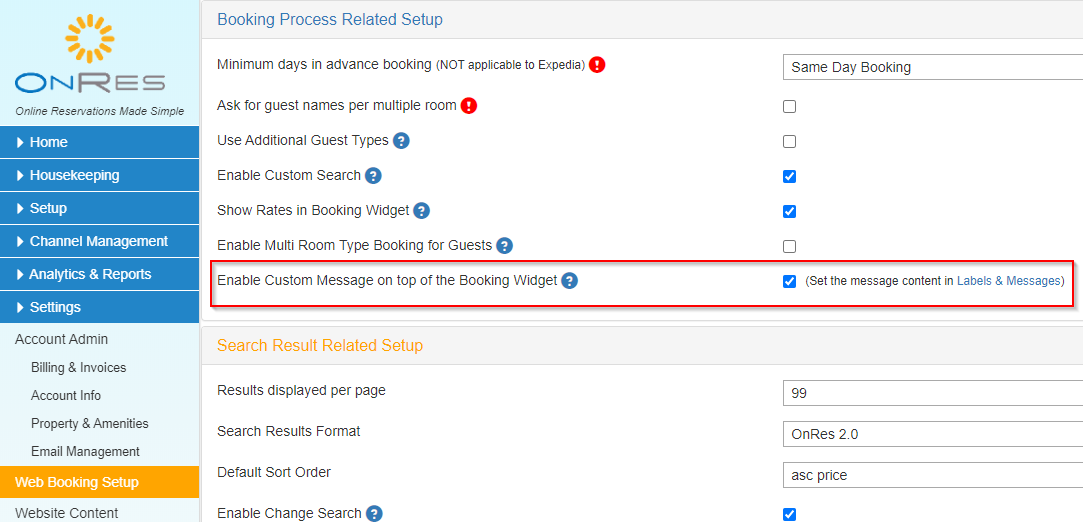
First, set up the Brief Message and Detailed Message at Settings >> Labels & Messages. You can set
it per language if you have multiple languages enabled.
Then you enable it at Settings >> Web Booking Setup
8. Customize Labels the Booking Process Pages
8.1 General Labels and Messages
You can customize the labels and messages shown on the booking process pages at Settings >> Labels & Messages. You can set
it per language if you have multiple languages enabled.
To set it in a different language, choose the Language dropdown list on to top right corner of the page, then edit the fields and save.
8.2 Override Labels with a specific rate
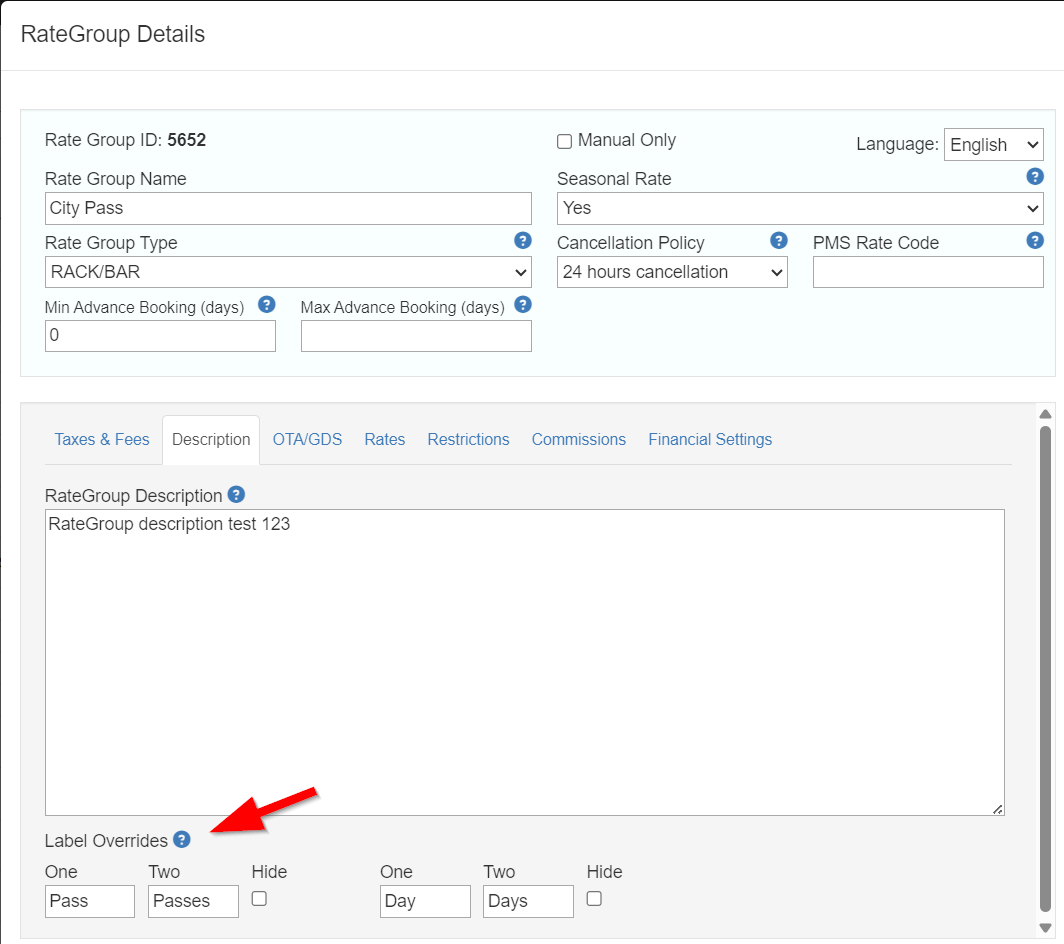
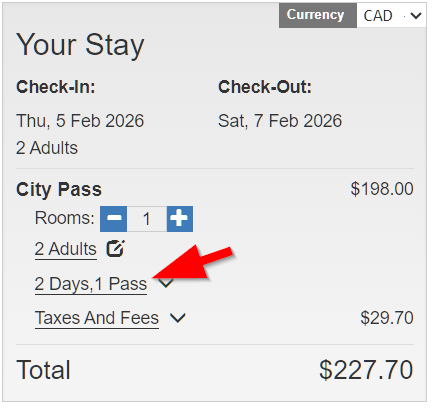
In the booking process pages, there are labels that can be overridden by a specific rate. For example,
in the booking summary table, it may show "2 Nights, 1 Room" by default, but if this booking is with a rate for a ticketed event, then
you can override it to show "2 Days, 1 Pass" instead.
Go to Rate Group setup, open the Rate Details window, and set the override labels in the "Label Overrides" section under the Description tab.
Make sure to enter the singular and plural forms for each label, and click Save to save the changes.
Alternatively, you can hide these labels by click on the Hide checkbox
You can set it per language if you have multiple languages enabled.
8.3 Custom guest questions (Label Configuration 1, 2, and 3)
You can ask guests up to three optional custom questions during the booking process. The questions appear on the
Guest Info step (after the guest selects a room and rate). Typical uses include flight number, arrival time,
license plate number, or a yes/no question such as whether airport transfer is required.
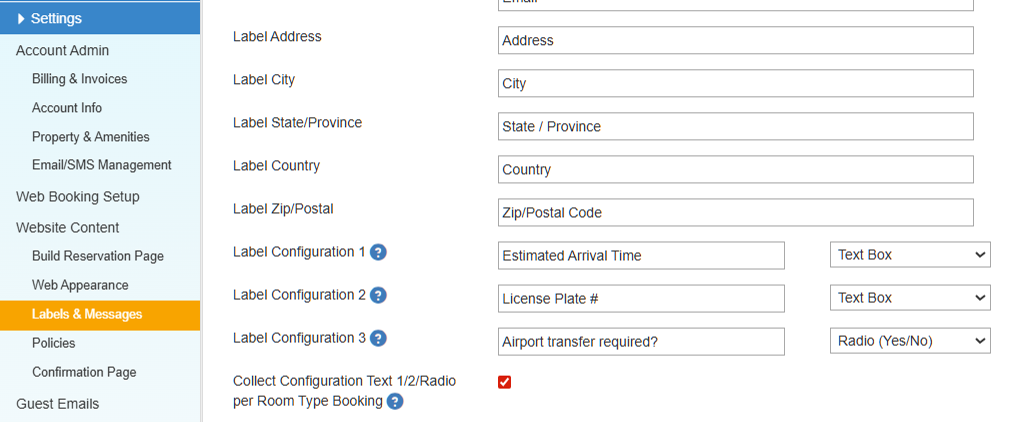
Configure the questions at Settings >> Labels & Messages, in the Checkout Page Labels section:
- Label Configuration 1, Label Configuration 2, and Label Configuration 3 — enter the text
shown to the guest (this text is used as the field label or placeholder). Leave a field blank to hide that question.
- Control type — for each question, choose Text Box or Radio (Yes/No). By default,
Configuration 1 and 2 are text boxes and Configuration 3 is a Yes/No radio button. You can change the control
type for any of the three fields.
- Collect Configuration Text 1/2/Radio per Room Type Booking — when Multiple Room Type Booking is enabled
and the guest books more than one room type, check this option to collect separate answers for each room type
instead of one answer for the whole reservation.
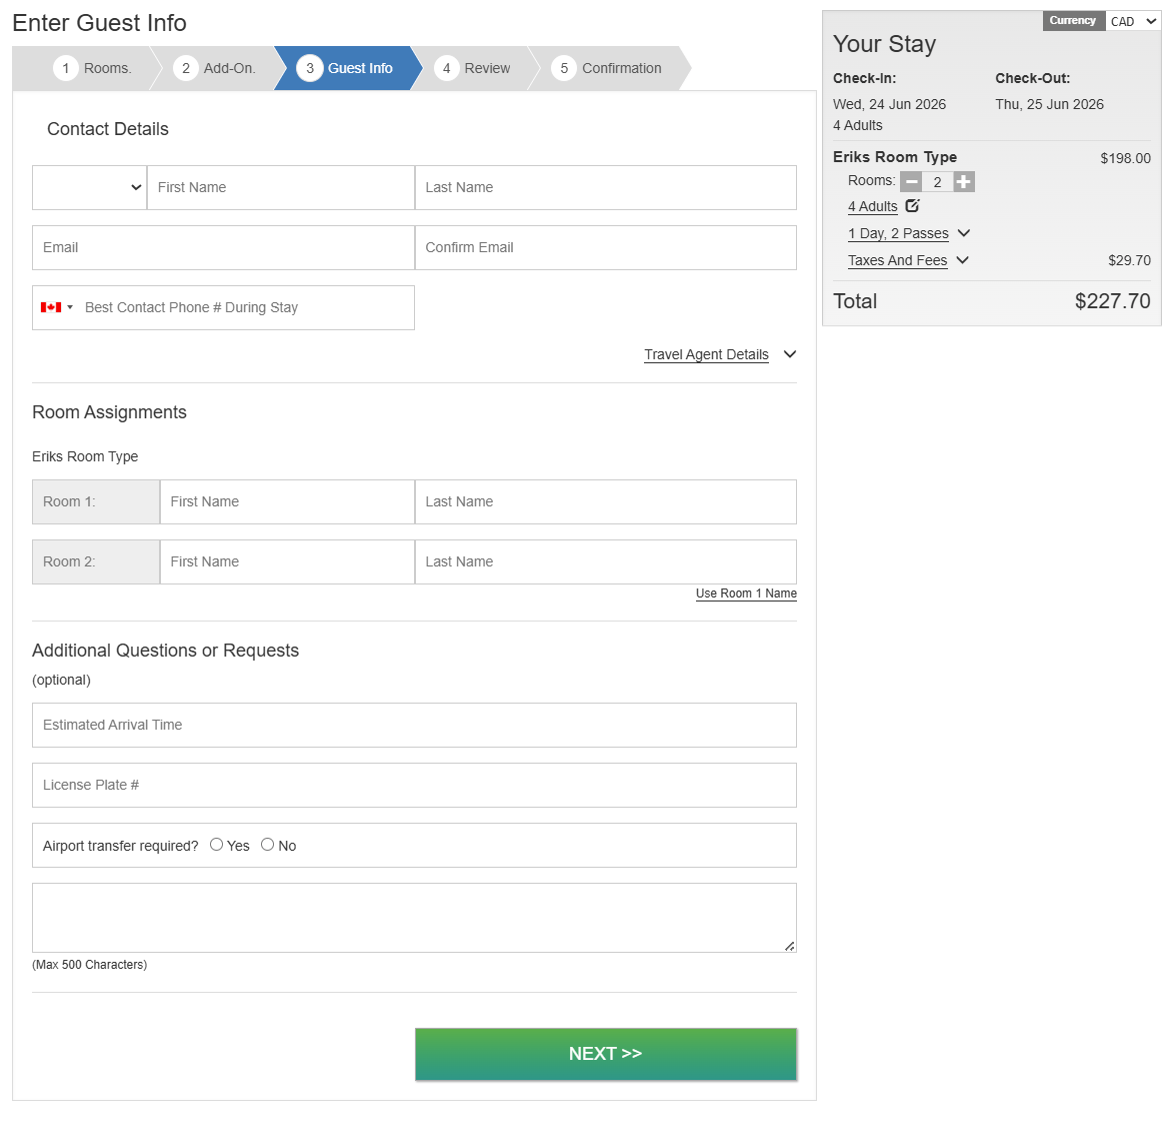
The same three label fields are also available on Settings >> Web Booking Setup (English). Control type
settings apply to the whole property and are shared between both setup pages.
Required questions: add (required) anywhere in the label text (for example,
License Plate # (required)). The guest must answer before continuing.
Multiple Languages: use the Language dropdown on Labels & Messages to set the question text for each
enabled language. Control type is not per language.
After booking: answers are saved on the reservation and shown in Reservation Details. They can be included
in confirmation emails using the merge tags <#ConfigText1#>, <#ConfigText2#>,
and <#ConfigRadio#>.
PMS-enabled accounts: if your property uses the OnRes PMS interface, contact Innsource if you would like
these answers mapped to PMS custom fields.
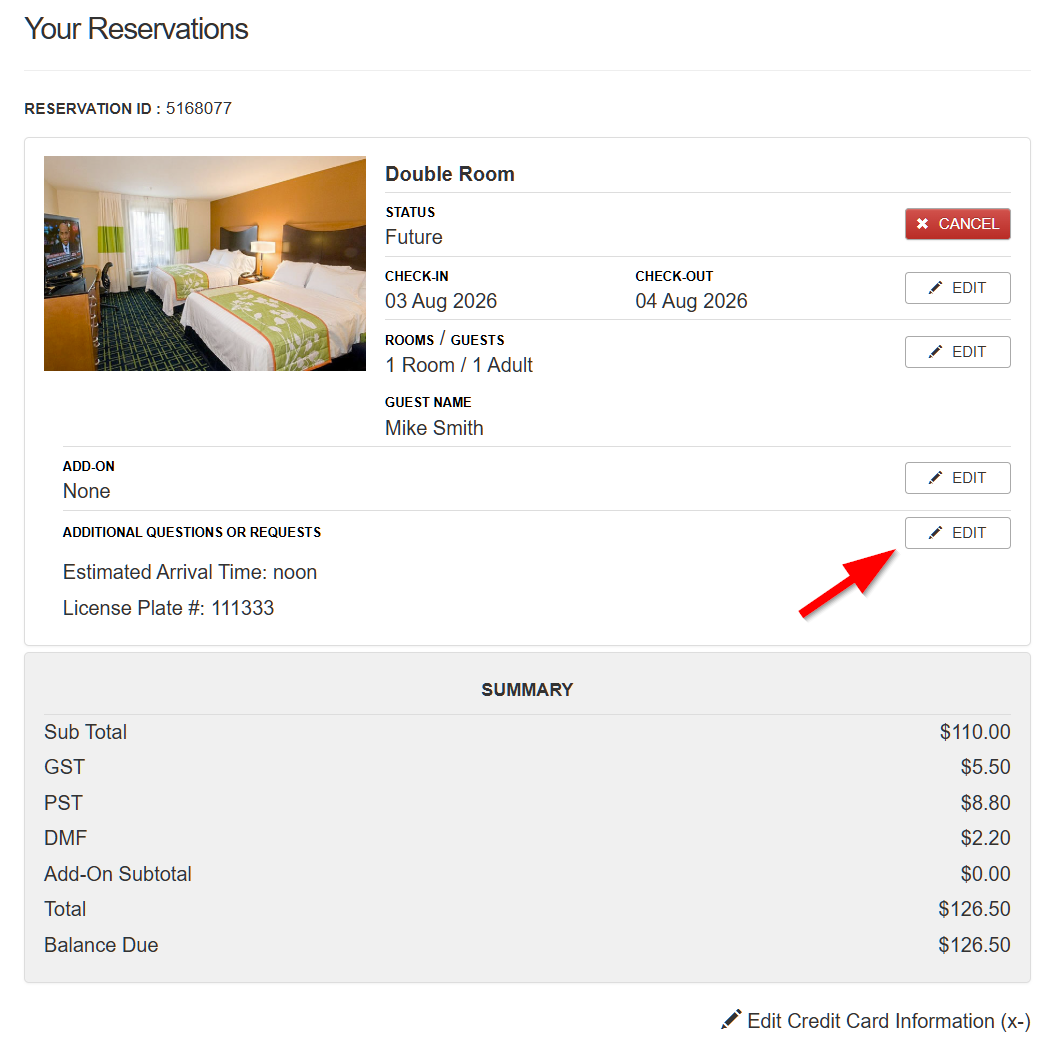
8.4 Guests can update their answers after booking
Guests can review and change their answers to the custom questions (Label Configuration 1, 2, and 3) from the
Guest Login/Manage reservation dashboard, under the Additional Questions or Requests section of
their reservation card. Clicking Edit opens a popup pre-filled with the
current answers.
As with other reservation changes made from the guest dashboard, the updated answers are applied when the
guest clicks Confirm and Save. Saving triggers a modification confirmation
email to both the guest and the vendor. If your confirmation email template is configured to include the
<#ConfigText1#>, <#ConfigText2#>, and/or <#ConfigRadio#>
merge tags (see 8.3 above), that email will show the newly updated answers.
Multiple Room Type Booking: if Collect Configuration Text 1/2/Radio per Room Type Booking is
enabled, each room in the reservation has its own answers and its own Edit button. If it is not enabled, all
rooms in the reservation share one set of answers — editing the answers from any one room's card updates them
for every room in the reservation.
A change to these answers is also recorded in the reservation's change log, showing the old and new values.
9. Flexible Stay
Flexible Stay lets guests book one stay that is fulfilled across multiple room segments when no single room type
is available for the entire date range. The guest sees up to five suggested itineraries on the search results page,
selects one option, and completes the normal booking process (guest info, payment if required, confirmation).
Flexible Stay requires Multiple Room Type Booking for guests to be enabled.
After booking, the reservation behaves like a standard master reservation with child segments — there is no special
post-booking guest workflow.
9.1 What is Flexible Stay and when does it appear?
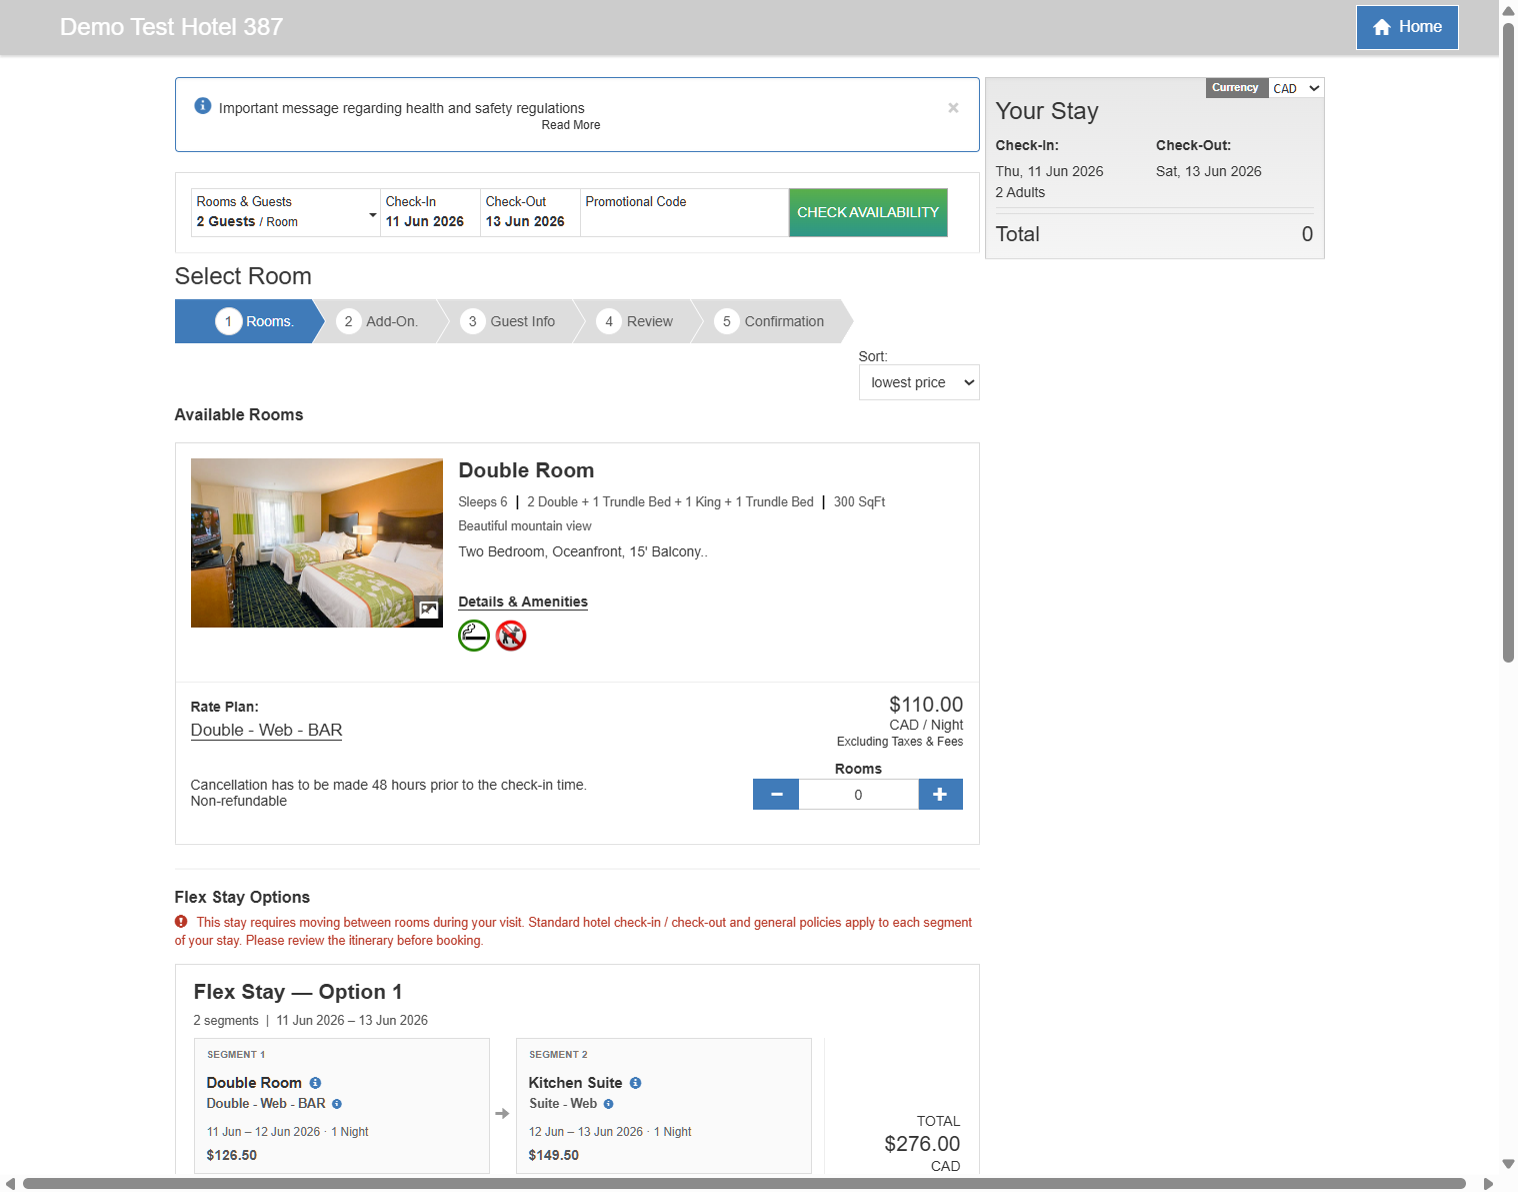
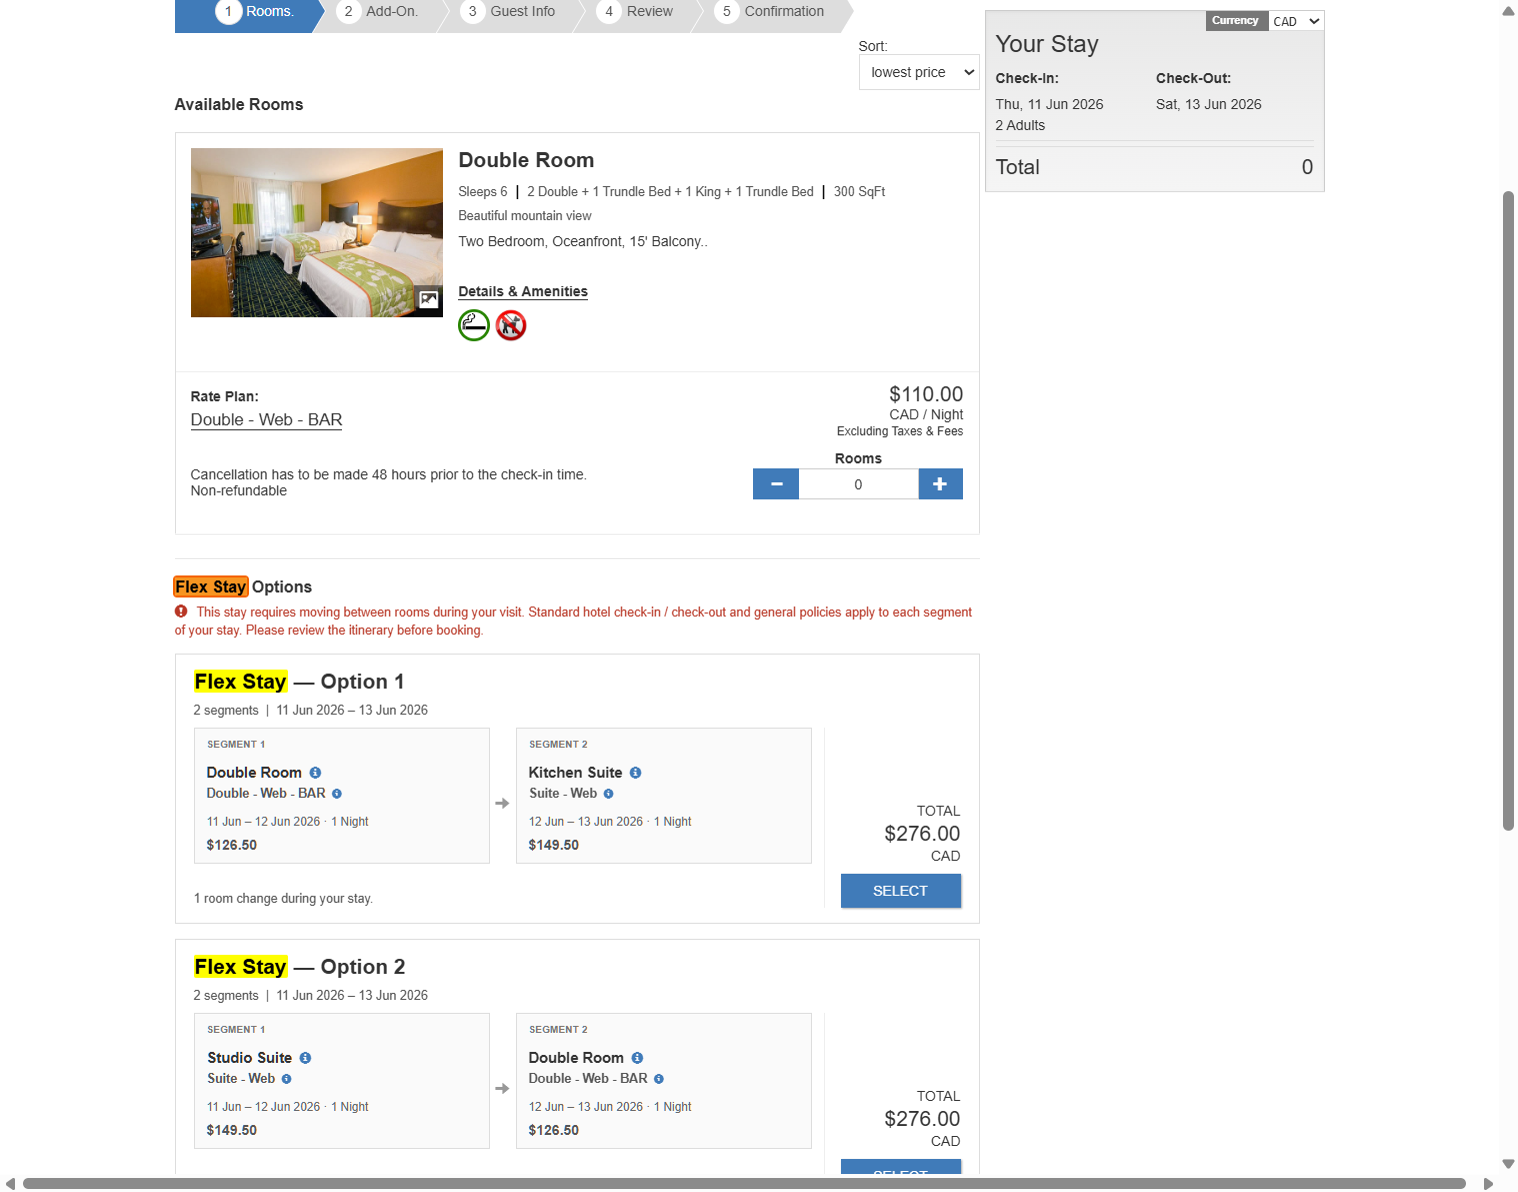
When Flexible Stay is enabled, the search results page can show two separate sections:
- Available Rooms — standard full-stay room and rate options (unchanged)
- Flexible Stay Options — up to five multi-segment itineraries, each showing the room types, dates,
and total price for the full stay
Both sections may appear on the same search. Flexible Stay options are never mixed into the standard
Available Rooms list.
Each Flexible Stay itinerary contains at least two segments (room moves). A disclosure message explains that
the guest will change rooms during the stay. Guests review the full itinerary before continuing to add-ons,
guest information, and payment.
9.2 How to enable Flexible Stay
Prerequisites:
- Your account must support Multiple Room Type Booking (MRB).
- Enable Multi Room Type Booking for Guests must be checked on the Web Booking Setup page.
Then enable Flexible Stay on the same page (Settings >> Web Booking Setup). The Flexible Stay
checkbox appears indented below the MRB option and is disabled automatically if guest MRB is turned off.
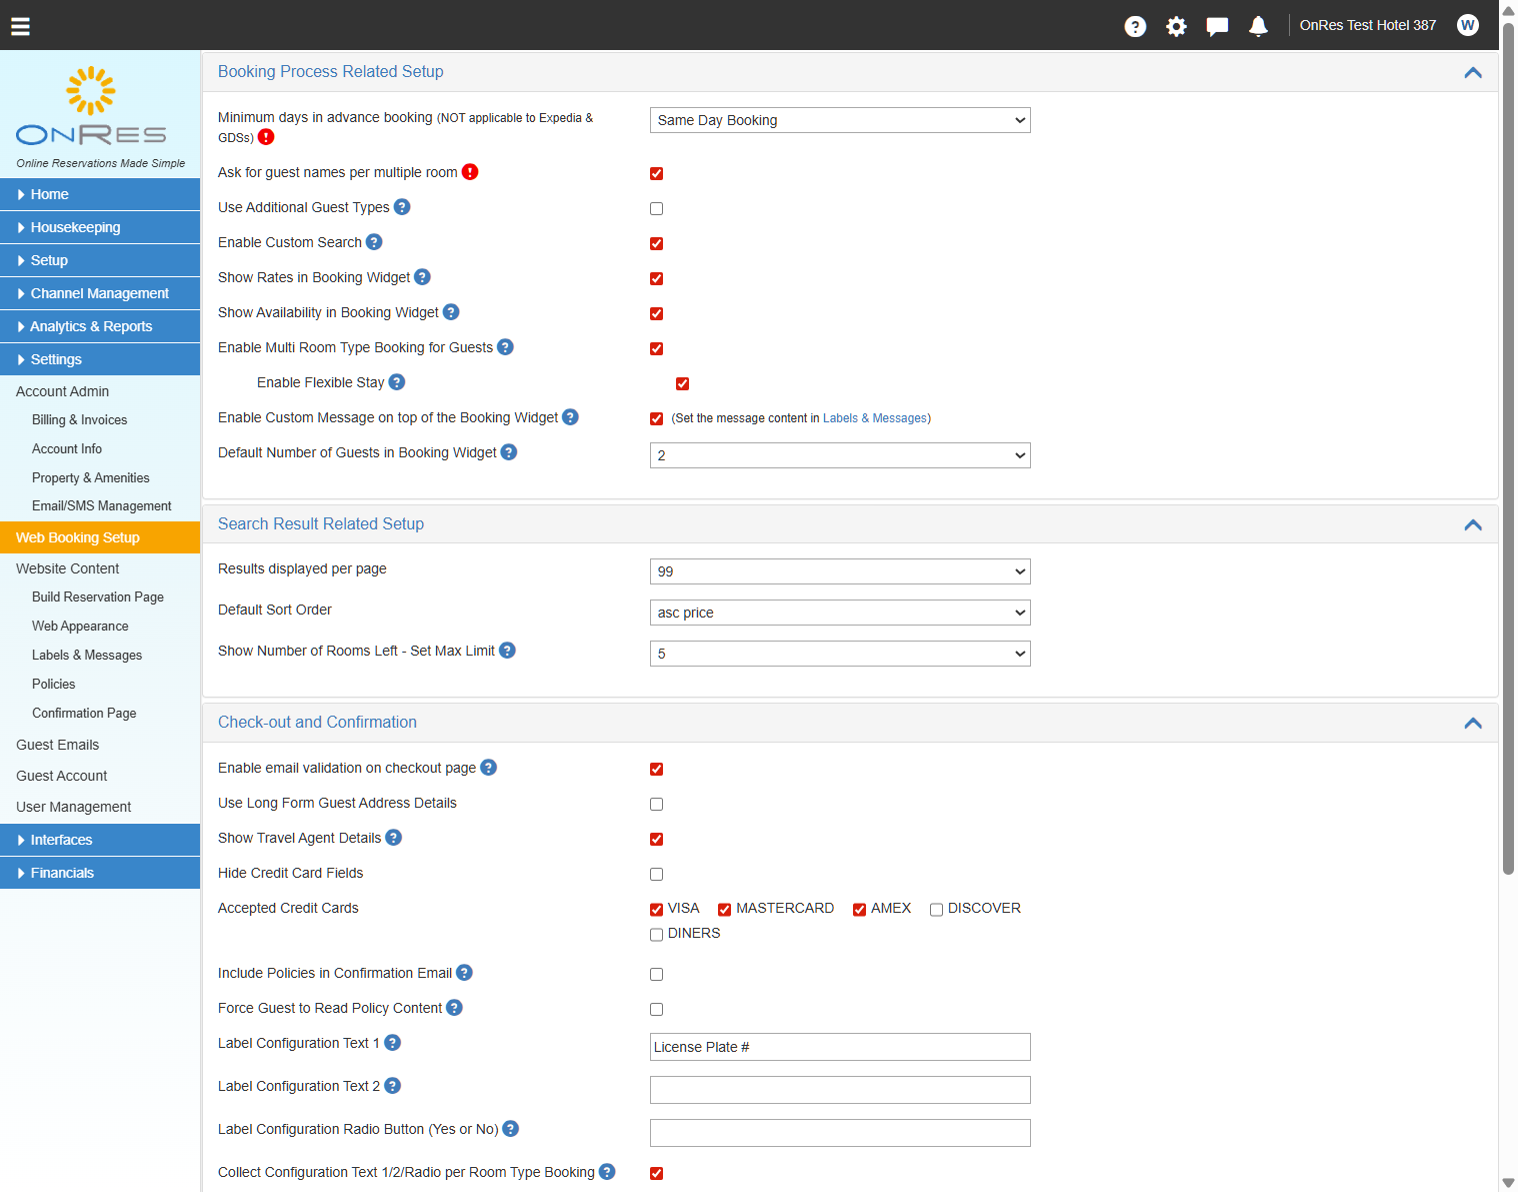
Note: Flexible Stay is off for all properties by default. Enabling the checkbox alone does not change
behavior until you save the Web Booking Setup page.
9.3 Configure display name and disclosure text
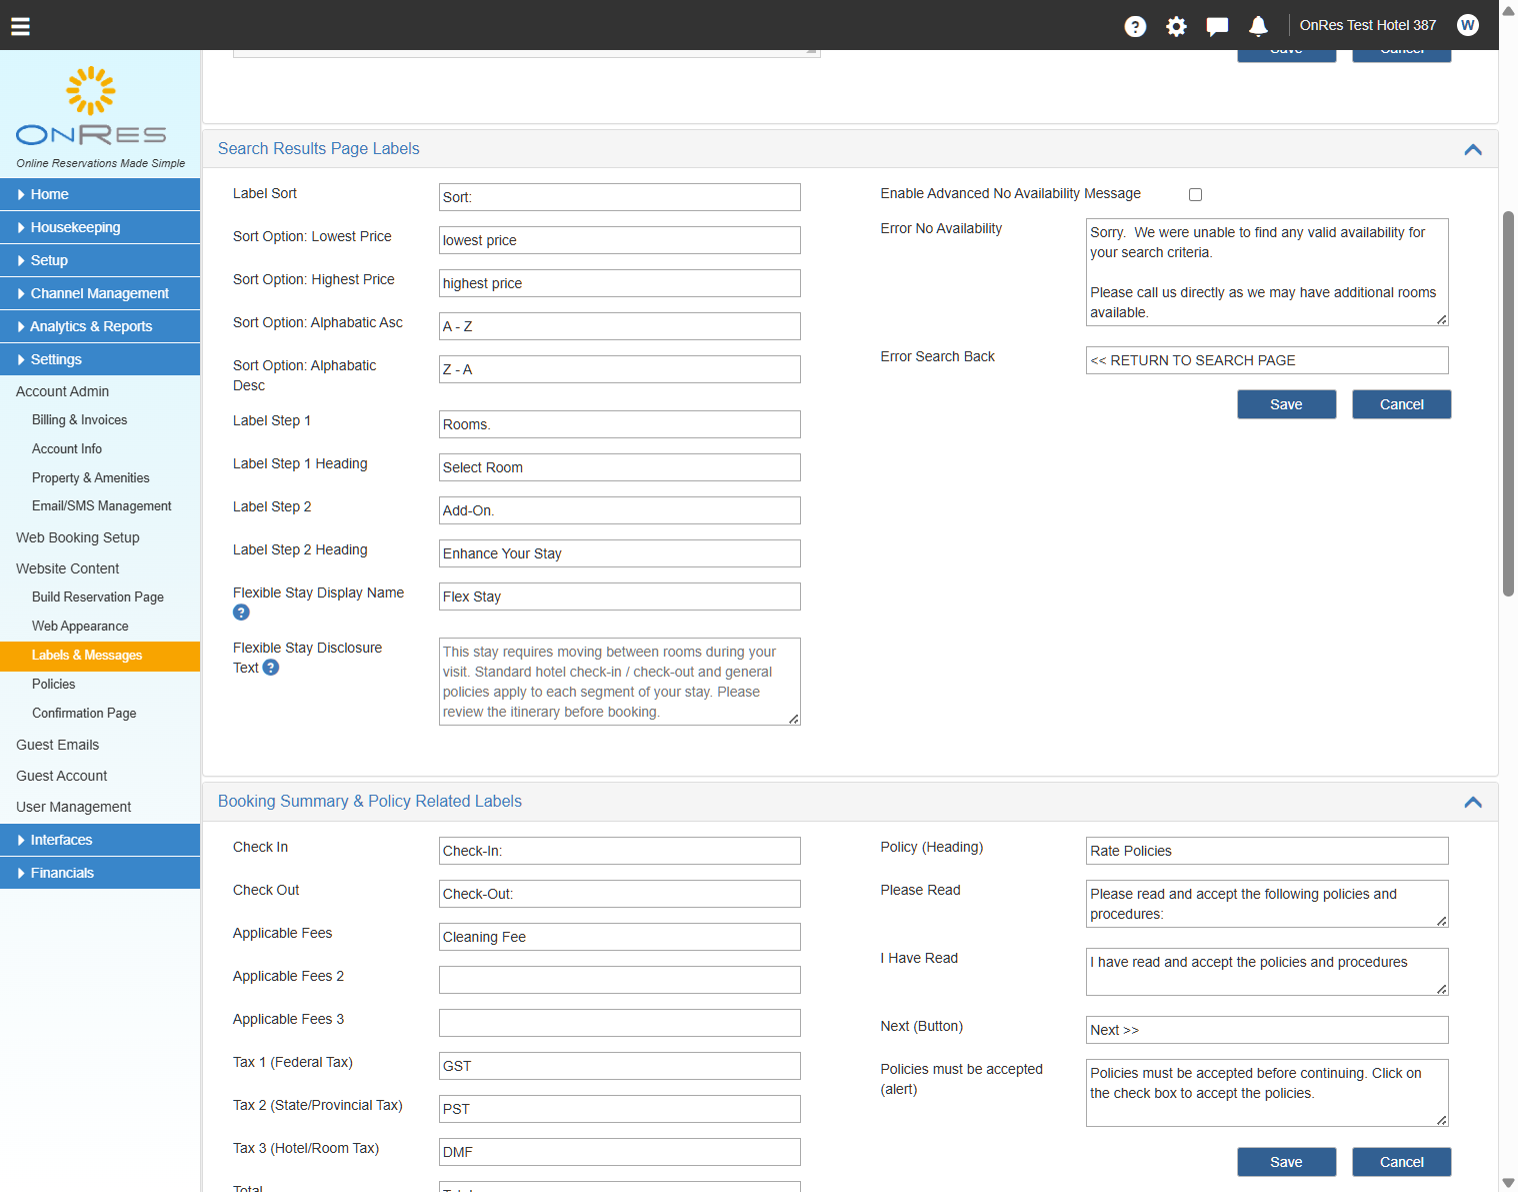
Guest-facing Flexible Stay labels are configured per language at Settings >> Labels & Messages,
in the Search Results Page Labels section:
- Flexible Stay Display Name — heading shown on Flexible Stay option cards (system default:
“Flexible Stay” if left blank)
- Flexible Stay Disclosure Text — notice shown with Flexible Stay options explaining that the guest
will move between rooms during the stay. If left blank, a system default disclosure is used.
Multiple Languages: use the Language dropdown on Labels & Messages to set the display name and
disclosure for each enabled language. New languages copy the English Flexible Stay labels when added.
The disclosure text can also be merged into confirmation emails using the
<#FlexibleStayDisclosure#>, <#FlexibleStayItinerary#>, and related
template tags when the booking is a Flexible Stay reservation.
9.4 How a Flexible Stay option is displayed
Each Flexible Stay option card shows:
- Display name and option number (e.g. Flexible Stay — Option 1)
- Segment count and overall check-in / check-out dates for the master stay
- A row of segments with product name, rate, dates, nights, and segment amount
- Product and rate detail links (info icon) for each segment
- Number of room changes during the stay and the disclosure text
- Total price and a Select button
When only Flexible Stay options are available (no standard full-stay rooms), a short message explains that
standard availability was not found and Flexible Stay options are shown below.
9.5 Guest booking flow after selecting an itinerary
When the guest clicks Select on a Flexible Stay option:
- The booking summary is populated with all segments for that itinerary.
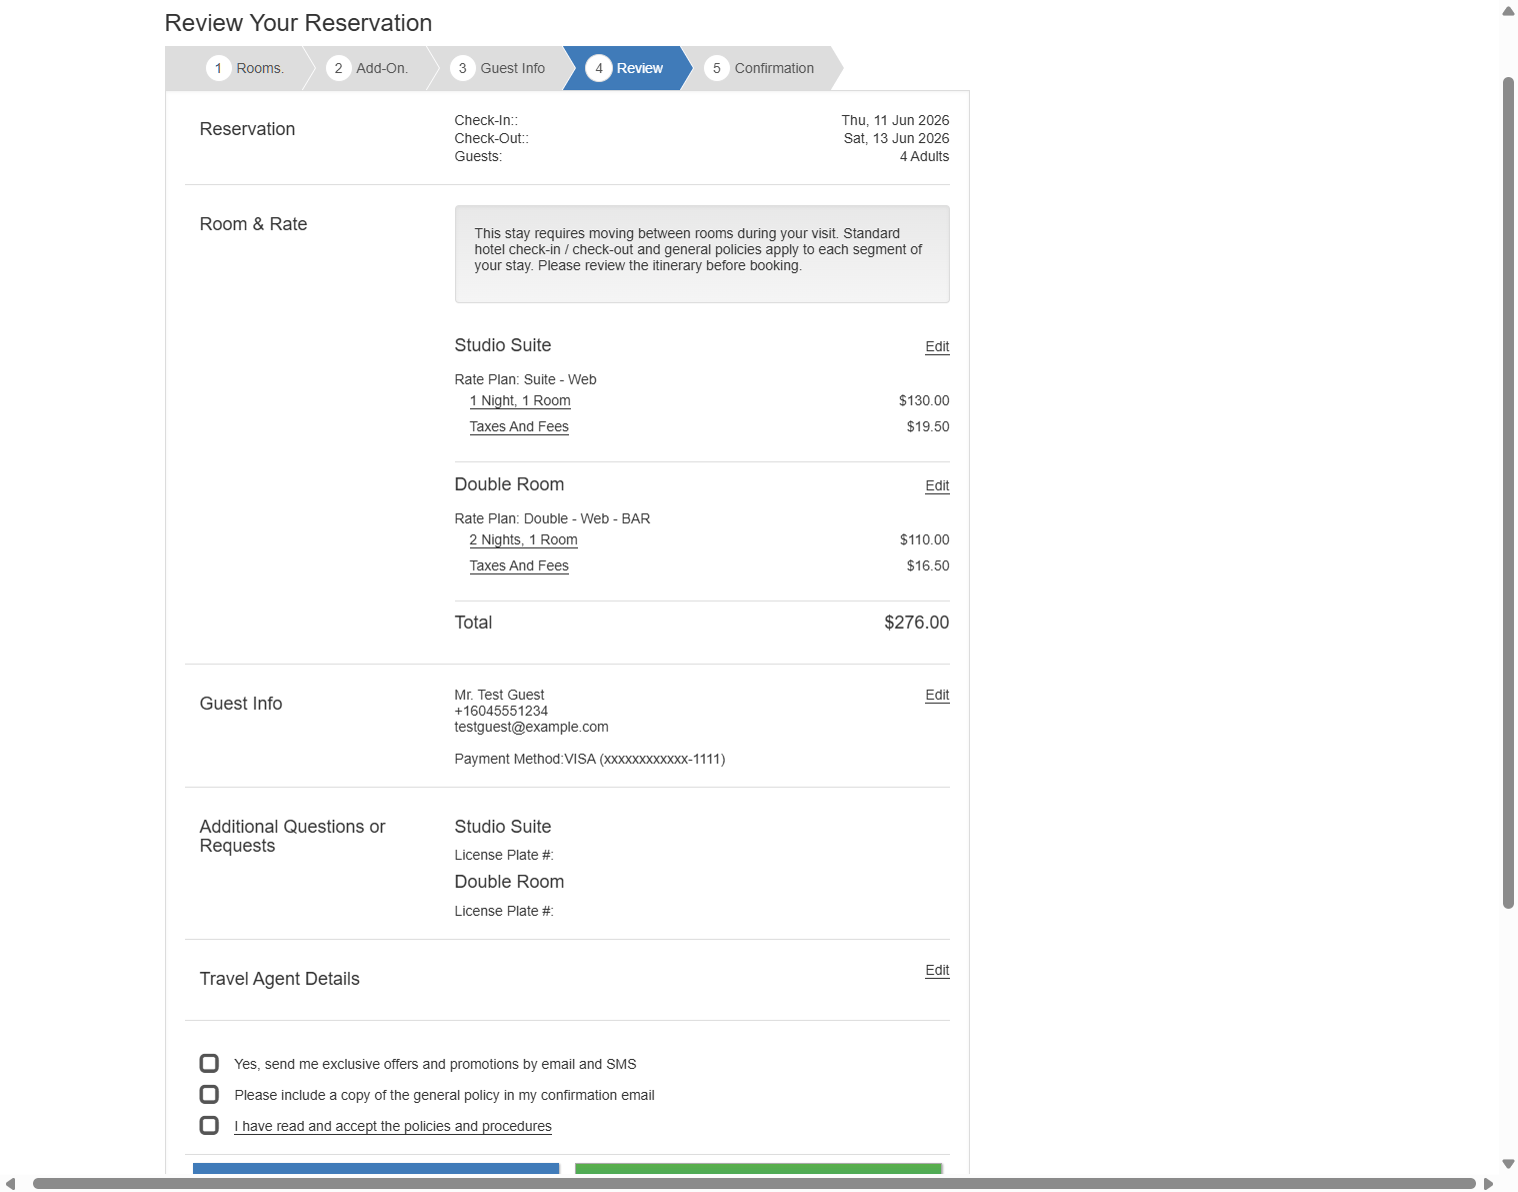
- The guest continues through the normal steps — Add-Ons (if enabled), Guest Info, Review, and Confirmation.
- On the Review step, the Flexible Stay itinerary and disclosure are shown in the reservation summary.
- Payment (if your property uses a payment gateway) is processed before the reservation is saved, consistent
with standard guest bookings.
- Confirmation email and SMS (if enabled) include Flexible Stay itinerary details when applicable.
9.6 Staff bookings from Reservation Details
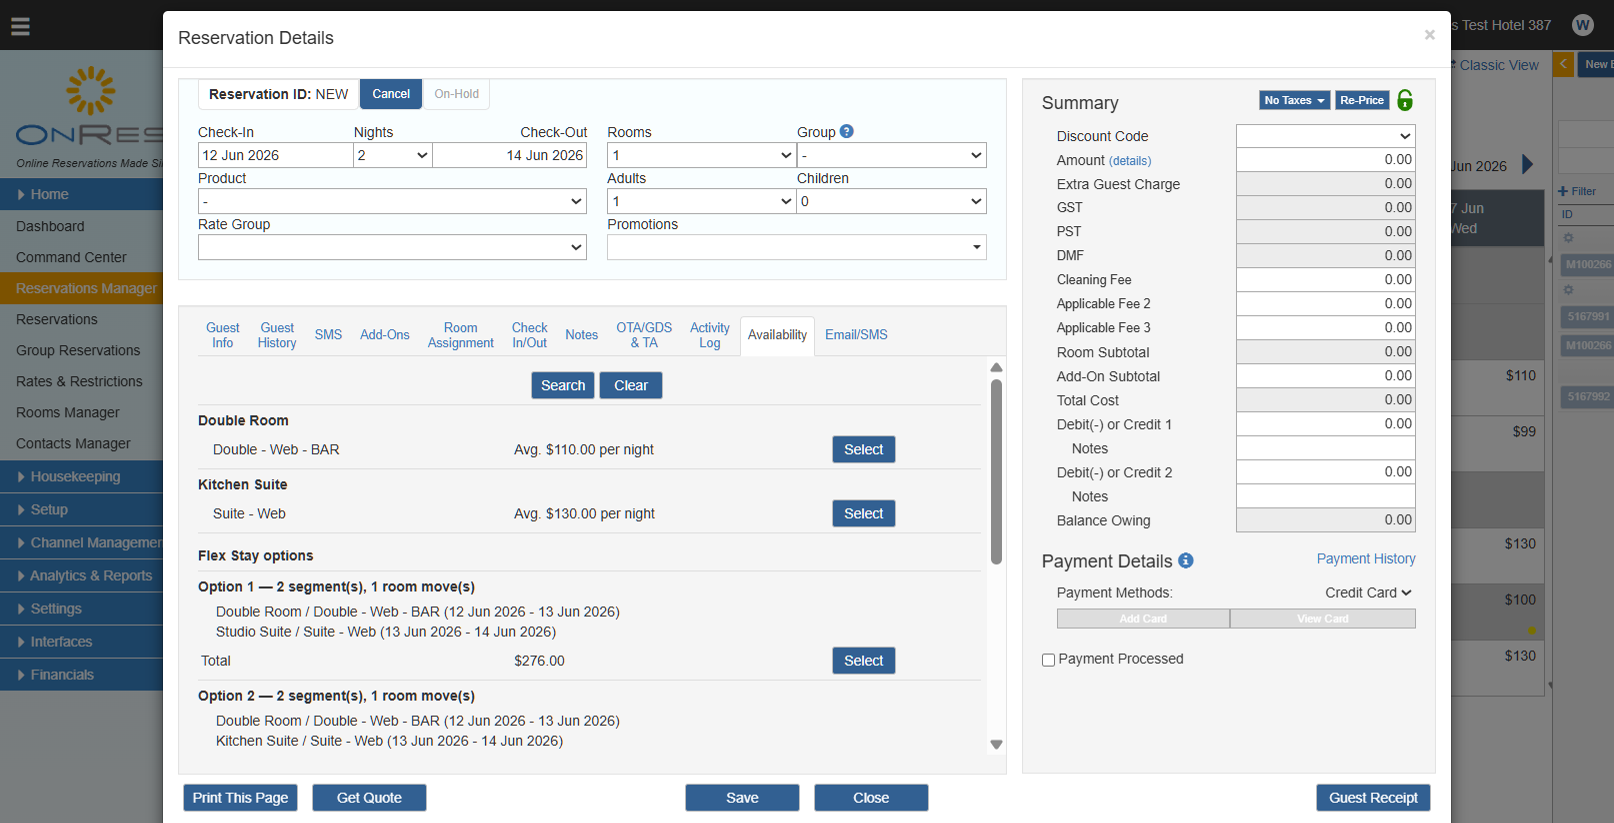
Hotel users can also create Flexible Stay reservations from the Availability tab on
Reservation Details when Flexible Stay is enabled for the property. Open Reservation Details from
the Reservation Manager (or create a new reservation), enter the stay dates and guest counts, then click
Search on the Availability tab.
Standard availability results and Flexible Stay options are shown in separate sections, similar to the
guest search page. Flexible Stay options are never mixed into the standard availability list.
Click Select on a Flexible Stay option to populate the reservation with
all segments for that itinerary, then complete and save the reservation as usual.