Analytics & Reports
The following reports are viewable in the Analytics & Reports section on the left side navigation menu.
- Sales Report
- Occupancy Report
- Custom Report
1. Sales Report
1.1 How to run a Sales report?
Click on the Sales Report tab under the Analytics & Reports section on the left side navigation menu
to open the Sales Report page.
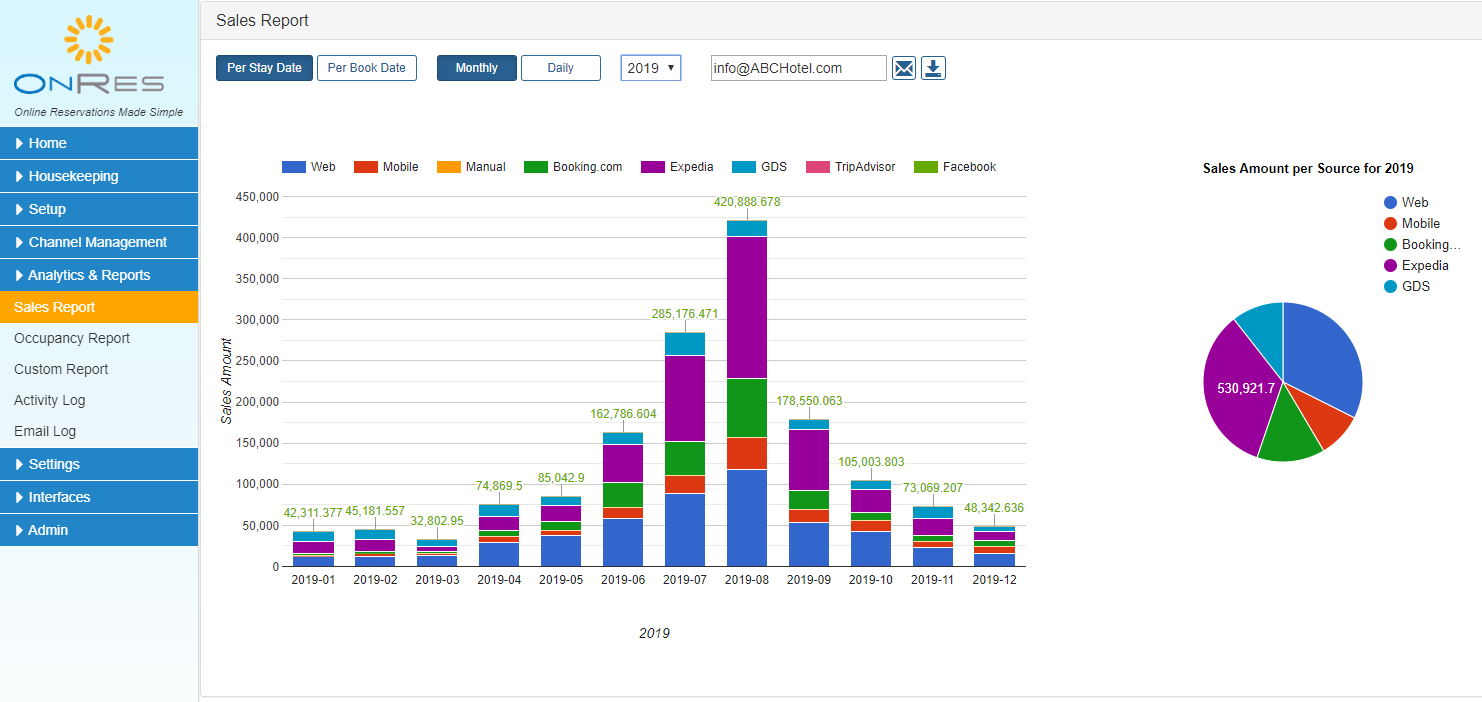
Sales report consists of a Stacked Column Chart and a Pie Chart. The charts can illustrate
the dollar value of the reservations made through different sources, e.g. Web, Mobile, Manual,
Booking.com, etc. Clicking on the chart will show the actual dollar value of each portion.
Choose the reporting period for either Monthly report (of the year chosen) or Daily report (of
the month chosen). The dates can be either the reservation's Stay Date or Book Date.
1.2 How to email or export the report?
When the report is generated, click on the icon
to email the report to the email address shown in the text box.
When the report is generated, click on the icon
to export/save the report in CSV format.
2. Occupancy Report
2.1 How to run an Occupancy report?
Click on the Occupancy Report tab under the Analytics & Reports section on the left side navigation menu
to open the Occupancy Report page.
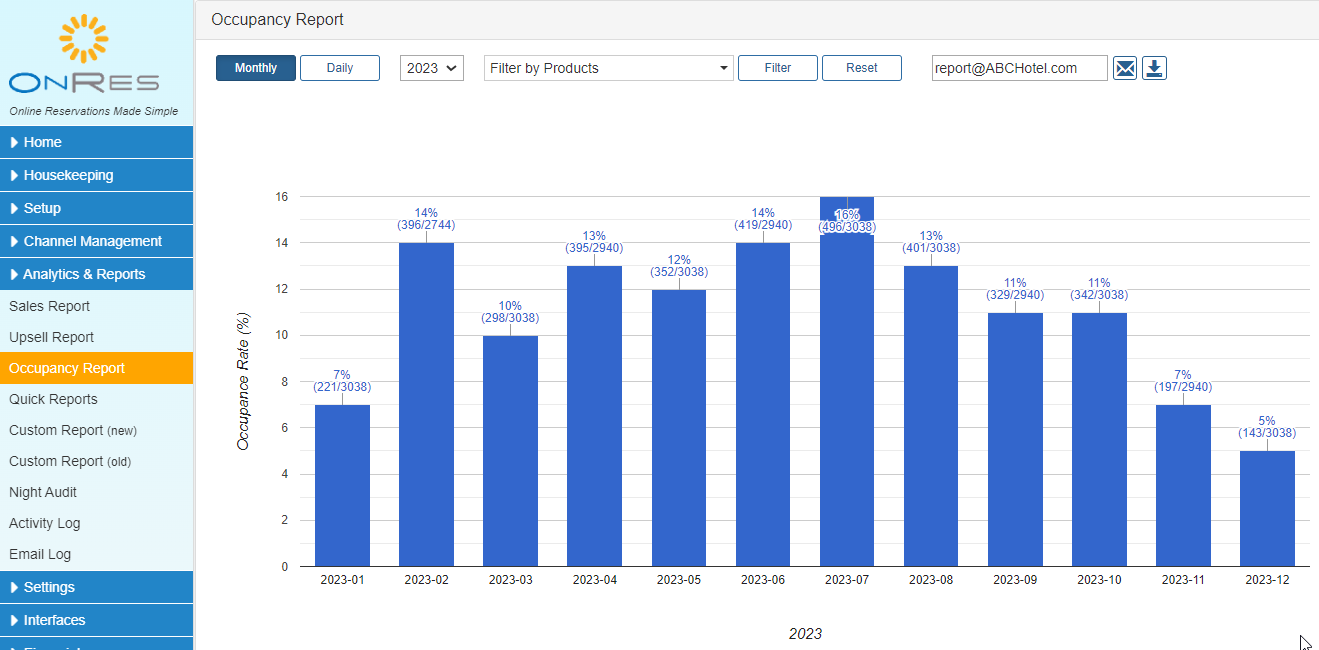
The column chart illustrate the occupancy percentage for the chosen reporting period, either Monthly
(of the year chosen) or Daily (of the month chosen).
You can filter the report results by products. Click on "Filter by Products" and select one or more products from
the dropdown menu, then click the Filter button to display the filtered the results.
You can also download/email the filtered results by click on the download/email button.
2.2 How to email or export the report?
When the report is generated, click on the icon
to email the report to the email address shown in the text box.
When the report is generated, click on the icon
to export/save the report in CSV format.
3. Custom Report (new)
You can create your own report with different fields, and have the report automatically repeated
on a set schedule.
3.1 How to create a Custom report?
Click on the Custom Report (new) tab under the Analytics & Reports section on the left side navigation menu
to open the Custom Report page.
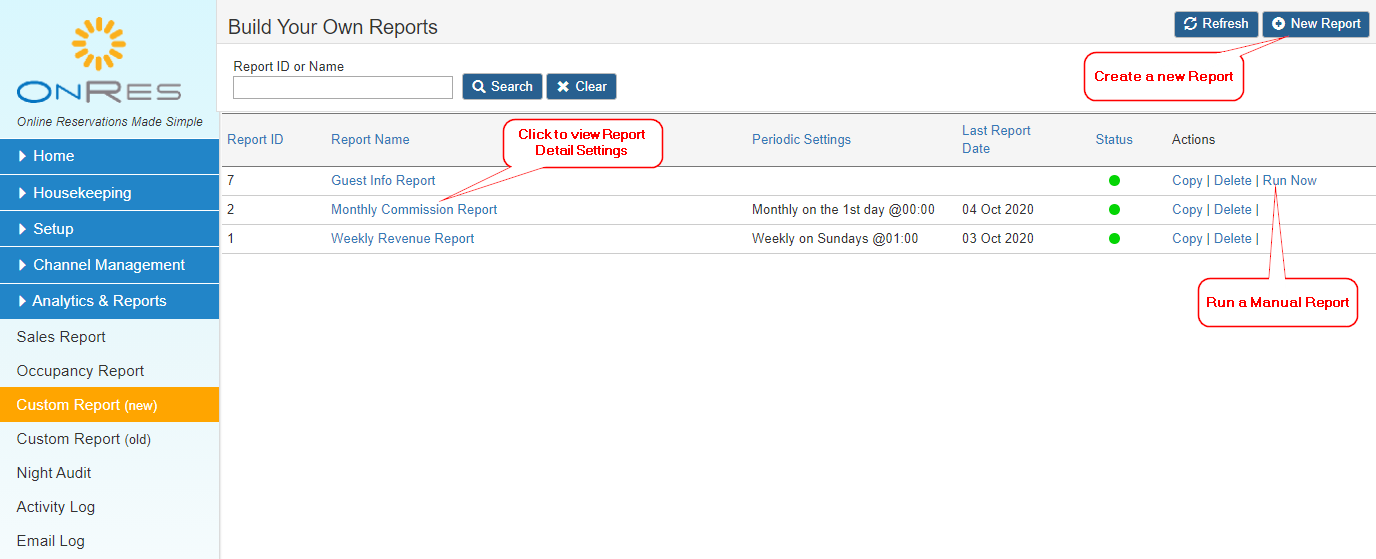
Click on the New Report button to open the Report Details pop-up.
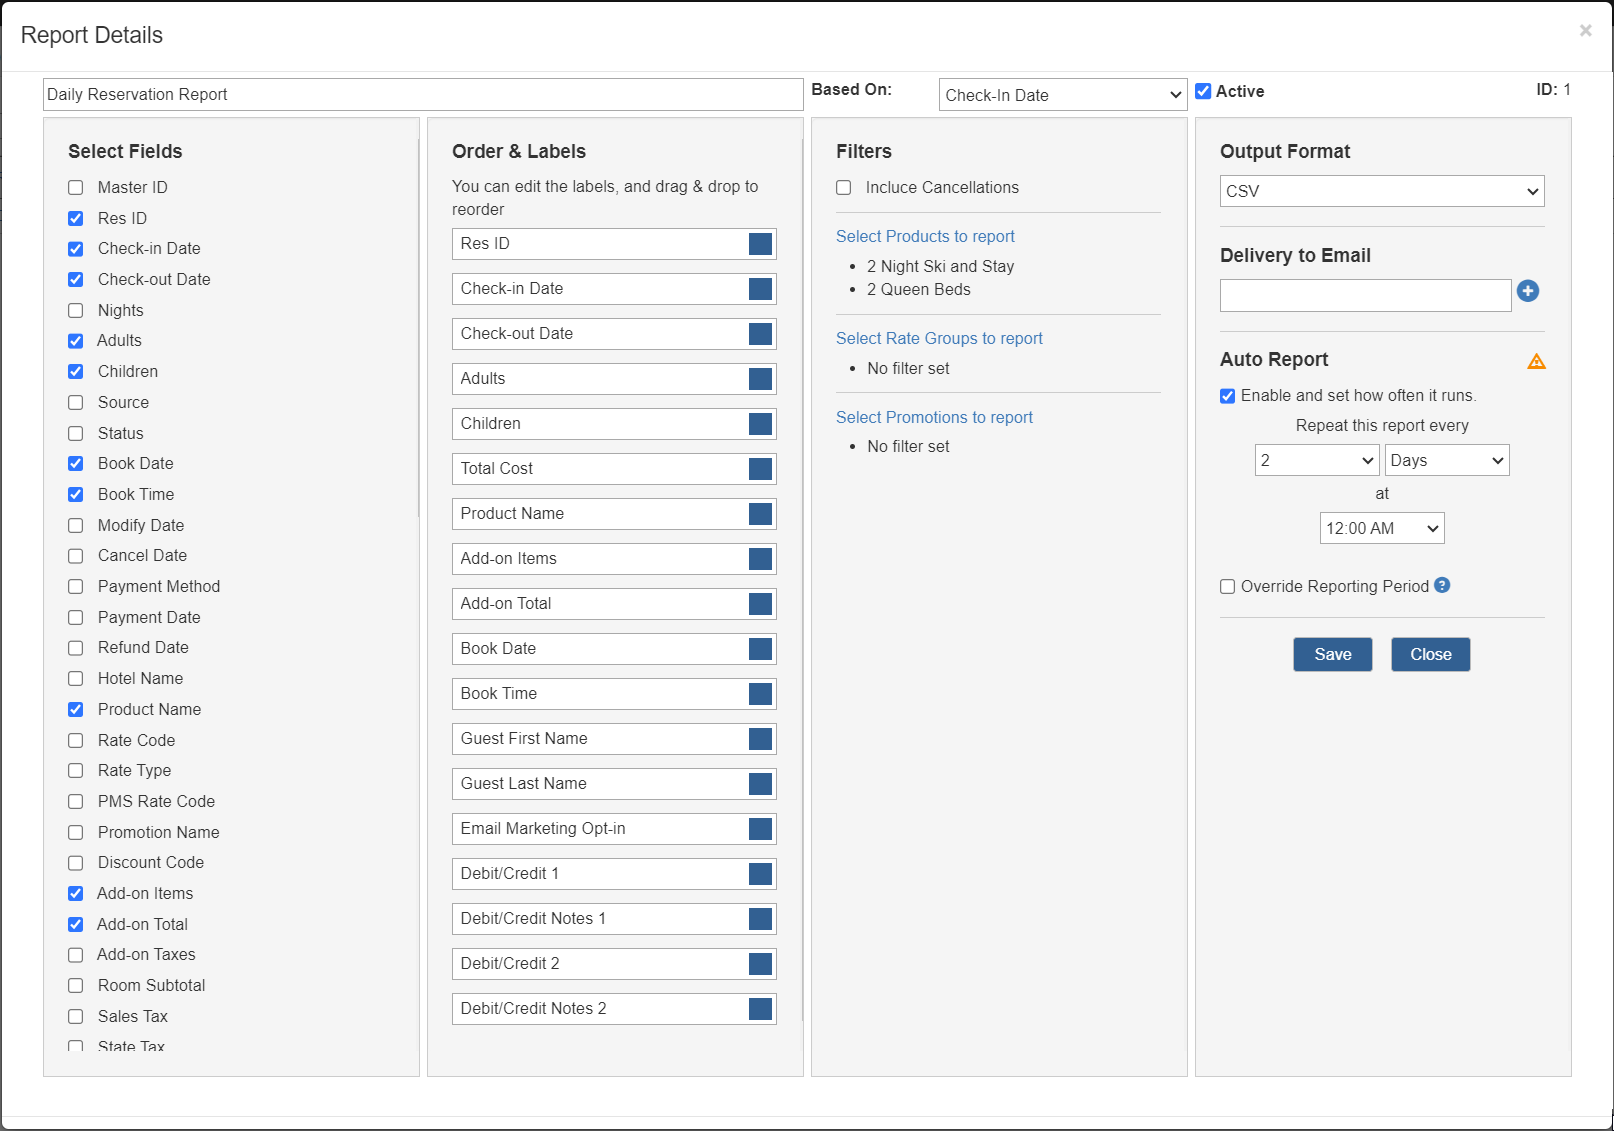
You can set the following items for your report
- Report Name - First, create a report name
- Based On - Select what kind of dates it's based on, e.g. Check-in, Check-out, or Book Date.
- Report Fields - Toggle on/off the check boxes to select/unselect the fields
- Order & Label - You can drag & drop to reorder the fields in the report. You can also edit their labels
- Filters - if you want the report data only for any specific products, rate groups or promotions, click on the
"Select Products to report", "Select Rate Groups to report", or "Select Promotions to report" link in the
Filters section, then select the desired Products, Rate Groups, or Promotions in the popup.
To remove the filters to report all data, uncheck all selected items to ensure "No filter set".
- Output - Choose either CSV or PDF as the output format
- Delivery - If an email address is present, the system can deliver the report to the email.
If email is not present, you can always download the report to your PC. Note, email is required
for Auto Reports
- Auto Reports - you can schedule the report to be repeated at a specific frequency, e.g.
Daily, Weekly, Monthly, or Anually. The default reporting period will be the past period depending
on the frequency, e.g. the past month for a monthly report. And you can override the default reporting
period by enabling the Override Reporting Period option and setting a fixed Start/End dates.
Note: In order to have the Auto Report run at the correct time, you need to set your Property's Time Zone
info correctly at the Settings >> Property & Amenity section

3.2 How to run a Custom Report?
Auto Reports will be run by the system at the scheduled time.
To run a Manual Report, click on the Run Now button on the Report list, to open the Run Report Now pop-up.
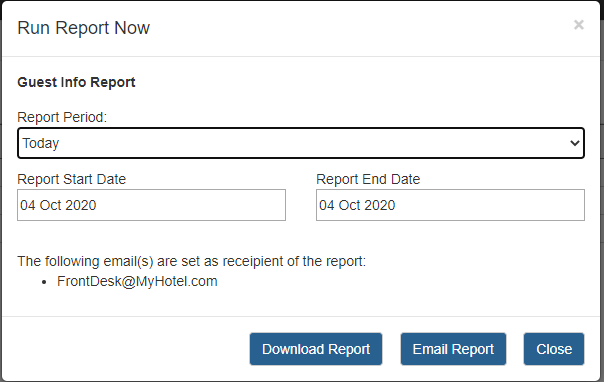
You can choose a pre-set report period, e.g. (Past 7-days, Month To Date, Year To Date, etc),
or choose a custom report date period. Then press Download Report
button to download the report to your PC.
If an email is set as the delivery method, you can also press the Email Report
button to have the report delivered to the email address.
3.3 How to create reports for Vacacation Rental accounts?
Accounts that are running in the Vacation Rental mode are often in the need of creating
reports for each individual rental property to track their revenues and commissions.
This section summarises the steps to create such reports.
Step 1 - Set up commission amount at the Rates Setup. Commissions are set on a per
Rate Group basis, therefore, individual rental properties that are booked on different
Rate Groups can have different commission rates.
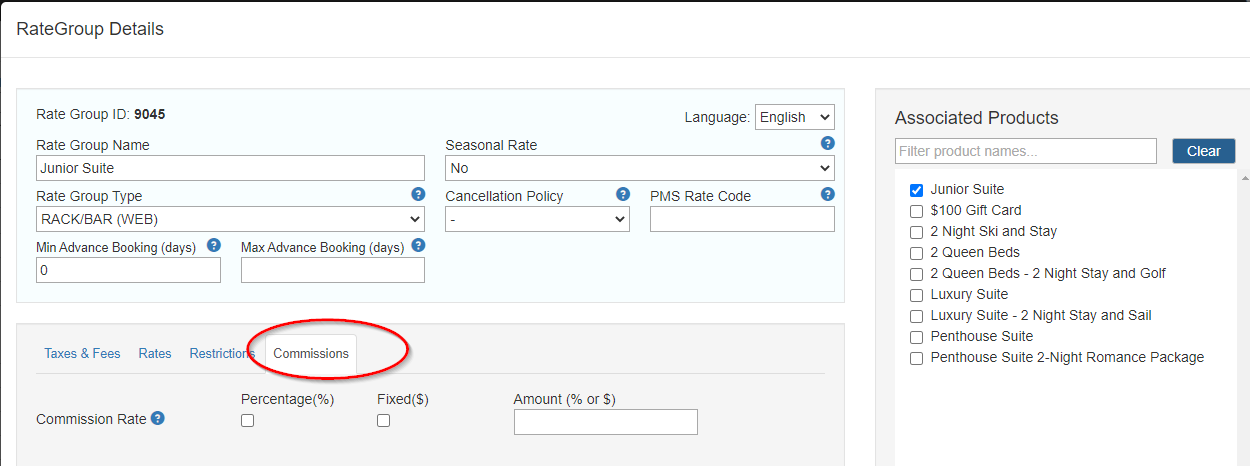
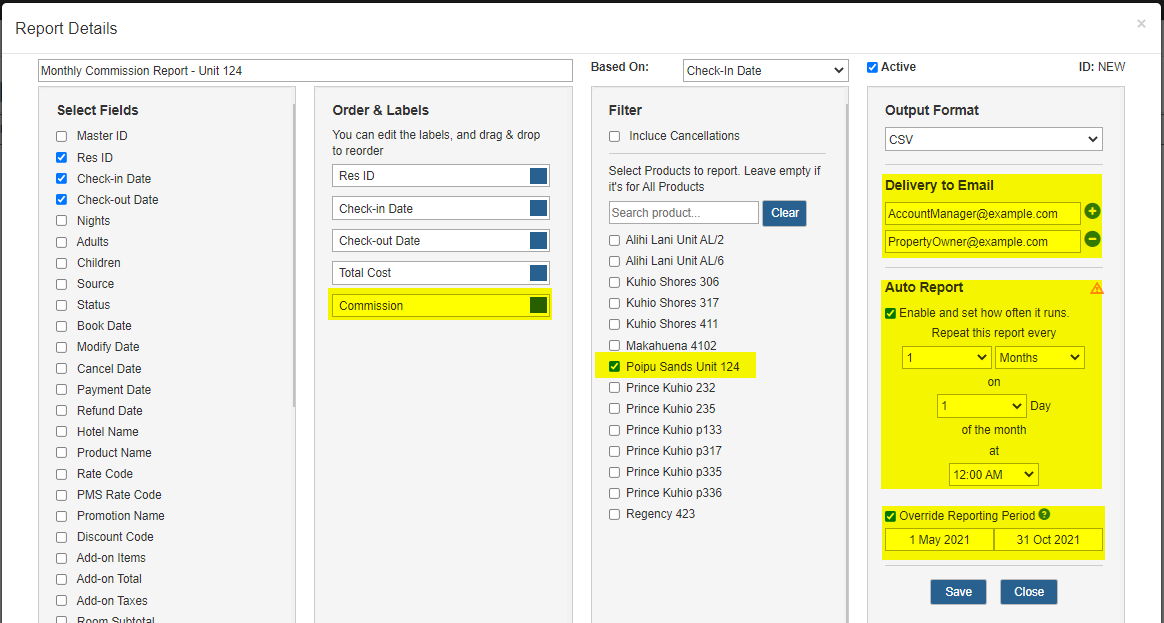
Step 2 - Create a Custom Report as described in the above section (Section 3.1).
- Include all the fields you like, e.g. Product Name, Check-in/out Dates, Total Cost, etc.
If this is a Commission report, make sure to include "Commission" in the Report Fields.
- If you would like to have a report for each property, create one report for each Property
by selecting the specific Product in the Filter section
- If you would like the system to deliver the report to each property owner, add the owner's
email address to the Delivery to Email section
- You can enable the Auto Report option to let the system deliver the report on the desired
dates at a desired frequency, e.g. Daily, Weekly, Monthly, or Anually.
The default reporting period will be the past period depending on the frequency,
e.g. the past month for a monthly report. And you can override the default reporting
period by enabling the Override Reporting Period option and setting a fixed Start/End dates.
3.4 How to report what reservations are booked by which staff ?
Just add "Source" in the Report Fields. Source indicates where the reservation was booked from, e.g.
Web, GDS, BDC, EXP, etc.
When it's a Manaual reservation, the Username of the staff who made this reservation will also be
included in this field.
4. Night Audit
4.1 What tasks are performed during Night Audit?
The following tasks are performed during a night audit process
Reservation Tasks
- Set NO-SHOW:
Set NO-SHOW status to reservations on the audit date that are not checked-in, any room
assignments for these reservations will be removed.
Housekeeping Tasks
- Set OD Status:
Update the Housekeeping status to Dirty for all Occupied rooms
- Set / Unset OOO:
If any rooms are scheduled to be Out of Order(OOO), the system will update the room status
to OOO upon entering the schedueld period; or back to Active upon exiting the period
Financial System Tasks
- Post room charges for the day
- Post add-on item charges for the day
- Process Ledger Verification and generate verification report
Also produce the following reports
- In House Guests
- Ledger Verification
- Room / Housekeeping Status
- Upcoming Arrivals
- Upcoming Departures
4.2 How to run a Night Audit?
You can manually run Night Audit every night, or set it up to let the system
run it at certain time each night automatically.
Note: in order to run the report at the correct time,
please make sure the Property's Time Zone information is correctly set at Settings >>
Property & Amenities

To run Night Audit manually:
Click on the RUN AUDIT button to start the night audit
process manually. Note: it's not recommended to run the audit multiple times for the same day.
If it has to be done, be aware that previous reports for the date will be overwritten during
the most recent audit.
To setup auto Night Audit:
Toggle on the checkbox for Enable auto daily audit, choose a time in your property's timezone,
then press Save Settings.
Once enabled, the system will run the audit automatically at the chosen time.
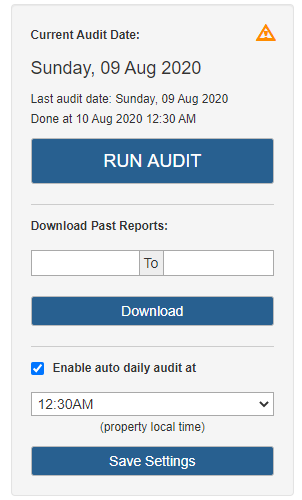
Current Audit Date
indicates the date that the audit will be performed based on the data on.
For example, if the current audit date is Aug 9, 2020, then the audit
will generate the reports for this date, e.g.
- In House Guests that staying for the night of Aug 9, 2020
- Arrival's list for Aug 10, 2020
- Departure's list for Aug 10, 2020
Depending on what time you open this Night Audit page, the Current Audit Date will be different.
If you open the page in the evening (between 8pm and 12am), the Current Audit Date will be
next day's date. If you open the page in the morning (12am - 8pm), the Current Audit Date will be
the same day's date.
4.3 How to view/download Night Audit reports?
The reports generated by the Night Audit process are in PDF format.
You can download individual reports for the current audit date by clicking on the
View and Download button

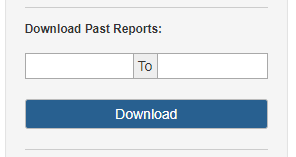
You can also download reports from certain date period in the past on the right side widget
5. Quick Reports
5.1 What are the Quick Reports and how to run them?
Quick Reports are pre-built reports that you can run any time. Current reports are:
- History & Forecast Report
Provides past, present and future objected information, such as occupancy, revenue,
room status and guest, and so on, for a period of time. E.g. if you run a report of
the current month on the 10th of the month, the report will show the past 9 days data
as History, and objected data for the rest of the month as Forecast.
- In-House Guests
Provides a brief summary of the current in-house guests, such as their names, room number,
special needs (if any). The guest names are recorded in the Room Assignment tab in
the Reservations Details window.
- Payment Transactions
For accounts connected to the Payment Gateway only. Given a date range, provides payment
transaction details, such as Transaction Date/Time, Amount, Reservation ID, TotalCost and
Balance Due.
- Blackout Dates
Report the blackout dates per room type within the given date range.
- Tokenizations
Report the number of credit card tokenizations occurred during the reservation process within the given date range.
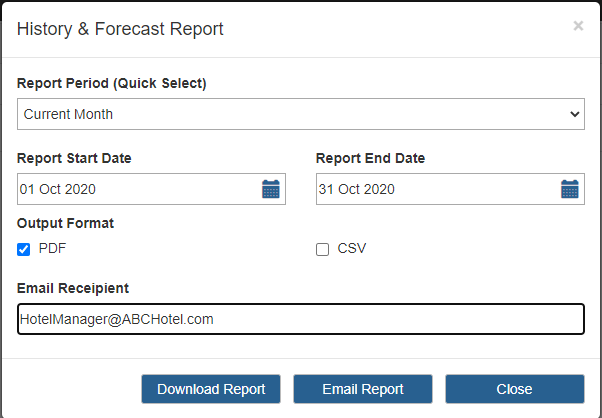
To run the report, click the Run Report button.
In the pop up window, select the date period, output format (PDF or CSV), and press
Download Report button to download the report, or optionally
press the Email Report button to have the report
sent to the email address showing in the Email Receipient box. The email address
is pre-populated and you can always change it.
